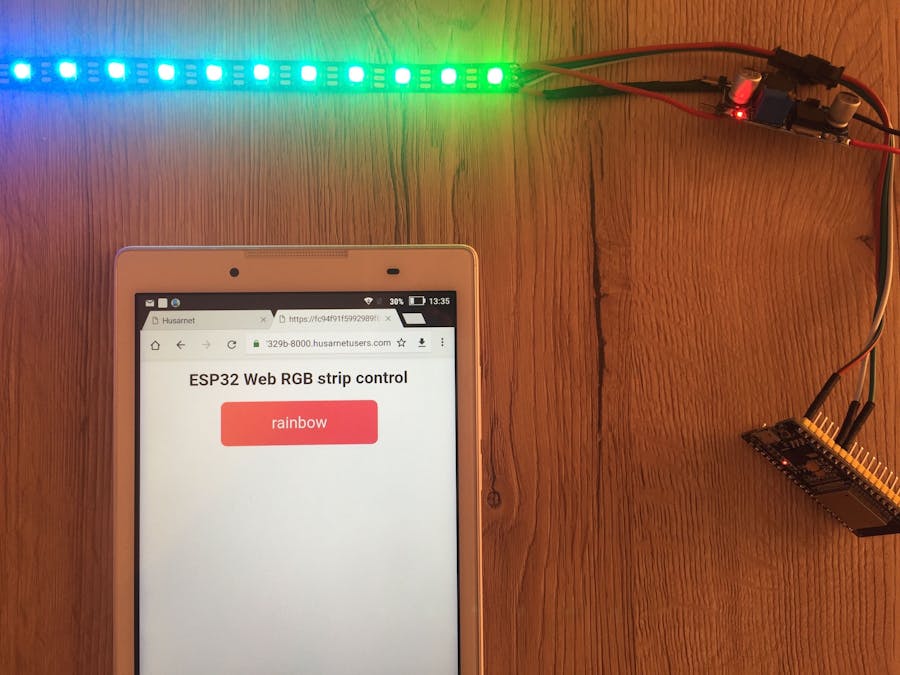
In this tutorial I will show you how to create web browser controlled WS2812 LED strip using ESP32 and Arduino IDE.
ESP32 is running an HTTP server and each time you click a button the theme is changed. That HTTP server is accessible both through a local network and the internet.
By default 5 LED themes are available:
- rainbow
- white shine
- red shine
- only white
- off
But you can easily add any theme you can imagine (and code :) ).
In the source code we use separate FreeRTOS tasks to handle HTTP server and LED strip theme - thanks to that code is clear, easy to understand and modify.
Preparing the hardwareWiring is very simple:
1. Connect 5V DC power supply to your LED strip. LED strip used in this tutorial contains 60 pixels and one meter, and needs even 3.5 A / m. Depending on how many pixels are you going to use buy an appropriate 5V DC power converted.
2. Connect ESP32 to your LED strip:
LED strip contains only 3 input pins: +5V, GND and Din. ESP32 is powered from 3.3V that is obtained thanks to onboard LDO linear regulator. Connect your power supply to the LDO input pin - in my dev board it's called V5, but in your board it can be named differently. Connect LED strip data input pin Din to G12 pin on your board.
LED strip will be controlled not only from a LAN, but also through the internet thanks to Husarnet. Husarnet provides modified ESP32-IDF - thanks to that you can use almost the same API as in standard Arduino package for ESP32. Husarnet also provides easy integration with Arduino IDE.
Now open Arduino IDE, and follow these instruction steps:
1. Install NeoPixelBus library in Arduino IDE:
- Open
Tools -> Manage Libraries - Search for
NeoPixelBus by Makuna - Click
Installbutton
2. Install Husarnet IDF for ESP32:
- Open
File -> Preferences - In a field Additional Board Manager URLs add this link:
https://github.com/husarnet/arduino-esp32/releases/download/1.0.4-1/package_esp32_index.json3. Install ESP32 dev boards
- Open
Tools -> Board: "..." -> Boards Manager ... - Search for
esp32-husarnet - Click
Installbutton
We include here a modified fork (mainly IPv6 support related changes) of official Arduino core for ESP32 - https://github.com/husarnet/arduino-esp32 . If you had installed the original version before, it is recommended to remove all others Arduino cores for ESP32 that you had in your system.
4. Select ESP32 dev board:
- Open
Tools -> Board "..." - Select
ESP32 Dev ModuleunderESP32 Arduinosection
4. Run demo:
- Clone the project code:
git clone https://github.com/DominikN/ESP32_ledstrip_webserver.git- Modify line 9 to setup number of pixels in your LED strip. The code is written to auto-scale LED theme deppending on number of pixels defined here.
// How many NeoPixels are attached to the Arduino?
#define NUMPIXELS 60- Modify lines 22 - 33 to add your Wi-Fi network credentials. That's comfortable to add more than one network credentials here - in case of moving your project to different physical destinations you will not need to reprogram your ESP32 each time.
// Add your networks credentials here
const char* ssidTab[NUM_NETWORKS] = {
 "wifi-network-1",
 "wifi-network-2",
 "wifi-network-3",
 "wifi-network-4"
};
const char* passwordTab[NUM_NETWORKS] = {
 "wifi-pass-1",
 "wifi-pass-2",
 "wifi-pass-3",
 "wifi-pass-4"
};- Connect input data pin of your LED strip to
G12pin of your ESP32 dev board - Upload project to your ESP32 board (deppending on your dev board you will need to press "BOOT" button, or short Pin0 or IO0 to GND while flashing)
- In Arduino IDE open
Tools -> Serial Monitorand wait until your ESP32 is connected to Wi-Fi network. After a few seconds you should see a similar link to this (default baudrate for Serial port in code is 115200):
[10009675] Visit
https://app.husarnet.com/husarnet/fc94f91f5992989f83474cc8abf7329bf8ae7f3ee4a9xxxxyyyyzzzz
to configure the device .- Copy that link and open it in your web browser
- Name your device (eg. ledstrip), click
Add to networkand selectCreate new network- and also name it (eg. ledstripnet)
- Open
ledstripnetand left clickledstripelement - Select
Make the Web UI publicand clickupdatebutton
- In the
Infocolumn withinledstripnetnetwork you should seeWeb UIbutton with a public available link to a control panel. Each time you will power your ESP32 board under that link you will have an access to a web UI to control your LED strip
5. (optional) Improvements - if you don't want to have any public available link to your ESP32 you will need to add your laptop to the "ledstripnet" network:
- install Husarnet on your Linux device (https://docs.husarnet.com/getting-started/ ) and add that to your network
- on your Linux device open a web browser and write an address to your ESP32 with 8000 port, eg.
http://ledstrip:8000
Creating an internet accessible web user interface for your ESP32 is straightforward. That Wi-Fi module integrates a lot of RAM and Flash memory that together with FreeRTOS allows you to easily host an HTTP server controlling anything you want. LED strip is only a nice example :).
I hope you will enjoy this project! :)


Comments