


Hardware components | ||||||
_ztBMuBhMHo.jpg?auto=compress%2Cformat&w=48&h=48&fit=fill&bg=ffffff) |
| × | 1 | |||
| × | 10 | ||||
| × | 10 | ||||
| × | 10 | ||||
| × | 10 | ||||
| × | 10 | ||||
 |
| × | 10 | |||
 |
| × | 10 | |||
| × | 1 | ||||
Software apps and online services | ||||||
 |
| |||||
Hand tools and fabrication machines | ||||||
 |
| |||||
 |
| |||||
Once in awhile, I like creating something fun and artistic. This project seemed straight forward enough. Use a solenoid to hit a ping pong ball upward into a clear plastic tube. Use a bunch of them with a microcontroller to produce cleaver patterns and hopefully a new art form!
On the electronics and programming side, this project turned out to be straight forward with no big problems or surprises. However, on the mechanical side, it turned out to be much, much more complicated and difficult than I expected.
So here is a full demo of the finished project:
The MechanicsI started out with a simple premise. A standard ping pong ball is 40mm in diameter, and should move smoothly through a clear plastic tube with an inside diameter of 42mm and an outside diameter of 45mm. This is true, but with a little experimentation I quickly realized there were some issues.
For the ball to move freely, the tube needs to be completely open at both ends - otherwise, the ball is slowed by the need for air to flow around it. I was planning on leaving the top open anyway, but it doesn't work without extensive venting at the bottom where the solenoid is.
Even with a lot of venting. I was surprised and disappointed by how little the solenoid was able to move the ball. I expected even a very small solenoid to be able to easily knock the ball out of the tube, and expected my task to be controlling how hard the solenoid hit the ball. Instead, I had to switch to a heavier solenoid, with a longer throw. It was much more expensive and drew much more current. Even then, I had to raise the voltage above the rated voltage, and add capacitors right at the solenoid. With all that, I still could only get the ball about half way up the 1 foot plastic tube!
A solution to both the venting problem and the power problem came from using a smaller ping pong ball - the 30 mm "beer pong" variety instead of a regulation ping pong ball. Only with all of the above changes was I finally able to project the ball to the top of the tube!
The mechanical issues didn't stop there, however. We need the solenoid securely fastened in the center at the base of the tube. I started experimenting with various 3D printed hardware to accomplish this. Once I had a mounting for the solenoid and tube, I saw a new issue!
With the 30mm ping pong ball in the 42mm diameter tube, it doesn't necessarily come down centered over the solenoid. I had to design a centering ring that sits a the bottom of the tube and centers the ball. Otherwise, it can bounce around at the bottom for a significant amount of time before being ready to fire again.
I also found that the ball's height in the tube was much more consistent if the solenoid had a fairly flat head hitting the ball. I added a small ram that attached to the solenoid arm, again created with a 3D printer.
I still had one annoying problem. The solenoid's action tries to move it up in its mounting. My first several attempts to secure it failed. I finally had to resort to 2-part epoxy to hold it in place.
I decided on 10 tubes and 10 ping pong balls. My solenoid holder / tube base is a single piece for two solenoid / tubes, so I need 5 of them in total. I also need 10 centering rings and 10 rams. Finally, I need a place to mount the Arduino that will control the whole thing, so I added a 3D printed a base plate.
All together, this represented a lot of mechanical design and a lot of 3D printing - a lot more than I originally expected! Files for all the 3D printed pieces are attached.
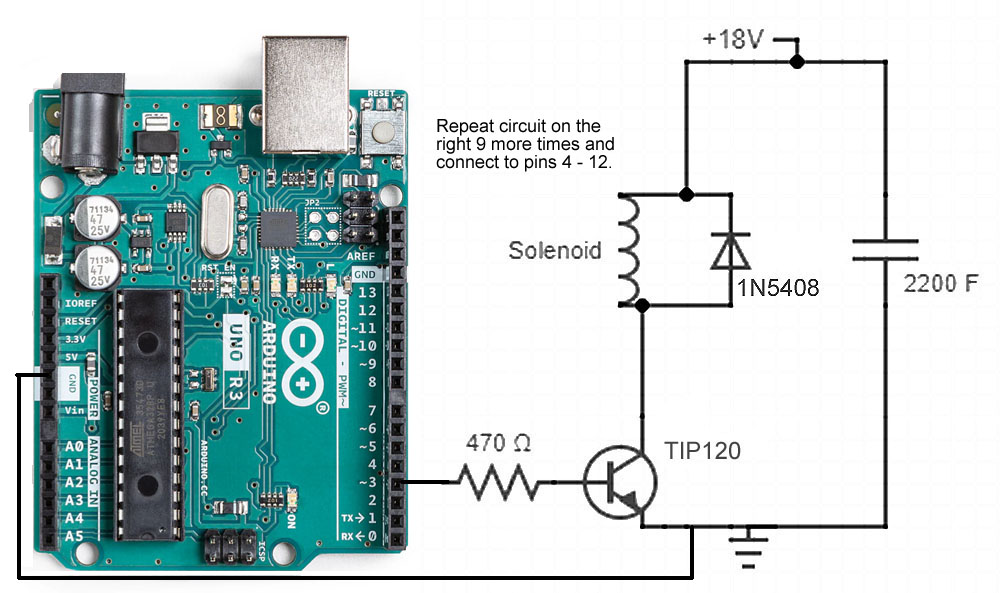
The ElectronicsThe circuit that fires the solenoid is fairly straight-forward.
We use a power Darlington NPN transistor to fire the solenoid. The transistor is turned on by our Arduino UNO through a 470 ohm resistor. Our solenoid is rated at 12 volts, but since we are turning it on for only 15 msec., we are powering it at 18 volts. The diode is there to suppress the inductive back EMF from the solenoid. A 2200 MFD capacitor is placed across the power supply and near the solenoid to help maximize the pulse to the solenoid.
The solenoid coil is rated at 1 amp and 12 volts. We are running it at 18 volts. and it looks like the initial surge current at 18 volts is about 3 amps. It doesn't need to be on very long to get maximum impact on our ping pong ball. 10 msec. doesn't quite do it, but 15 msec. is more than enough! We are firing our solenoids at maximum frequency of twice / second, so the duty cycle is low and our solenoids should be fine running at 18 volts.
We have 10 of these circuits, one for each of our 10 solenoids / ping pong balls. That actually places all 10 of our 2200 MFD capacitors in parallel. With 18 volts and all that capacitance, we still just get the balls close to the top of the tubes! Each solenoid circuit has its own control pin on the Arduino, so we have complete control of the whole system through software.
I am powering this system with a bench power supply, 10 amps and 0 - 30 volts. If you want to power it from a dedicated power supply, 18 volts at 5 amps should work fine, as we are typically firing the solenoids one at a time, and the 2200 MFD capacitors level the power demand to some degree.
ProgrammingEverything here is pretty straight-forward. I used an Arduino Uno, but almost any microcontroller could easily handle the program. Setup configures pins 3-12 as our 10 digital outputs, each one controlling a solenoid. A subroutine fires the selected solenoid for 15 msec. and then waits a prescribed time in msec. before moving on. The main loop goes through the various effects you see in the demo video before starting over again. All the code is attached.
Lessons LearnedIf I were starting from scratch, I would do some things differently. So I have some advise for anyone else wanting to create art from ping pong balls and solenoids.
1. Even with my 3D printed parts, this is difficult work mechanically. The solenoids create a lot of vibration and noise. Anything that can shake loose, detach, or break will quickly do so! Everything needs to be properly secured. Every wire needs to be soldered, etc. I should have found a better way to secure the solenoids in the bases. They were constantly trying to move.
2. The solenoids I used are barely up to the task. The 10 mm throw is long enough, but they don't have much power. You can easily stop them from moving with one finger. I suspect even the little ping pong balls slow them down.
3. Even with my centering ring, we need about 400 msec. between firings of a single solenoid. That is because the ball is bouncing around at the bottom and hasn't centered yet. I would have liked it to be faster. Further experimentation is needed.
4. The inconsistency of the height of the balls in the tube is annoying. I never really found a solution. Perhaps a better solenoid that reliably sends the ball all the way to the top every time is the answer. It would require a small wire across the top of the tube to stop the ball from coming out of the tube!
5. Ideally, I would like to have two foot high tubes and solenoids that shoot regulation ping pong balls completely out of the tubes. I never found them, but perhaps someone else will!


Comments
Please log in or sign up to comment.