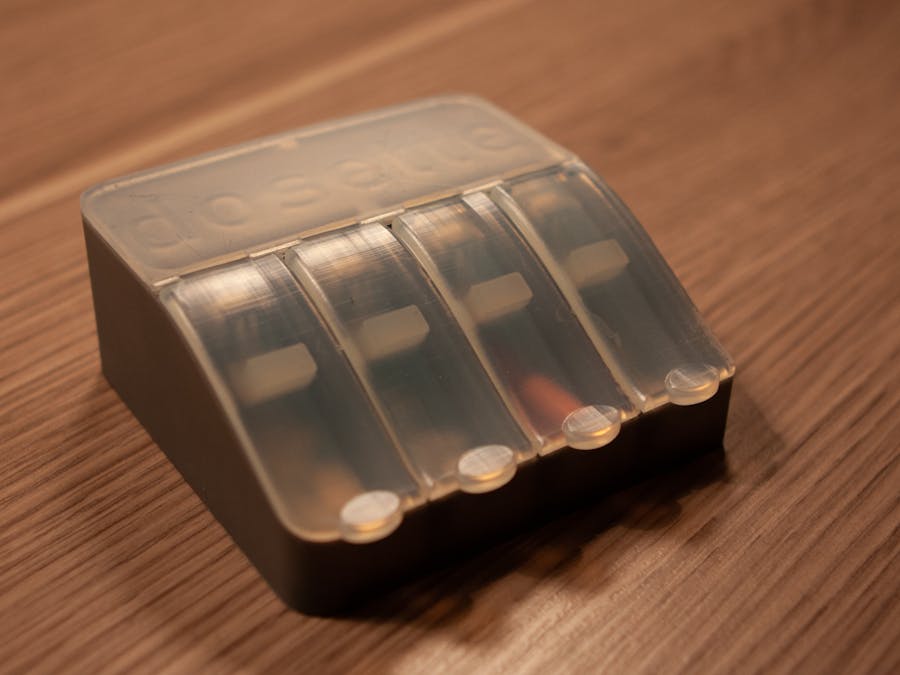
The aim of this prototype is to create a pill organizer with the following features:
- Let caregivers know if a patient is taking her medicine
- Decade-long battery life
- WiFi & smartphone independent for patient
- Interoperable with electronic medical record systems (EMR)
- Works at home, in hospitals and institutions with no extra infrastructure required (WiFi, internet, smartphone)
- Ready for patient- or caregiver reminders on smartphone or display
- Suitable for multiple different types of medication schedule
Failure for patients to take correct prescribed medicine at the correct schedule, medicinal compliance, poses a serious health risk.
This prototype explores the practical benefit of digitizing pill organizers, dosettes, to allow remote monitoring and reminders.
Two classes of use-cases were in mind when making design choices:
Private: My own and family member's life critical medication:
In this case we remember our own dosage, but when we get out of our routine we sometimes forget to take our medication and other times we forget if we already have taken it. This case covers responsibility for children's medication and relatives living far away. A notification system and a journal, in the form of a smartphone app would be the most obvious tool for monitoring usage. A fixed display might be worth future exploration.
Caregivers: Home care, nursing homes and hospital use:
In this case this can be a tool to help catch noncompliance in medication orders. The most appropriate tool for monitoring and documenting this would be the electronic medical record (EMR) already used by healthcare professionals. To accomplish this the prototype must be extendable for eHealth record exchange.
Design choicesYou might wonder why there are 4 compartments in the dosette, why not 7 for instance? With 4 compartments I am able to cover enough different types of use cases, while proving the concept:
- You could use the compartments to schedule up to 4 intervals per day.
- You could separate up to 4 different types of pills, for instance filling each compartment for a week at a time.
For development board I chose the Mini Ultra LoRaWAN from Rocket Scream. It sports the trusted Microchip ATMega328P-AU, the same series many Arduino enthusiasts have started out with. In today's market saturated with overpowered MCU's, I find it a good practice to start a low-power prototype with hardware just about capable for the job. As a software developer using high-level programming languages it is easy to misuse resources making it hard to obtain simplicity and a power-efficient design. It is all relative and I am sure hardcore electronics developers are unimpressed by my coding style!
The board states that a minimum of 35 uA current draw can be obtained in sleep mode with no external circuitry, let's see how close we can get in this project.
The development board also features my go-to LoRaWAN radio, the Microchip RN2483A/RN2903A. This module has many available libraries and is easy to work with.
Note: The development board has been updated to V3 and you should make an informed choice if you want to base your next project on either.
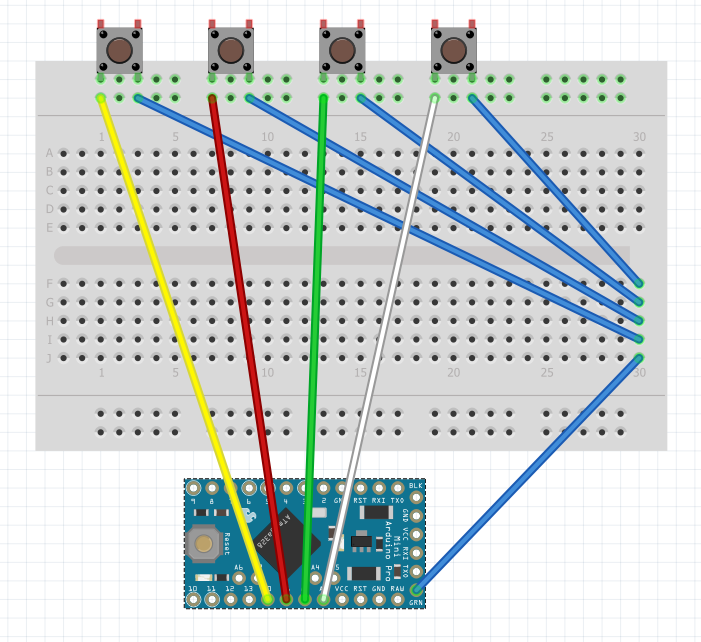
In addition I used a breadboard with jumper wires, a protoboard, some soft silicone coated 30 AWG wire and standard 3-legged micro switches.
On the breadboard I started out connecting the switches so that when left unpressed the connection was cut, Normally Open configuration. In my code each pin was configured as inputs with 20k Ohm internal pullup resistors. When the switches were engaged this would short circuit each pin to ground, giving a LOW-level reading. This made sense on the breadboard, but I soon realized the switches would be engaged for most of the time, when the lids were closed. We will soon see what this meant for current consumption. This was easily remedied by changing my circuits so that when the switches were unpressed the pins would be grounded, Normally Closed configuration.
I used a stacking protoboard simply for reusability of the dev board. Also, this gives you a second chance if you mess up the circuit. Beware though - the protoboards I used were designed for another dev board and I had to cut a few traces. If in doubt, check and recheck all pins using a multimeter with a continuity setting.
I have left comments in the device code you can find in the code repository linked at the end of the article. Please read more about using the TheThingsNetwork Arduino library here. I have published other projects using the same radio module and library, providing more details. My starting point was the provided low-power example from the author of the popular Rocket Scream LowPower library.
My intention was to use the following flow of code:
The flow chart is generated by code using the very handy Mermaid markup script tool.
As I had only used external interrupts previously I spent quite a bit of time experimenting with Pin Change Interrupts. Besides the MCU datasheet I used Nick Gammon's Interrupts guide extensively.
Isolated experiments worked as expected but I ran into trouble when combining pin interrupts and external interrupts from the radio. Vigilant monitoring using the oscilloscope didn't provide answers I could understand for missing wake-up events from the radio and I decided to try an alternative: The radio would wake up the MCU at a given interval, and this would serve as a means of accumulating successive lid events and as a debouncing mechanism. As I will show the difference in current consumption is negligible, at least for the purpose of this prototype.
I learnt a lot about more advanced use of interrupts in this project. They can be very powerful, rendering the need for multi core MCU's further away. They can also be demanding to understand and debug. Try to rely on debugging using a logic analyzer or oscilloscope, rather than serial statements, as the latter can seriously affect the sequence of instructions. Also, get familiar with the volatile statement.
As I don't read binary or hex on a daily basis I had to write out the possible combinations to visualize the results, a great aid.
I made a bold statement this device could last for over 10 years on the 3.6 volt SAFT LS14500 AA-size battery it is equiped with. While a claim hard to prove I do have some backing that could at least make a few years of battery life probable.
This is a current consumption profiling snapshot where I have highlighted the sleep phase. This is what the device will be doing absolutely most of the time. The numbers measured are even better than the stated 35 uA. Even taking these numbers with a grain of salt, they are more than good enough for a prototype, imagine what could be accomplished with custom electronics!
Below is a comparison of having the default state of the switches shorted to ground vs. having them pulled up.
For further backing this project using the same dev board has lasted for over a year consuming about the same at sleep, but much more reading sensors and transmitting one every hour.
This project uses other components but has lasted for over 3 years on 2 standard AAA batteries in temperatures below -10 Celcius.
The Things NetworkAs I use LoRaWAN for communication using The Things Network community network was an obvious choice for a prototype like this. There are plentiful of guides on setting up gateways and applications, you can find more details in my previous LoRaWAN projects. For decoding the device payload I had to write a piece of JavaScript code to extract each lid's state into seperate properties. This will simplify mapping the states to a more structured format for exchange with medical systems. The payload decoder is provided in the repo.
function Decoder(bytes, port) {
// Decode an uplink message from a buffer
// (array) of bytes to an object of fields.
var decoded = {};
if (port === 1)
{
decoded.lid1 = (Boolean)(bytes[0] & 1);
decoded.lid2 = (Boolean)((bytes[0] >> 1) & 1);
decoded.lid3 = (Boolean)((bytes[0] >> 2) & 1);
decoded.lid4 = (Boolean)((bytes[0] >> 3) & 1);
}
return decoded;
}
Messages are being received in the TTN application and I now have the option of configuring webhooks for integration, or using MQTT clients for subscription.
3D printed enclosureThe most interesting part of the project was to design and 3D print an enclosure that would serve the purpose.
I start every prototype like this by importing or drawing the electronics parts in CAD, Fusion 360.
I also do a lot of sketching by hand to get a feel for different approaches. For this project I made 5-6 completely different designs. I will also follow this by sketching details of parts of interest, before starting with CAD.
I went through quite a few iterations regarding the hinges for the lids and tested a few different types of material. I used a Formlabs Form 3 SLA printer and a standard Gray V4 resin for the main compartments. For the lids I experimented with flexible materials to accomplish a hingeless design. Elastic 50A is a silicone-like material that I have previously used for custom gaskets. I designed and printed a one-piece part but realized it was too soft to work as intended.
The compartments feature some venting holes so I would be able to print without support material while avoiding cupping.
I redesigned a one-piece hingeless part using a more rigid resin called Rigid. The area I wanted to bend became too thick and broke. I believe it would be possible to make this work but I had to set this experiment aside for a more traditional approach.
Using the same Rigid resin I split the lids into separate pieces, connected with hinges. There is room for improvement in the robustness in design but I was satisfied with what I had learned and left it for a future iteration.
Another area of interest are the press-fit areas for the switches, this worked out very well! I plan to test a similar type of arrangement for the hinges in a future iteration.
Another improvement would be to isolate the switch mechanism from the pills.
Models are available in the repo.
I intend to have the dosette talk with EMR's. This is my line of work professionally and poses a different set of challenges. This project write-up is limited to the physical and electronics part of the prototype, but I will leave some thoughts on how to accomplish integration.
Firstly I recommend writing a REST-based web service that can map the lid states to HL7 FHIR or openEHR messages. You can find some examples of this on my previous projects. I also contributed to The Things Conference 2021 with a short talk on exactly this, Considerations when developing LoRaWAN for healthcare. The talk will be released shortly.
Google Cloud Healthcare API is a great and free way to start experimenting with your own FHIR sandbox. You could also deploy your own openEHR sandbox locally or in the cloud using EHRBase.
ConclusionAll in all this was a very enjoyable and meaningful project. I got to use many previously accuired skills, as well as to learn a bit more. As soon as I get to adapt my existing FHIR and openEHR service I will test how this works integrated with an EMR. I will then proceed to make devices for my family members.
I would appreciate any feedback - improvements, criticism or any suggestions from the community!


Comments
Please log in or sign up to comment.