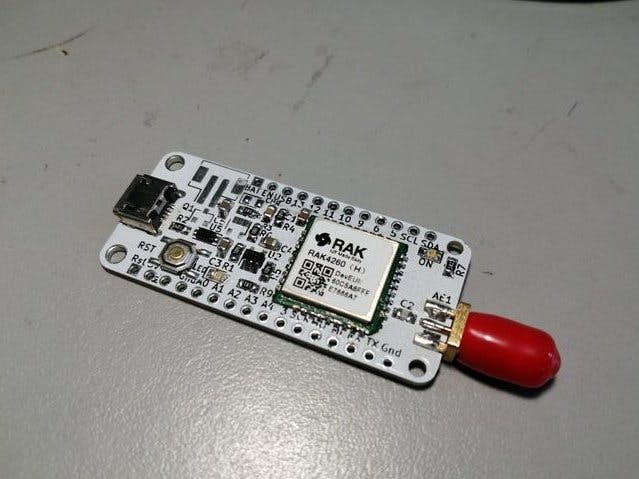
Welcome to this tutorial where we will show you how to use the RAK4260 module with the Arduino IDE, for this tutorial we will use the development board BastWAN
Characteristics:- Microcontroller SAMR34, Thanks to RAK4260
- ARM Cortex M0+ low power
- SPI Flash memory for future Circuit Python support ;D
- ATECC608A-Lora encryption chip
- LED for user
- LiPo Battery charger
- SMA or u.FL possible connectors
- Mirco USB port
- Reset Button
0.Burn the Bootloader
If you're trying to do this tutorial without a BastWAN Board you will need to burn the bootloader since the module by itself doesn't came with the bootloader flashed.
You can find the Bootloader right here, this bootloader is based on the UF2 from Microsoft which allows you to reprogram it with Arduino and other platforms.
You will need a JLink or a ATMEL ICE or a Black Magic Probe, or maybe you can do your own programer based on the Black Magic probe or maybe with a Raspberry as a ARM programmer theres a lot of ways to flash this chips nowadays
1.Install Arduino IDE:
The first thing to do is to get installed at least the 1.6.6 version of Arduino IDE.
Once you have installed the Arduino IDE you will need to follow the next steps
2. InstalltheSAMDSupportfrom Arduino
You must install the las SAMD Board from Arduino (1.6.11 version or higher)
On the menu, go to, Tools -> Boards -> Board Manager
You must type Arduino SAMD on the search filter you will see it Arduino SAMD Boards (32-bits ARM Cortex M0+) and click Install
3. ElectronicCatsBoardsInstall
To add board support for our products, start Arduino and open the Preferences window (File > Preferences). Now copy and paste the following URL into the 'Additional Boards Manager URLs' input field:
https://electroniccats.github.io/Arduino_Boards_Index/package_electroniccats_index.json- If there is already an URL from another manufacturer in that field, click the button at the right end of the field. This will open an editing window allowing you to paste the above URL onto a new line.
Press the "OK" button.
- Press the "OK" button.
Open the "boards manager" that is in tools --> Board --> board manager.
- Open the "boards manager" that is in tools --> Board --> board manager.
Now write "Electronic Cats" (without quotes) in the search bar.
- Now write "Electronic Cats" (without quotes) in the search bar.
Click in install for "ElectronicCats SAM Boards", jus wait to finish to install and only close the window.
In Tools --> Boards, scroll to down in the boards list you can see the Electronic Cat´s boards.
In order to compile the examples you will need to select the board BastFamily and select the options as the photo.
Hello World in LoRa:Down you will find 2 codes the first is for the receiver of the Tx-Rx and the second is the sender example
In both examples the variables RFM_SWITCH, RFM_RST, RFM_DIO0, SS are declared on the board definition so you don't need to use the pin number.
In this examples we're using this library thanks to @sandeepmistry.
Receiver
#include <SPI.h>
#include <LoRa.h>

void setup() {
  Serial.begin(9600);
  //while (!Serial);
  pinMode(RFM_SWITCH,OUTPUT);
  digitalWrite(RFM_SWITCH,1);
  Serial.println("LoRa Receiver");
  LoRa.setPins(SS, RFM_RST, RFM_DIO0);
  if (!LoRa.begin(915E6)) {
    Serial.println("Starting LoRa failed!");
    while (1);
  }
}

void loop() {
  // try to parse packet
  int packetSize = LoRa.parsePacket();
  if (packetSize) {
    // received a packet
    Serial.print("Received packet '");

    // read packet
    while (LoRa.available()) {
      Serial.print((char)LoRa.read());
    }

    // print RSSI of packet
    Serial.print("' with RSSI ");
    Serial.println(LoRa.packetRssi());
  }
}
Sender
#include <SPI.h>
#include <LoRa.h>
int counter = 0;

void setup() {
    Serial.begin(9600);
    //while (!Serial);
    Serial.println("LoRa Sender");
    pinMode(RFM_TCXO,OUTPUT);
    pinMode(RFM_SWITCH,OUTPUT);
    pinMode(LED_BUILTIN,OUTPUT);
    LoRa.setPins(SS,RFM_RST,RFM_DIO0);
    if (!LoRa.begin(915E6)) {
        Serial.println("Starting LoRa failed!");
    while (1);
    }
}

void loop() {
    Serial.print("Sending packet: ");
    Serial.println(counter);
    digitalWrite(LED_BUILTIN,1);
    // send packet
    LoRa.beginPacket();
    digitalWrite(RFM_SWITCH,0);
    LoRa.print("hello ");
    LoRa.print(counter);
    LoRa.endPacket();
    counter++;
    delay(500);
    digitalWrite(LED_BUILTIN,0);
    delay(500);
}Down you will find one example of using the BastWAN as a LoRaWAN Class A device with ABP activation, this is one example but using this Library thanks to @beelan to use correct this example you will need to read the documentation of the library cause you will depend on the configurations of your LoRaWAN gateway and you need to configure it correctly in order to get this working well.
You will need to put your LoRaWAN credentials to get access to your LoRaWAN server.
In the examples the variables SS,RFM_SWITCH, RFM_RST, RFM_DIO0, RFM_DIO1 RFM_DIO2, RFM_DIO3, RFM_DIO4, RFM_DIO5 are declared on the board definition so you don't need to use the pin number.
/**
* Example of ABP device
* Authors:
*        Ivan Moreno
*        Eduardo Contreras
*  June 2019
*
* This code is beerware; if you see me (or any other collaborator
* member) at the local, and you've found our code helpful,
* please buy us a round!
* Distributed as-is; no warranty is given.
*/
#include <lorawan.h>

//ABP Credentials
const char *devAddr = "00000000";
const char *nwkSKey = "00000000000000000000000000000000";
const char *appSKey = "00000000000000000000000000000000";

const unsigned long interval = 10000;    // 10 s interval to send message

unsigned long previousMillis = 0;  // will store last time message sent
unsigned int counter = 0;     // message counter

char myStr[50];
char outStr[255];
byte recvStatus = 0;

const sRFM_pins RFM_pins = {
  .CS = SS,
  .RST = RFM_RST,
  .DIO0 = RFM_DIO0,
  .DIO1 = RFM_DIO1,
  .DIO2 = RFM_DIO2,
  .DIO5 = RFM_DIO5,
};

void setup() {
  // Setup LoRaWAN access
  Serial.begin(115200);
  delay(2000);
  if(!lora.init()){
    Serial.println("RFM95 not detected");
  delay(5000);
  return;
  }
  // Set LoRaWAN Class change CLASS_A or CLASS_C
  lora.setDeviceClass(CLASS_A);
  // Set Data Rate
  lora.setDataRate(SF8BW125);
  // set channel to random
  lora.setChannel(MULTI);
  // Put ABP Key and DevAddress here
  lora.setNwkSKey(nwkSKey);
  lora.setAppSKey(appSKey);
  lora.setDevAddr(devAddr);
}

void loop() {
  // Check interval overflow
  if(millis() - previousMillis > interval) {
  previousMillis = millis();
  sprintf(myStr, "Counter-%d", counter);
  Serial.print("Sending: ");
  Serial.println(myStr);
  lora.sendUplink(myStr, strlen(myStr), 0);
  counter++;
  }
  recvStatus = lora.readData(outStr);
  if(recvStatus) {
    Serial.println(outStr);
  }
  // Check Lora RX
  lora.update();
}


_M6kErcYJ84.png?auto=compress%2Cformat&w=40&h=40&fit=fillmax&bg=fff&dpr=2)
Comments
Please log in or sign up to comment.