Esmacat
Published © GPL3+

EtherCAT Arduino Shield by Esmacat and Motor Shield Tutorial

Use an EtherCAT master to communicate with an EtherCAT Arduino Shield by Esmacat(EASE) on an Arduino to control motors using a motor shield.

IntermediateProtip2 hours3,080

Things used in this project

Hardware components

Esmacat Master S
(Optional Esmacat Master)
×1
Esmacat Master C
(Optional Esmacat Master)
×1
Arduino UNO
Arduino UNO
×1
EtherCAT Arduino Shield by Esmacat (EASE)
×2
Adafruit Motor Shield
Adafruit Motor Shield V2 to control the motors
×1
Power over Ethernet Injector
×1
Ethernet Cable, Cat6a
×3
DC Adapter
To supply power to the Power over Ethernet Injector.
×1
Servo Motor
(Optional to test the code). Any Servo motor can be used. This specific motor has been used in this tutorial.
×1
DC Motor
(Optional Motor to test the code). Any dc motor can be used. This specific motor has been used in this tutorial.
×1
Stepper Motor
(Optional Motor to test the code). Any stepper motor can be used. This specific motor has been used in this tutorial.
×1
Power Source
Any power source like a lipo battery or battery eliminator to power the motors.
×1

Software apps and online services

Arduino IDE
Arduino IDE
Visual Studio 2017
Microsoft Visual Studio 2017
(Optional) IDE for building C++ Applications in Windows.
QT creator
(Optional) IDE for building C++ Applications in Linux.

Story

Read more

Schematics

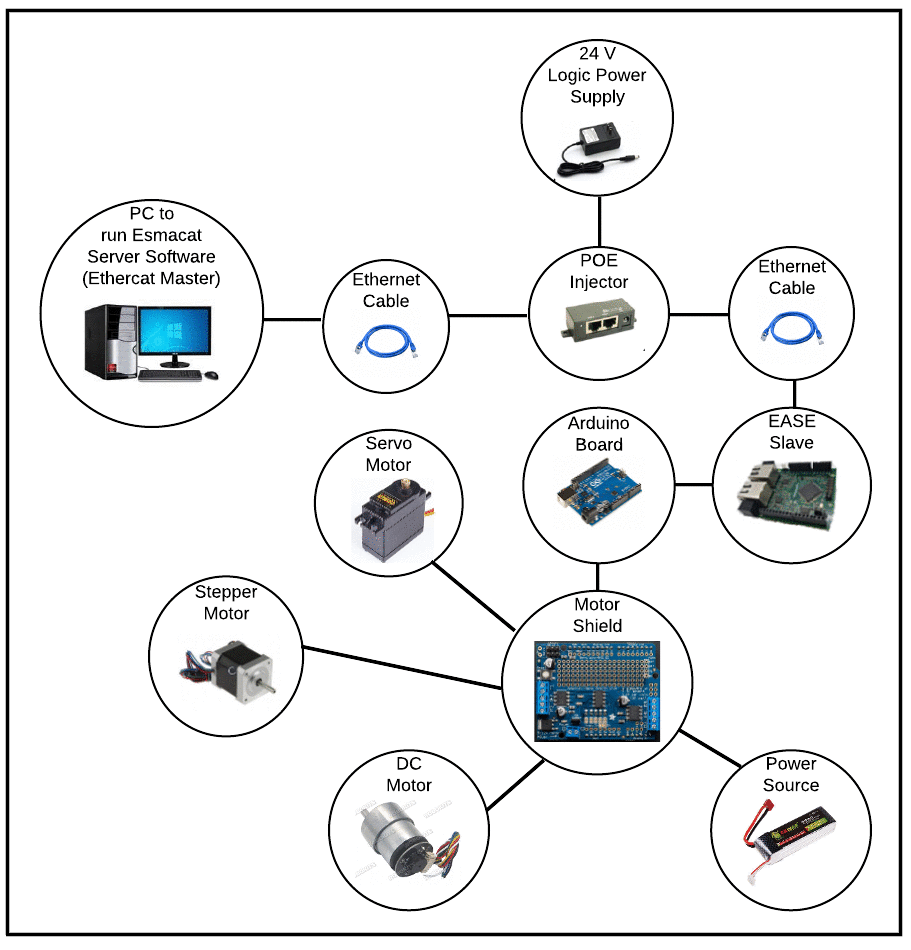
Hardware Setup Schematic

Schematic of the connection used in the tutorial

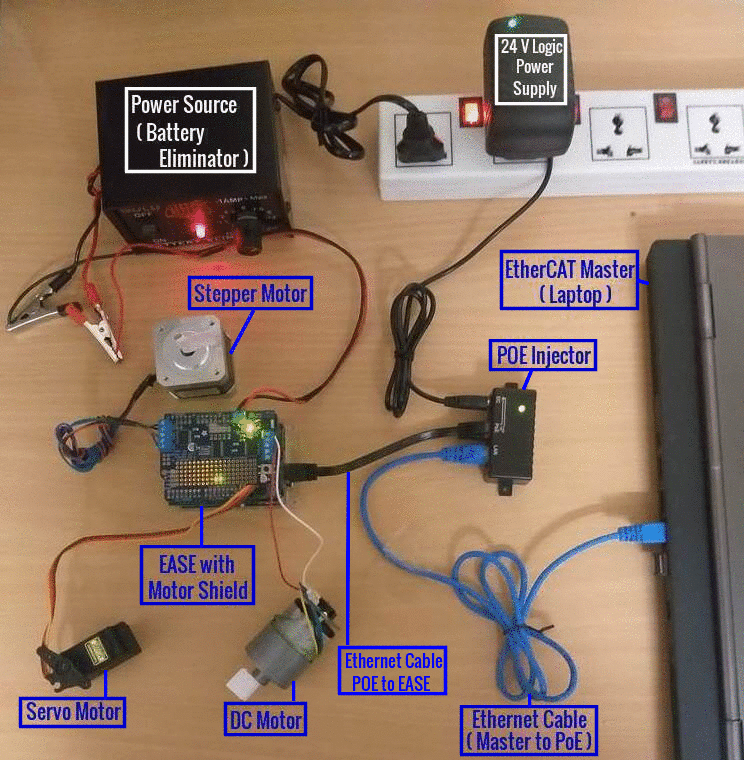
Physical Hardware Connection schematic

Hardware setup after final connections.

Code

Arduino with EASE and Motor Shield Code

Arduino
Code to be uploaded with the Arduino Board with EASE and Motor Shield.
/*
  Motors Control

  This sketch does the following:
  1) Controls 3 different motors attached to the Motor Shield.
  2) Depending on the motor selected as input form the Master,
      2.1) If the motor selected is a Servo Motor, the motor is set at the desired position.
      2.2) If the motor selected is a DC Motor, the motor is set to run at a particular speed 
           by modifying the pwm control input to the motor.
      2.3) If the motor is selected is a Stepper Motor, the motor is set to run at a particular
           speed.        
           
  created 24 Dec 2019
  by Harmonic Binonics Inc. (https://www.harmonicbionics.com/). 
  
*/
 
/*
    Motor Select Options
    |--------------------------------------------------------|
    |   Motor Select Integer Value   |    Motor Controlled   |
    |--------------------------------------------------------|
    |               0                |       Servo Motor     |
    |               1                |         DC  Motor     |
    |               2                |     Stepper Motor     |
    |--------------------------------------------------------|
*/

#include <Wire.h>
#include <Adafruit_MotorShield.h>   // Include the Adafruit Motor Shield Library

#include <Servo.h>   // Include the Arduino Servo Library
#include <Esmacatshield.h>      //Include the Esmacat Arduino Library

// Define the Pin Numbers as Macros
# define servo_control_pin 9   // Servo is connected to Servo port #1 on the Motor Shield
# define Serial_baud_rate 9600
# define ARDUINO_UNO_SLAVE_SELECT 10      // The chip selector pin used in Arduino Uno is 10 

// Create objects for various motor classes and EASE
Esmacatshield ease_with_motor(ARDUINO_UNO_SLAVE_SELECT);      // Create a slave object and specify the Chip Selector Pin


Adafruit_MotorShield AFMS = Adafruit_MotorShield();   // Create the motor shield object with the default I2C address

// Create an object for Stepper Motor
Adafruit_StepperMotor *stepper_motor = AFMS.getStepper(200, 2);   // Connect a stepper motor with 200 steps per revolution (1.8 degree)
                                                                  // to motor port #2 (M3 and M4)

// Create an object for DC Motor
Adafruit_DCMotor *dc_motor = AFMS.getMotor(2);   // Connect a DC motor to motor port #1 (M2)


Servo servo_2;  // Create an object for the Servo Motor Class 
                // Servo is connected to Servo port #2 on the Motor Shield so the name servo_2 is used

// Required variables Initialization

int motor_select = 0;   // Variable to choose which motor to control
int servo_angle = 0;   // Variable to store the input angle
int stepper_speed = 0;   // Variable to store stepper motor speed
int dc_speed = 0;   // Variable to store dc motor speed
int ease_registers[8];      // EASE 8 registers

void setup() 
{
  Serial.begin(9600);           // set up Serial library at 9600 bps

  AFMS.begin();  // create with the default frequency 1.6KHz
  
  stepper_motor->setSpeed(10);  // 10 rpm random initialization of speed
  
  dc_motor->setSpeed(0);   // Set the initial Speed of DC Motor to 0 

  servo_2.attach(servo_control_pin);   // Servo 1 on Adafruit Motor Shield is connected
                                       // to Pin 10 of the Arduino board
  ease_with_motor.start_spi();      // Start SPI for EASE
}

void loop() 
{
  
  ease_with_motor.get_ecat_registers(ease_registers);

  motor_select = ease_registers[0];   // Motor to control
  servo_angle = ease_registers[1];   // Actual Servo position
  dc_speed = ease_registers[2];   // Actual dc motor speed
  stepper_speed = ease_registers[3];   // Actual Stepper Motor Speed

/* Values received can be printed out on the Serial Monitor for Debugging purposes.
/*  
  Serial.print(motor_select);
  Serial.print("\t");
  Serial.print(servo_angle);
  Serial.print("\t");
  Serial.print(dc_speed);
  Serial.print("\t");
  Serial.println(stepper_speed);
*/  

  if(motor_select == 0)
  {
    servo_2.write(servo_angle);
    Serial.print("Servo Angle ");
    Serial.println(servo_angle);
  }
  
  if(motor_select == 1)
  {
    if(dc_speed > 0)
    {
      dc_motor->setSpeed(dc_speed);
      dc_motor->run(FORWARD);
    }
    else
    {
      dc_motor->setSpeed(dc_speed);
      dc_motor->run(BACKWARD);
    }
    Serial.print("DC Speed");
    Serial.println(dc_speed);
  }

  if(motor_select == 2)
  {
    if(stepper_speed > 0)
    {
      stepper_motor->step(stepper_speed,FORWARD,SINGLE);
    }

    else
    {
      stepper_motor->step(stepper_speed,BACKWARD,SINGLE);
    }
    Serial.print("Stepper Speed");
    Serial.println(stepper_speed);
   }
}

ease_master_motor_control/main.cpp

C/C++
Software to be run on EtherCAT master, main.cpp file
/** @file
 *  @brief This file contains the template for the main program for the Esmacat slave
 *  project */
/*****************************************************************************************
 * INCLUDES
 ****************************************************************************************/
#include <iostream>
#include "my_app.h"

/*****************************************************************************************
 * FUNCTIONS
 ****************************************************************************************/
/**
 * @brief Initializes the execution of the Ethercat communication and
 *        primary real-time loop for your application for the desired
 *        slave
 * @return
 */

int main()
{
    //this is defined in my_app.cpp and my_app.h
    my_app app;

    // if you already know the ethernet adapter name for EtherCAT, uncomment and use the line below
    //    app.set_ethercat_adapter_name(" WRITE YOUR ETHERNET ADAPTER NAME");

    // If the name is not known, select through the terminal an ethernet adapter (the slave)
    // you'd like to communicate with over EtherCAT
    app.set_ethercat_adapter_name_through_terminal();

    // start the esmacat application customized for your slave
    app.start();

    //the application runs as long as the esmacat master and slave are in communication
    while (app.is_esmacat_master_closed() == FALSE );
    return 0;
}

ease_master_motor_control/my_app.cpp

C/C++
Source Code for the application class
/** @file
 * @brief This file contains the definition of the functions associated with the user-defined
 * application for the Esmacat slave project */
 /*****************************************************************************************
 * INCLUDES
 ****************************************************************************************/
#include "my_app.h"

/*****************************************************************************************
 * FUNCTIONS
 ****************************************************************************************/
/**
 * @brief Identifies the actual Esmacat slave sequence in the EtherCAT communication chain.
 */
void my_app::assign_slave_sequence(){
    assign_esmacat_slave_index(&ease_motor_shield, 0);   //<-- The Motor Shield is connected in number 0
}

/**
 * @brief Configure your Esmacat slave.
 * Link Esmacat slave object with the actual Esmacat slave in the EtherCAT communication chain.
 * Functions beginning with 'configure_slave' must only be executed in this function
 */
void my_app::configure_slaves(){
    // add initialization code here
    // Functions starting with "configure_slave" work only in configure_slaves() function
}

/** @brief Initialization that needs to happen on the first iteration of the loop
 */
void my_app::init()
{
    // Motor Shield Initialization
    ease_motor_shield.set_output_variable_0_OUT_GEN_INT0(0);
    ease_motor_shield.set_output_variable_1_OUT_GEN_INT1(0);
    ease_motor_shield.set_output_variable_2_OUT_GEN_INT2(0);
    ease_motor_shield.set_output_variable_3_OUT_GEN_INT3(0);

    // Variable Initialization
    servo_position = 0;
    dc_pwm = 60;
    stepper_speed = 0;
    motor_select = -1;    

    cout << "Motor Party Program" << endl;
    counter = 0;
}

/*
   EASE Motor Shield Register Mapping
   |--------------------------------------------------|
   |   Register Number   |           Mapping          |
   |--------------------------------------------------|
   |         0           |         Motor Select       |
   |         1           |         Servo Angle        |
   |         2           |       DC Motor Speed       |
   |         3           |     Stepper motor Speed    |
   |--------------------------------------------------|
/*

/**
 * @brief Executes functions at the defined loop rate
 */
void my_app::loop(){

    // add functions below that are to be executed at the loop rate
    ease_motor_shield.set_output_variable_0_OUT_GEN_INT0(motor_select);

    if (counter == 0)
    {
        motor_select = (motor_select + 1) % 3;
        if (motor_select == 0)
        {
            cout << "Controlling Servo Motor now" << endl;
            dc_pwm = 60;
            stepper_speed = 0;
        }
        else if (motor_select == 1)
        {
            cout << "Controlling DC Motor now" << endl;
            servo_position = 0;
            stepper_speed = 0;
        }
        else if (motor_select == 2)
        {
            cout << "Controlling Stepper Motor now" << endl;
            servo_position = 0;
            dc_pwm = 60;
        }
    }

    if (motor_select == 0)
    {
        cout << "Servo at " << servo_position << "degrees \n";
        if (counter > 90)
        {
            servo_position -= 1;
            ease_motor_shield.set_output_variable_1_OUT_GEN_INT1(servo_position % 180);
        }
        else if (counter < 90)
        {
            servo_position += 1;
            ease_motor_shield.set_output_variable_1_OUT_GEN_INT1(servo_position % 180);
        }
    }
    
    if (motor_select == 1)
    {
        cout << "DC Motor pwm value at " << dc_pwm << endl;
        if (counter > 90)
        {
            dc_pwm -= 1;
            ease_motor_shield.set_output_variable_2_OUT_GEN_INT2(dc_pwm % 255);
        }
        else if (counter < 90)
        {
            dc_pwm += 1;
            ease_motor_shield.set_output_variable_2_OUT_GEN_INT2(dc_pwm % 255);
        }
    }

    if (motor_select == 2)
    {
        cout << "Stepper motor running at " << stepper_speed << "rpm \n";
        if (counter > 90)
        {
            stepper_speed -= 1;
            ease_motor_shield.set_output_variable_3_OUT_GEN_INT3(stepper_speed % 255);
        }
        else if (counter < 90)
        {
            stepper_speed += 1;
            ease_motor_shield.set_output_variable_3_OUT_GEN_INT3(stepper_speed % 255);
        }
    }
    counter = (counter + 1 ) % 180;
}

ease_master_motor_control/my_app.h

C/C++
Header files for the application class
/** @file
 * @brief This file contains the declaration of the class associated with the user-defined
 * application for the Esmacat slave project */

#ifndef MY_APP_H
#define MY_APP_H

/*****************************************************************************************
 * INCLUDES
 ****************************************************************************************/
#include <iostream>
#include "application.h"
//Include the header file for the Esmacat slave you plan to use for e.g. Analog Input slave
#include "ethercat_arduino_shield_by_esmacat.h"
using namespace std;


/*****************************************************************************************
 * CLASSES
 ****************************************************************************************/
/**
 * @brief Description of your custom application class
 *
 * Your custom application class my_app inherits the class 'esmacat_application'
 * Write functions to override the parent functions of 'esmacat_application'
 * Declare an object of your slave class (e.g. ecat_ai)
 * Declare any other variables you might want to add
 * Define the constructor for initialization
 */
class my_app : public esmacat_application
{
private:
    void assign_slave_sequence(); /** identify sequence of slaves and their types*/
    void configure_slaves(); /** setup the slave*/
    void init(); /** code to be executed in the first iteration of the loop */
    void loop(); /** control loop*/

    esmacat_ethercat_arduino_shield_by_esmacat ease_motor_shield;   /**< create your Esmacat slave object */
    uint32_t servo_position;
    uint32_t dc_pwm;
    uint32_t stepper_speed;
    uint32_t motor_select;
    uint32_t counter;

public:
    /** A constructor- sets initial values for class members */
    my_app()
    {

    }
};

#endif // MY_APP_H

ease_master_motor_control/CMakeLists.txt

Plain text
CMake Lists file of the project
file(GLOB MY_PROJECT_HEADERS *.h)
file(GLOB MY_PROJECT_SOURCES *.cpp *.c)

add_executable(ease_master_motor_control ${MY_PROJECT_SOURCES} ${MY_PROJECT_HEADERS})
target_link_libraries(ease_master_motor_control ethercat_driver esmacat)
install(TARGETS ease_master_motor_control DESTINATION ./bin)

EtherCAT Arduino Shield by Esmacat (EASE) Arduino Library

Esmacat Master Software

Code to be used on the Esmacat master. (Contains the header files and source codes needed for EtherCAT communication).

Credits

Esmacat

Esmacat

11 projects • 16 followers
Esmacat is an easy yet powerful EtherCAT solution for robotics. Our EtherCAT tech allow users to run EtherCAT applications in minutes!

Comments