- Thinger.io is a IoT platform that is easy to use and easy to understand, with a clean design to give awesome experiences to developers.
- Makers can register for free accounts to start building their IoT projects in minutes, just using its cloud infrastructure.
- Any source IoT platform device can be connected. Arduino, ESP8266, Raspberry Pi, Intel Edison, etc. - that’s not a problem.
- Thinger.io platform senses and acts over devices in real-time. Its technology minimize data bandwidth, processing power, code size and increases the server scalability.
- Its data buckets will easily store any kind of information, and its dashboards can just as easily display the information stored or received in real time.
This example shows the simplest thing you can do with thinger.io to see physical output: it blinks one LED with any device connected to the Internet.
We are going to use Arduino IDE (the latest version is on www.arduino.cc) and a NodeMCU development board.
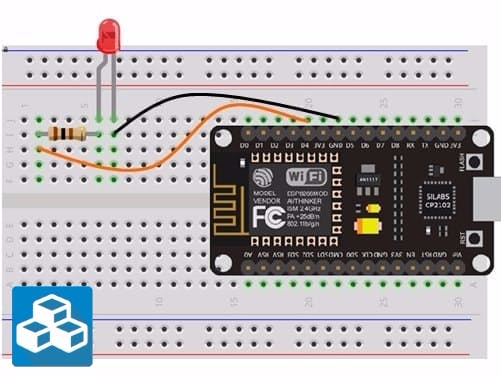
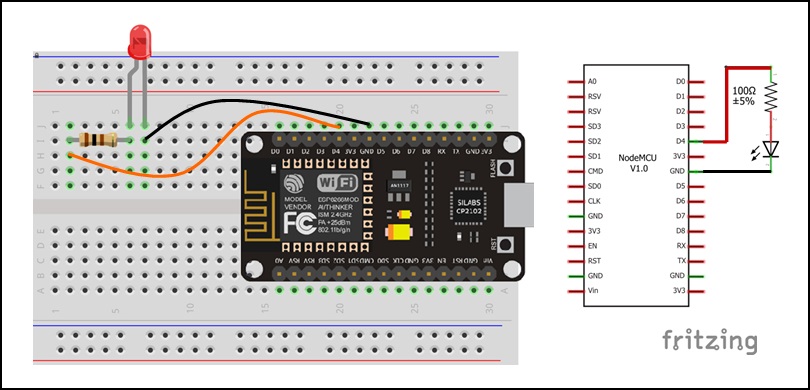
The hardware required to build the circuit is the following:
ACCESS TO THE PLATFORM
The very first step to work with thinger.io is to sign up in the platform, giving a user name, email address and password. You will receive a message to confirm the email address and once it's done you can access and start using it.
After you have signed in, you have access to the console dashboard, in which graphically, you can see the account stats (with the number of devices, dashboards data buckets and endpoints used), the location of the connected devices and a the data transmission made by the devices (data transmitted and received).
CONFIGURATION OF A DEVICE
To configure the connection to a device using thinger.io is quite easy. Select Devices > Add Device and fill the three requested fields:
- Device Id: this is the name you want to assign to the IoT board you want to control or actuate. Spaces aren’t allowed in the Devide Id.
- Device description: a brief description about the use of the device.
- Device credentials: a key to establish and keep the connection between thinger.io and the device secure.
If you’re following this project, it's time to fill the three fields:
It's done. If you click Statistics, you can go back to the console dashboard and you will see that the device is added.
Arduino IDE: Installation of the Thinger.io Library and Upload of the SketchINSTALLATION OF THE THINGER.IO LIBRARY
To install thinger.io library into your Arduino IDE you can use the Library Manager. Open the IDE and click to the “Sketch” menu and then Include Library > Manage Libraries.
Then the library manager will open. Look for the library called: thinger.io by Alvaro Luis Bustamante, and click on install and wait for the IDE to install the new library. Once it has finished, an Installed tag should appear next to the Bridge library. You can close the library manager.
Now you can use the thinger.io functions in the Arduino IDE!!!
UPLOAD OF THE SKETCH
This is the sketch that we are going to use:
/*
 Hello World Thinger.io -Blink-

 This code is under public domain.
 Dani No www.esploradores.com
 */

#include <ESP8266WiFi.h>       //ESP8266 WiFi connection library
#include <ThingerESP8266.h>    //THINGER.IO library

// Thinger.io connection parameters
#define user "ESPloradores"
#define device_Id "NODEMCU_LED"
#define device_credentials "Rzdl9J%3uAHj"
ThingerESP8266 thing(user, device_Id, device_credentials);

// WiFi connection parameters
const char WiFi_ssid[]="********";      //WiFi SSID
const char WiFi_password[]="********";  //WiFi password
// Global variable
int led = 2;       // GPIO02 - D4

void setup() {

 // Initialization of the WiFi connection with THINGER.IO
   thing.add_wifi(WiFi_ssid, WiFi_password);

 // Initialization of the LED
   pinMode(led, OUTPUT);

 // Resource for changing LED status from THINGER.IO
  thing["LED"] << [](pson& in){
    if(in.is_empty()){
      in = (bool) digitalRead(led);
      }
    else{
      digitalWrite(led, in ? HIGH : LOW);
      }
    };
  }

void loop() {
  thing.handle();
  }
It's necessary to change the “Thinger.io connection parameters“ and make them match with the data used when we made the device in thinger.io.
It is also necessary to change the WiFi SSID and WiFi password and make them match with your own WiFi network.
Once the changes have been done, you can upload the sketch to the NodeMCU.
A QUICK LOOK AT THE CODE
The on/off function has the following structure:
- RESOURCE NAME: is the name of one variable used to group communication data between the device board and and the thinger.io platform. This name will allow us to identify or select the data to use, in the dashboards, data buckets or endpoints.
- OPERATORS Y PARAMETES: indicate the direction in which the information circulates between the resource and the platform, as well as its form of codification. In our case, the data are input to the resource from the platform and come encoded in JSON format. JSON format is a variable type that can contain booleans, numbers, floats, strings, or even structured information like in a JSON document.
- BODY: is the place to program the way to act on one or more devices connected to the inputs or outputs of the device board, from the data supplied from the platform (and if applicable from the device board itself).
TURNING ON AND OFF THE LED FROM thinger.io
To turn on and off the led from thinger.io, open the platform and click Devices and then your device -NODEMCU_LED-.
Then the device will open.
Then click on View API and LED-Private. Once it´s done you can see the switch to turn the LED on and off.
TURNING ON AND OFF THE LED FROM THE thinger.io APP (Only for Android)
The first step is to install the APP on your tablet, smartphone… you can find it in the Play Store for Android.
Open the -NODEMCU_LED- device and click Add into the Device Tokens.
Write a representative name about the use of the connection in the Token name field, and click Ok > Show QR Code.
Open the APP and click “+“. Then scan the Device QR Code.
Click in the device and you will see the switch to turn the LED on and off.
Dani No www.esploradores.com


Comments
Please log in or sign up to comment.