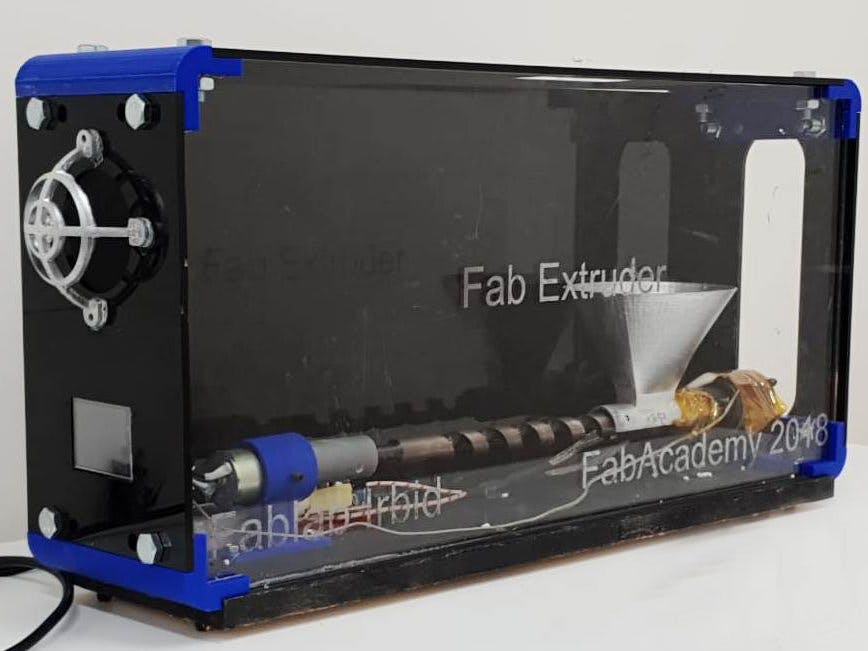
We found that there are some waste in filament in our lab, so we thought about doing a filament recycling extruder to recycle the waste materials and reuse them to save cost and conserve the environment.
The idea behind this project is to introduce a functional extruder with reasonable price, which can be affordable to the Fablab community and others.
- This project is done by fablab Irbid`s 3D printing specialist, Qusai Malahmah .
- For more information visit his website: Qusai Malahmeh
1. High Torque DC Motor.
2. Coupler.
3. K-type thermocouple.
4. Lead screw.
5. Touch screen " 320x240 Resistive LCD Touch Screen Intelligent Display Module for Arduino"
6. Heating element.
7. Solid State Relay " SSR-50DA 3-32VDC 50A/250V Output "
8. PLA _for the extensions holder, and case.
9. Acrylic _ for the case " 6 mm"
10. Wood _ for the base "18 mm "
11. Metal pipe.
12. Copper _ for the nozzle
Step 2: Design and ManufacturingThe design goes through different steps like 3D printing, laser cutting, metal & wood. We drew the design on SolidWorks. Also we have downloaded some parts like screws and couplers from Grabcad.
3D-printed parts:
Most of the parts were 3D printed using 2 different types of printers one FDM which is Ultimaker 2+. and the other one is SLA which is Formlabs.2. Using different types of filaments and resins.
Using the following settings:
1. Funnel, printed on Ultimaker using wooden fill materials.
Temperature of the nozzle is 240 degree.
- Nozzle 0.4 mm
- Layer height : 0.2 mm
- Infill : 20%
2. Motor holder- Printed with PLA
- Nozzle 0.4 mm
- Layer height : 0.1 mm
- Infill : 50%
3. Corner joints- Printed with PLA
- Nozzle 0.4 mm
- Layer height : 0.3
- Added touch the plate support Zigzag shape to be removed easily.
4. Motor holder
Printed on SLA printer because we need to have it with high accuracy and it gives us an accuracy of 0.05 mm. This part is very sensitive as the feeding screw and motor will be fitted on it.
Laser cut:
Most of the laser cutting jobs will be for the body.
the settings for acrylic 6 mm:
- Power 100 %.
- Speed 0.35.
- Frequency 5000.
Wood work :
We cut the base for the project using the Makita saw with the dimensions of 16cm x 60cm.And drilled the holes manually.
Step 3: ElectronicsWe used many input and output devices with a custom made controller to make sure the system is working properly.
The inputs are:
- K type thermocouple.
Decided to go with the K type because the temperature used for the project will be around 200_250 degrees C and the K type can reach to 1260 degrees.
Using MAX6675 chip which connect the thermocouple with Arduino. The device measures the output of a K Thermocouple and provides the result to the Arduino via a SPI interface.
In the code we used "max6675.h" library.
- Nextion LCD Touchscreen
In the code we used "Nextion.h" library with Nextion editor.
The outputs are:
- Solid-State RelayUsed a solid-state relay to be able to control the temperature.
- DC Motor
DC 12V 15RPM Gear Motor High Torque Electric Micro Speed.
- Nextion LCD Display
The components of the Fab Extruder board are :
1. Atmega328P Chip as the microcontroller.
2. MOSFET with a diode to drive the motor.
3. Voltage regulator to convert the voltage from 12V to 5V.
4. MAX6675 thermocouple K-type.
5. Crystal 16MHz.
6. Reset Button.
7. LED with a resistor.
8. 2x 22PF capacitors.
9. 5x Terminals.
10. Pin headers for programming purposes.
The schematic and the design of the board shown in the above pictures. Also the fab extruder code is attached.
Step 4: ExperimentsThe above video shows an experiment we did to get recycled filament, as you can see the diameter of the result filament changes depending on many parameters such as:
- The speed of extrusion,
- Cooling the filament
- The speed of pulling.
We managed to extrude good results for an experiment and the closest thing to the actual filament diameter we got was 1.71mm.
The diameter should be 1.75mm and we managed to get 1.71mm.
In our opinion the cooling plays a major role in the result. We will work on a cooling mechanism in the future to produce better results. But we managed to put the extruded filament in a 3D Printer and it got extruded.


_t9PF3orMPd.png?auto=compress%2Cformat&w=40&h=40&fit=fillmax&bg=fff&dpr=2)
Comments
Please log in or sign up to comment.