


Hardware components | ||||||
 |
| × | 1 | |||
| × | 1 | ||||
| × | 1 | ||||
| × | 1 | ||||
Amazon(TM) announced a while back a "Dashbutton" - a thing that you can be placed, pressed, followed by a send notification via HTTP to order automated supplies needed ... https://www.amazon.com/oc/dash-button
That sounds like an closed shop system just to order supplies needed from one single vendor - but we can build an WiFi enabled button based on the #ESP8266 just for a couple of bucks while having also access to GPIOs and an open platform to do what ever you want with a button in the brave new #IoT world. Beyond it will support the #IFTTT application and its Maker Channel but also any LAMP based DIY backend.
There are tons of daily interactions where you simply would like to press a button:
- coffee is fresh
- bread is fresh from the bakery
- call me
- switch things on / off
- lunch is ready
- vote for anything
- add yours
There are some of these button already out in the market but we make it cheaper and open to add your ideas ...
Let's go .... and build one! Yours ...
Step 1
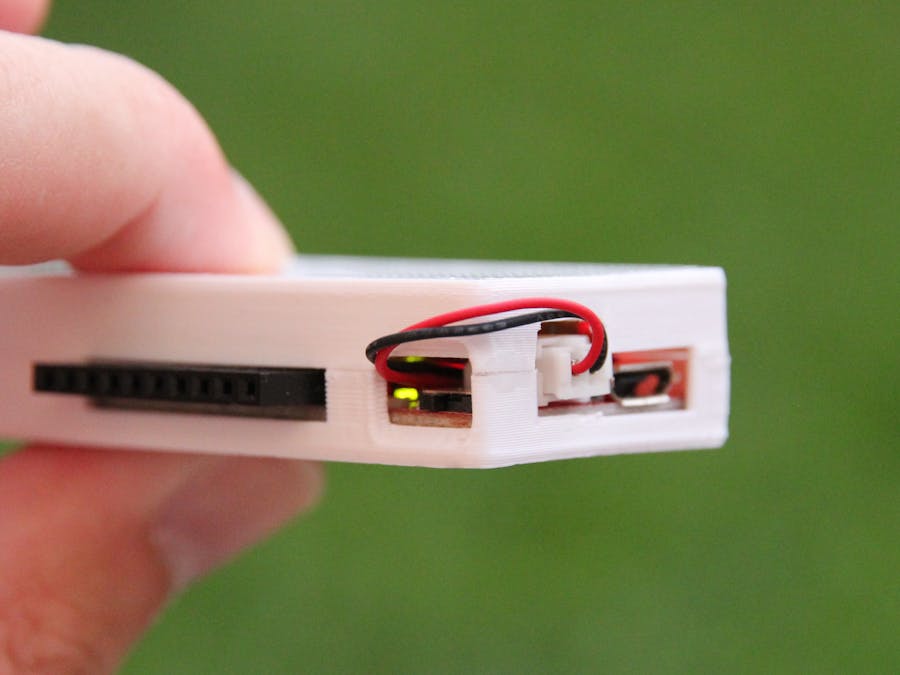
We do need a housing for the EPS8266 Thing - but not just a housing, we want to have an integrated button, which is water resistant and is flat in design too. Here you go - the STL can be downloaded from this webpage, printed on any 3D printer and mounted with little glue later on. Mount the distance shield just by pressing it firmly into position and use little glue to fix the micro switch in the center. This will position the micro switch just behind the surface of the case in perfect distance. So if you press with your thumb onto the surface you will trigger the switch.
So the cool thing about this is - you don't see a physical button or switch from the outside, just push the case and it will trigger the button hidden inside the case - it's magic ;-)
Step 2:
Flash the LUA files on the #Dashbutton like ESP8266 Thing!
Using nodeMCU firmware an python based toolchain it looks like this (don't forget the 3.3V FTDI):
$ python /home/pi/esp/luatool-master/luatool/luatool.py --port /dev/ttyUSB0 --src init.lua --dest init.lua --verbose
$ python /home/pi/esp/luatool-master/luatool/luatool.py --port /dev/ttyUSB0 --src init.lua --dest ifttt_sw.lua --verbose
Restart your ESP8266 Thing and your are up and running!
Press carefully on to the surface the button is hidden off and wait for your IFTTT message, if you don't get a message check first if while you press the "button" a green light inside is confirming input on GPIO4. You might need to press for max. 5 secs.
Have fun with your new button - stick it where you want ... ;-) put a comment if you have a great idea to share ...
Putting all together and earlier tests:


_3u05Tpwasz.png?auto=compress%2Cformat&w=40&h=40&fit=fillmax&bg=fff&dpr=2)
Comments
Please log in or sign up to comment.