I have always wanted to control my fish tank with a simple low cost and power usage hardware supporting voice command from wherever I am whether I am travailing or at work instead of forgetting to feed my fish every other day and the WIZ750SR seemed a perfect solution.
In this tutorial, we will learn how to control the fish tank lights and feeding the fish with voice commands through Google Assistant with Adafruit I/O MQTT & IFTTT protocols.
DemoAquarium lights
Feeding the fish
Closer look on the fish feeding
1: Set Up Adafruit MQTTFirst of all, we need an Adafruit account after loging in create a new feed.
- Go to Feeds > Actions > Create a New Feed
- Enter a name and description and click create
- Then Go to Dashboards > Actions > Create a Dashboard
- Also enter a name and description and click create
- Go to Dashboards > the one you created and click on the blue add icon to create a new block and choose slider
- Edit the block settings so the slider values are from 0-4 (2 lights on/off and 1 for feeder)
Copy your credentials (username and password) of io.adafruit to the mbed.org code in the next step
- press the yellow key to get these data
The project is provided below, but I will explain the main parts briefly.
The code on Mbed os is simply Uding the MQTT library ( if you don't know what is MQTT it's messaging protocol where one device subscribe to a certain topic and another publish to all subscribers )
- inside the main function
1- we subsribe to the topic "******/feeds/welcome-feed" from adafruit
2- connect to the host name with the username and password from last step
char* topic1 = "******/feeds/welcome-feed"; //******  type your username on IFTT instead of the stars
char* hostname = "io.adafruit.com";//your MQTT broker host
   int port = 1883; // broker port number
data.clientID.cstring = MQTTClientID;
   data.username.cstring = "*******";   //******  type your username on IFTT instead of the stars
   data.password.cstring = "************************";   //******  type your Password on IFTT instead of the stars
   if ((rc = client.connect(data)) != 0)
       printf("rc from MQTT connect is %d\n", rc);
   if ((rc = client.subscribe(topic1, MQTT::QOS0, messageArrived)) != 0) {
       out.printf("rc from MQTT subscribe is %d\n", rc);
   }
- In the messageArrived function we check the message received from the Adafruit io and based on the message we send another through serial communication to the Arduino
void messageArrived(MQTT::MessageData& md)
{
   MQTT::Message &message = md.message;
   out.printf("Message arrived: qos %d, retained %d, dup %d, packetid %d\n", message.qos, message.retained, message.dup, message.id);
   out.printf("Payload %.*s\n", message.payloadlen, (char*)message.payload);
   s.printf("%.*s\n", message.payloadlen, (char*)message.payload);//To send serial data to arduino
   int    i = atoi((char*)message.payload);
   switch(i) {
       case 0:   //start servo to feed the fish
           out.printf("Feeding");
           s.printf("Feed");
           break;
       case 1:    //turn lights on
           out.printf("Lights on");
           s.printf("ON");
           break;
       case 2:    //turn lights off
           out.printf("Lights off");
           s.printf("OFF");
           break;
       case 3:    //turn Dancing led strip on
           out.printf("Led Flashing");
           s.printf("Dance");
           break;
       case 4:    //turn Dancing led strip off
           out.printf("Led Not Flashing");
           s.printf("NoDance");
           break;
   }
}
click Compile and download the bin file to the Wiz750sr through the w7500 Isp tool make sure you tick "Erase all code Block" in order not to re-assign your mac address choose the com port and browse the binary file directory then click ISP start
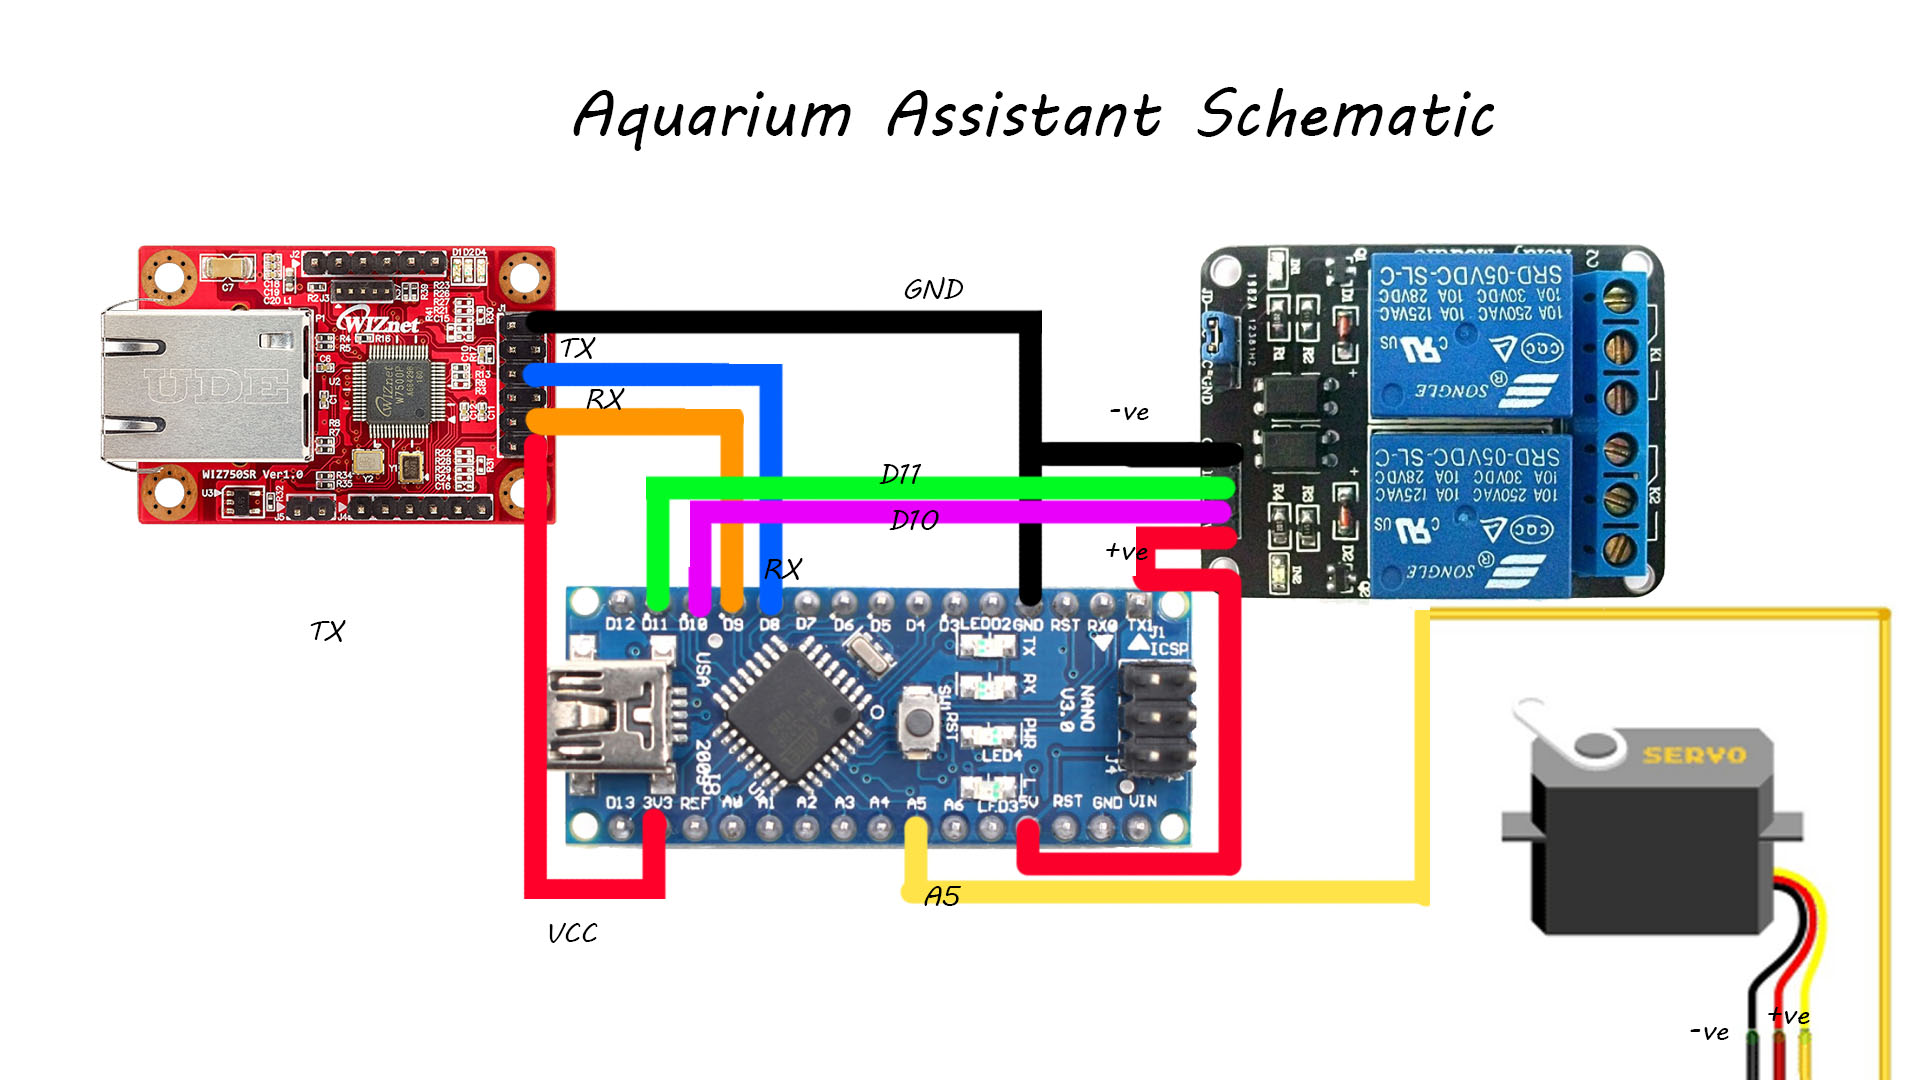
After connecting the arduino as the schematic and uploading the code it should now after recieving the message turn on/off the relay by digitalWrite function
Note: I have reversed the relay output unintentionally so it's in my case normally closed in other word digitalWrite LOW make it turn on and vise versa nothing important but incase you find it strange
else if (res == "ON") {
     Serial.println("Lights ON");
     //realy 1 on
     digitalWrite(10, LOW);   // turn the Relay on
     delay(1000);                       // wait for a second
   }
   else if (res == "OFF") {
     Serial.println("Lights OFF");
     //realy 1 off
     digitalWrite(10, HIGH);   // turn the Relay on
     delay(1000);                       // wait for a second
   }
   else if (res == "Dance") {
     Serial.println("Dancing Lights ON");
     //realy 2 on
     digitalWrite(11, LOW);   // turn the Relay on
     delay(1000);                       // wait for a second
   }
   else if (res == "NoDance") {
     Serial.println("Dancing lights OFF");
     //realy 2 off
     digitalWrite(11, HIGH);   // turn the Relay on
     delay(1000);                       // wait for a second
   }
- The other function is rotateServo(3) rotate the motor 3 times to ensure food has fallen in the tank
if (mySerial.available()) {
   String res = mySerial.readString();
   if (res == "Feed") {
     Serial.println("Feeding ur fish NOW");
     rotateServo(3);
   }
- Sign up and login to IFTT platform then create a new applet as follows
- Go to this link > select ‘+ this’ and Search for ‘Google Assistant’ then choose a trigger select ‘Say a simple phrase’
Fill in what you want to say and what should be the reply , choose 'English' language Then click on ‘Create trigger’
Now select ‘+that’
In choose action service page, search for ‘Adafruit’, connect to your adafruit account and authorize it
Choose action ‘Send data to Adafruit IO’ and Fill in your Feed name , Data to save , choose a number within the slider's value 0-4 , Then ‘Create action’ then click ‘Finish’ and Make sure your applet is turned ON.
Follow these steps again for the other actions (turning lights off , Feeding the Fish) with differnet slider value Now Let's Test that everything is working
5: Testing Our MQTT Brokermqttfx is an MQTT Client you can use to test in case the Publish-Subscribe protocol is new to you by opening 2 istanstence of the program and write the same topic with same broker address as "iot.eclipse.org", port "1883" but of course different client IDs and connect write anything to in the publish and send it the subscriber instance should receive it successfully try it again with adafruit data to confirm everything is correct Finally test using your android phone try asking Google Assistant to feed your fish and you should see the number you have written for this action in the subscriber's messages
After making sure everything is working well on the software end let get our hardware Ready
Mount the servo to a plastic cup that will be our fish feeder and connect the Relay to the output as in the picture , I have made this connection in-order not to damage the original cables of the Led Light strips and Aquarium Lamp.
Connecting the relay module
A more detailed schematic of the connection
Testing the relay
Testing the feeder servo
Working ProjectLink to the working project (as many MQTT libraries were causing problem compiling till I found this one working so I published it to easier than just main.c file).
https://os.mbed.com/users/Fady/code/Aquarium_Assistant/
Hope you liked the project! If you need any help creating yours, don't hesitate to ask here in the comments and I will be more than happy to help! Thanks!


Comments
Please log in or sign up to comment.