


Hardware components | ||||||
| × | 1 | ||||
 |
| × | 4 | |||
 |
| × | 34 | |||
 |
| × | 1 | |||
 |
| × | 1 | |||
| × | 2 | ||||
 |
| × | 1 | |||
| × | 1 | ||||
| × | 6 | ||||
| × | 3 | ||||
| × | 1 | ||||
| × | 1 | ||||
| × | 1 | ||||
Software apps and online services | ||||||
| ||||||
| ||||||
| ||||||
| ||||||
Hand tools and fabrication machines | ||||||
 |
| |||||
| ||||||
 |
| |||||
Hello,
Complicated PETG printing w/ no base layers as the lines build half layer by half line. See here. I will show the final print one day. About a minute vid. here while building w/ PETG and the Recore:
Updates and dually noted here, I have been trying to Print in PETG for about four weeks to about two months. Who can recall? Anyway...here is a vid. of me promoting the Recore, Klipper, and printing in PETG:
I have updated items to share about the board, this SBC called the Recore, as their is a newer version available that makes things a bit cleaner and safer to use:
This SBC pinout is located above for the Recore A6. You can find this photo and more info. at their wiki located here online: Recore A6 - iagent .
Also, there are some tutorials build in to test from userspace on their wiki for Refactor located online here: Refactor - iagent
If you read up on their work they put in for the Recore, you will find some neat 1 GHz, quad core aspects to the main processor. The co-processor is a STM32.
.................................
1. I have learned a couple things about 3D Printing (not enough).
2. Some of what I learned from testing and reading while also learning from others, keeps getting more interesting in the 3D World.
3. Klipper is its own thing in the 3D Printing World along with its use.
4. There are many aspects to 3D Printing that are all encompassing when in relation to one another.
5. I am basically saying that XYZ and E for a robot each separately controls each other in ways I never knew were possible.
6. If X is off in calculations, Y and Z may suffer a bit in a way that is detrimental to the print. If the Z-Axis is not fastened properly and the values accumulated to account for movement are skewed, the axes may suffer to the point where the print is not actually what is intended to print.
7. For instance, printing a simple cube of 20mm^3 may result in a measurement in the end that is not exactly 20mm^3. One of the three 20mm measurements may be skewed a bit and to the point where you can visually see it.
8. Measuring, accumulating data on builds, and making sure your calculations are all correct for your type and build environment are all things to take into account when using hardware from electronics.
.................................
There are two Refactor images in question for the Recore, i.e. both of which work on the Recore_A5. I have not tested the Recore_A6 yet with the Refactor 3.0.3 revision of the software.
I will post in a bit on the printer.cfg file for the Recore_A5 and Refactor 3.0.3 revision for people wondering what has changed, what configurations changed, and how to add specifics to your builds. Enjoy.
Okay...so. I figured out the configurations on the CURA slicer software and for the PrintrBot Simple Metal, one would need to use 50mm/s print speed and 90mm/s travel speed for good prints b/c of the Klipper Source and the mechanics of this particular printer. Here is the printer.cfg file for the 3.0.3 Refactor source and this specific printer:
# Recore_1403 config

[recore]
revision: A5
gain_t0: 1
gain_t1: 1
gain_t2: 1
gain_t3: 1
pullup_t0: 1
pullup_t1: 1
pullup_t2: 1
pullup_t3: 1
#offset_t0: 0
#offset_t1: 0
#offset_t2: 0
#offset_t3: 0

# The STM32F031 mcu
[mcu]
serial: /dev/ttyS4
baud: 250000
restart_method: command

# The AR100 mcu
[mcu ar100]
serial: /dev/ttyS1
baud: 1500000

#[static_digital_output endstops_5V_enable]
#pins: ar100:PG11, ar100:PG8

# pin high = 12V, pin low = 5V
[static_digital_output endstop_ES0_5V_12V]
pins: ar100:PG11, ar100:PG8

#[static_digital_output temperature_5V_enable]
#pins: ar100:PF1

#[static_digital_output over_current_alarm]
#pins: !ar100:PG1

[static_digital_output user_led_enable]
pins: PA12

#[static_digital_output enable_high_power]
#pins: !ar100:PG2

#[static_digital_output thermistor_pullups]
#pins: ar100:PD6, ar100:PD24, ar100:PF1

# Load "thermocouple" sensor
#[thermocouple]

[printer]
kinematics: cartesian
max_velocity: 500
max_accel: 3000
max_z_velocity: 25
max_z_accel: 10

[tmc2209 stepper_x]
uart_pin: ar100:PB1
tx_pin: ar100:PB0
uart_address: 0
run_current: 0.700
#hold_current: 0.500
#microsteps: 16
stealthchop_threshold: 250
driver_internal_rsense: 1
ref_resistor: 6800

[tmc2209 stepper_y]
uart_pin: ar100:PB1
tx_pin: ar100:PB0
uart_address: 1
run_current: 0.700
#hold_current: 0.500
#microsteps: 16
stealthchop_threshold: 250
driver_internal_rsense: 1
ref_resistor: 6800

[tmc2209 stepper_z]
uart_pin: ar100:PB1
tx_pin: ar100:PB0
uart_address: 2
run_current: 0.700
#hold_current: 0.500
#mircosteps: 16
stealthchop_threshold: 250
driver_internal_rsense: 1
ref_resistor: 6800

[tmc2209 extruder]
uart_pin: ar100:PB1
tx_pin: ar100:PB0
uart_address: 3
run_current: 0.700
#hold_current: 0.500
#microsteps: 16
stealthchop_threshold: 250
driver_internal_rsense: 1
ref_resistor: 6800

[stepper_x]
step_pin: ar100:PL4
dir_pin: ar100:PE8
endstop_pin: ar100:PH5
rotation_distance: 35
microsteps: 16
position_endstop: 0
position_max: 152
homing_speed: 15.0

[stepper_y]
step_pin: ar100:PL5
dir_pin: ar100:PE9
endstop_pin: ar100:PH6
rotation_distance: 35
microsteps: 16
position_endstop: 0
position_max: 152
homing_speed: 15.0

# probe
[probe]
pin: ar100:PH4
z_offset: 0.20
x_offset: 0.0
y_offset: 0.0

[stepper_z]
step_pin: ar100:PL6
dir_pin: !ar100:PE10
endstop_pin: probe:z_virtual_endstop
#endstop_pin: !ar100:PH6
rotation_distance: 1.50
microsteps: 16
#position_endstop: 0
position_max: 152.0
homing_speed: 8.0

[extruder]
step_pin: ar100:PL7
dir_pin: ar100:PE11
heater_pin: PA9
sensor_type: EPCOS 100K B57560G104F
sensor_pin: PA1
rotation_distance: 35
microsteps: 16
nozzle_diameter: 0.375
filament_diameter: 1.75
control: pid
pid_Kp: 22.2
pid_Ki: 1.08
pid_Kd: 114
min_extrude_temp: 30
min_temp: 0
max_temp: 300

#[extruder1]
#step_pin: ar100:PL8
#dir_pin: ar100:PE12
#rotation_distance: 40
#microsteps: 16
#nozzle_diameter: 0.400
#filament_diameter: 1.75
#heater_pin: PA9
#sensor_pin: PA1
#sensor_type: RECORE PT1000
#control: pid
#pid_Kp: 22.2
#pid_Ki: 1.08
#pid_Kd: 114
#min_temp: 0
#max_temp: 300

#[extruder2]
#step_pin: ar100:PL9
#dir_pin: ar100:PE13
#rotation_distance: 40
#microsteps: 16
#nozzle_diameter: 0.400
#filament_diameter: 1.75
#heater_pin: PA10
#sensor_pin: PA2
#sensor_type: PT100 INA826
#adc_voltage: 3.27
#control: pid
#pid_Kp: 22.2
#pid_Ki: 1.08
#pid_Kd: 114
#min_temp: 0
#max_temp: 300

#[heater_bed]
#heater_pin: PA11
#sensor_type: EPCOS 100K B57560G104F
#sensor_pin: PA3
#control: watermark
#min_temp: 0
#max_temp: 300

[fan]
pin: PB0

#[output_pin fan1]
#pin: PB1
#[output_pin fan2]
#pin: PB5
#[output_pin fan3]
#pin: PB4

# Set up board voltage, current, temperature.
[temperature_sensor board]
sensor_type: EPCOS 100K B57560G104F
sensor_pin: PA6
max_temp: 110
gcode_id: Board

[temperature_sensor cold_junction]
sensor_type: EPCOS 100K B57560G104F
sensor_pin: PA7
gcode_id: CJ

# Vout = Vin * 10K/110K = Vin*11
[adc_temperature v]
temperature1: 0.35
voltage1: 0
temperature2: 36.65
voltage2: 3.3

[temperature_sensor voltage]
adc_voltage: 3.3
sensor_pin: PA4
sensor_type: v
gcode_id: Voltage
# 1 A = 20 mV

[adc_temperature current]
temperature1: 0
voltage1: 0
temperature2: 165
voltage2: 3.3

[temperature_sensor current]
adc_voltage: 3.3
sensor_pin: PA5
sensor_type: current
max_temp: 20
gcode_id: Current

#[gcode_button over_current_alarm]
#pin: !ar100:PG1
#press_gcode: M112
...
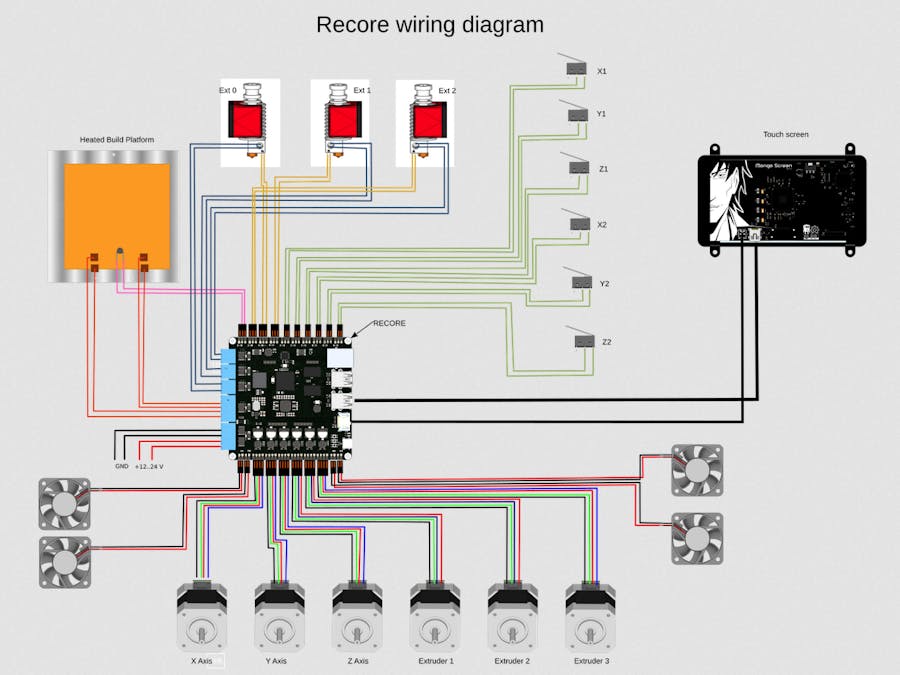
As you can tell from the above configuration file from what is possible on the Recore, there are room for three extruders, a hotbed, and more than three steppers.
...
More Updates: 4/25/2022...
Here is the updated video for 4/12/2022:
New! I made an knurled knob that I retrieved from an online site called Thingiverse.
Here...
Just an update here. It seems the STM32 on the Recore A6 (updated version shipping now) has PWM capabilities. So, if you are into making things with the advancement of this technology in your builds, well, it is available.
...
I think the people at https://wiki.iagent.no/wiki/Recore_A6 are working on making the PWM functionality more available and ready to deploy in your projects, i.e. as stated on the link just posted. So, w/out further ado, enjoy.
...
I want to start out by making a joke of myself. First, I gave up on the RepliCape, i.e. for reasons that will soon be understood.
...
The Recore is an updated board from similar folks from the iagent.no site and they have a discord channel if you look up #Recore maybe? Anyway, I thought, I once had the RepliCape working. Why not try one of their newer boards? This is what it took to have me sold. I have been around with their organization just for a bit and I am not affiliated.
I enjoy 3D Printing and making specific builds on particular machines. My machine for now is an older model Printer called a Metal Simple 1403. It was produced by a fellow at PrintrBot in '15 or before that time.
...
Anyway, here is the story about how I was destine to fail right off the bat. I added a heated bed to one of my builds. This build stop working. For the life of me, I could not figure out why or for what reasons until today, i.e. this morning actually.
NPN Sensors and my configured heated bed were not friendly with one another and the reasoning has to do with magnetic waves in metal. The NPN sensor picks up on these waves in metal from magnetism and replies accordingly.
My heated bed was a barrier and not a useful tool. Aw. I have seen better days as you can tell. Not only did I beat myself by not educating myself more on my specific build, the NPN sensor could not detect magnetism of the iron/steel of the 6^3 build plate.
I was destine to quit! I know. Shameful. But, in hindsight, I would not know this lesson so well as I do as of now. Currently, I feel overwhelmed in thought, i.e. what could I have produced? Where would I be? What would I have PRINTED?
All jokes aside, NPN sensors and metal need each other. Inductance!
I do not want to get to into inductance now, i.e. as I would have to research more ideas than I currently have jumbled in my brain. Long story, long...the RepliCape is coming back!
I will make another post soon on it. Now, down to the Recore! So, this thing has a AR100 64-bit processor and a separate STM chip to handle specifics. If you go to their wiki, which I did get the front image from just now, you will see a plethora of ideas related to their conquest into single board computing and 3D Printing/CNC.
Here I am just chatting away about my hobby. Enjoy!
...
Here is that link now: https://wiki.iagent.no/wiki/Recore. You can see on this page what the STM handles and what the A64 handles in relation to the pinout and processing acquisition.
...
Anyway, here is a nice overview to familiarize yourself with the board:
They have some neat ideas on schematics, instruction, and other relative ideas on source with gpiod on their github.com page and the Recore Wiki page(s).
So, to start, one would have to grab an image from this link: https://github.com/intelligent-agent/Refactor.
You can use etcher or dd or another utility to burn the image onto a USB Drive. Now, w/ a USB-C to USB 3.0 cable, plug in your USB-C into the board and plug in your USB Drive with the written image on it.
The board will boot and one would sign in via:
user name: root
password: kamikaze
You will be prompted to enter a username and passwd. Enter at will!
This is where you will most likely be doing some computations and programming in.cfg file format. There is a printer.cfg file that handles what Klipper and OctoPrint understand as a real set of instructions for pinmuxing.
So, a common set up of the pinmuxing comes with the image that was installed on the USB Drive under /debian/printer.cfg.
...
One would use ip addr and ssh on Linux or PuTTY on Win 10 to handle a single sign on on your Recore.
It is easy on Windows to handle finding your IP Addr on the Recore. You can ssh into the Recore once you find your IP Addr. For instance on my end...I have 192.168.xx.xxx. I signed in, set up credentials, and was blazing through some new filesystems that you will see once booted.
Now, w/ that same IP Addr, type that IP Addr in the browser search bar along with the :5000 Port entry. So, if your IP Addr is 192.68.7.445, one would simply type:
192.168.7.445:5000
That will bring you to OctoPrint's web server...there are some tricks so far if you get errors during your 3D Printing routines.
Under the Klipper radio button, there is another radio button called Firmware. This restarts the firmware on the Recore and in the OctoPrint source/web server, it handles as a short reboot of "senses" for the board.
...
I will be showing some printing later, e.g. as my heated bed is still on my printer. I wanted to configure things to the "T" and then proceed w/out the heated bed w/ my NPN sensor still attached.
But, there are the regular four stepper motors for use, e.g. XYZ and E for extruder.
Then, you have a place for your hot end, thermistor(s), fan(s), and/or other peripherals/modules in use.
...
Anyway, the ideas from these guys and gals too, I guess, were spot on. I failed them in the beginning by blasting rare conditions that were not unheard but that were misunderstood. Some specific error codes mean specific things but if it is a hardware issue, like with me and heated bed with the NPN sensor, Discord may be a bit odd at first if you are thinking about purchasing a board or are already using a board from their organization.
...
Trust me, the error, "MCU shutdown ADC out of range, " has plagued my screen many times on the OctoPrint web server.
This was due to hardware issues I could fix and software issues I should have read about during my time not knowing what was going on. So, instead of issues and lessons here, let us dive into more 3D Printing.
Recore:
- has a 64-bit main processor and a 32-bit arm processor for separate tasks
- has many I/O pins all dedicated to specific tasks, i.e. whether it is CNC or 3D Printing
RepliCape:
- Attaches to a BBB or other am335x board
- Uses PRU (Programmable Realtime Units) for specific tasks...
...
I use a regular 12v 12.5A switching power supply to handle the steppers, fan, hotend, thermistor, and endstops including the NPN inductive sensor.
...
Now that we all had fun at my expense, this is a highly educated board. Neat to own, fun to use, and works. Two cents here working its magic!
...
So, outside of kiss and tell, WHEN WILL I SHOW SOME PRINTING? Soon. Not right now but soon...
Seth
P.S. If you need any other info. please attend an online learning session on 3D Printing etiquette and glossary terminology. It will definitely save you a big upset of a time.
Oh!
...
If you finally break down and get this board for your Printing/CNC needs/wants, make sure you have a USB 3.0 port on your computer. This will save you a ton of debugging issues. Sometimes it is the simplest things that keep us from having fun w/ Mr. Safety! Yes, I typed that out.
Oh...again!
Here is my current printer.cfg file for the cartesian printer I am using:
# Generic Recore config
# The STM32F031 mcu
[mcu]
serial: /dev/ttyS4
baud: 38400
restart_method: command
# The AR100 mcu
[mcu ar100]
pin_map: ar100
serial: /dev/ttyS1
baud: 1500000
[printer]
kinematics: cartesian
max_velocity: 500
max_accel: 3000
max_z_velocity: 25
max_z_accel: 30
# In order to enable 100 times gain for thermocouples,
# uncomment the following lines
#[static_digital_output gain_100]
#pins: !ar100:PD4, !ar100:PH11, !ar100:PE17, !ar100:PB2
[static_digital_output enable_high_power]
pins: !ar100:PG2
[static_digital_output over_current_alarm]
pins: !ar100:PG1
[static_digital_output endstop_5V_12V]
pins: ar100:PG11, ar100:PG8
[static_digital_output thermistor_pullups]
pins: ar100:PD6, ar100:PD24, ar100:PF0, ar100:PF1
[static_digital_output user_led]
pins: PA12
[tmc2209 stepper_x]
uart_pin: ar100:PB1
tx_pin: ar100:PB0
uart_address: 0
microsteps: 16
run_current: 0.500
hold_current: 0.500
stealthchop_threshold: 250
driver_internal_rsense: 1
ref_resistor: 6800
[tmc2209 stepper_y]
uart_pin: ar100:PB1
tx_pin: ar100:PB0
uart_address: 1
microsteps: 16
run_current: 0.500
hold_current: 0.500
stealthchop_threshold: 250
driver_internal_rsense: 1
ref_resistor: 6800
[tmc2209 stepper_z]
uart_pin: ar100:PB1
tx_pin: ar100:PB0
uart_address: 2
microsteps: 16
run_current: 0.500
hold_current: 0.500
stealthchop_threshold: 250
driver_internal_rsense: 1
ref_resistor: 6800
[tmc2209 extruder]
uart_pin: ar100:PB1
tx_pin: ar100:PB0
uart_address: 3
microsteps: 16
run_current: 0.500
hold_current: 0.500
stealthchop_threshold: 250
driver_internal_rsense: 1
ref_resistor: 6800
[stepper_x]
step_pin: ar100:PL4
dir_pin: ar100:PE8
endstop_pin: !ar100:PH9
step_distance: .0225
position_endstop: 0
position_max: 152.4
homing_speed: 2.0
[stepper_y]
step_pin: ar100:PL5
dir_pin: ar100:PE9
endstop_pin: !ar100:PH8
step_distance: .0225
position_endstop: 0
position_max: 152.4
homing_speed: 2.0
# probe
[probe]
pin: ar100:PH4
z_offset: 2.122
[stepper_z]
step_pin: ar100:PL6
dir_pin: ar100:PE10
endstop_pin: probe:z_virtual_endstop
position_min: -2
#endstop_pin: !ar100:PH7
step_distance: .0225
#position_endstop: 0
position_max: 152.4
homing_speed: 2.0
[extruder]
step_pin: ar100:PL7
dir_pin: ar100:PE11
heater_pin: PA8
sensor_type: EPCOS 100K B57560G104F
sensor_pin: PA0
step_distance: .0225
nozzle_diameter: 0.400
filament_diameter: 1.75
control: pid
pid_Kp: 22.2
pid_Ki: 1.08
pid_Kd: 114
min_extrude_temp: 30
min_temp: 0
max_temp: 300
pullup_resistor: 4755
adc_ref: 3.301
vo_ref: 3.21206
pullup_ref: 3.27
#[heater_bed]
#heater_pin: PA11
#sensor_type: EPCOS 100K B57560G104F
#sensor_pin: PA3
#control: watermark
#min_temp: 0
#max_temp: 300
#pullup_resistor: 4755
#adc_ref: 3.301
#vo_ref: 3.21206
#pullup_ref: 3.27
#[extruder1]
#step_pin: ar100:PL8
#dir_pin: ar100:PE12
#step_distance: .004242
#nozzle_diameter: 0.500
#filament_diameter: 1.75
#heater_pin: PA9
#sensor_pin: PA1
#sensor_type: EPCOS 100K B57560G104F
#control: pid
#pid_Kp: 22.2
#pid_Ki: 1.08
#pid_Kd: 114
#min_temp: 0
#max_temp: 210
#[extruder2]
#step_pin: ar100:PL9
#dir_pin: ar100:PE13
#step_distance: .004242
#nozzle_diameter: 0.500
#filament_diameter: 1.75
#heater_pin: PA10
#sensor_pin: PA2
#sensor_type: EPCOS 100K B57560G104F
#control: pid
#pid_Kp: 22.2
#pid_Ki: 1.08
#pid_Kd: 114
#min_temp: 0
#max_temp: 210
# Print cooling fan (omit section if fan not present).
[fan]
pin: PB0
#[output_pin fan1]
#pin: PB1
#[output_pin fan2]
#pin: PB3
#[output_pin fan3]
#pin: PB4
[temperature_sensor board]
sensor_type: EPCOS 100K B57560G104F
sensor_pin: PA6
gcode_id: Board
[adc_temperature v]
temperature1: 0
voltage1: 0
temperature2: 24
voltage2: 3.3
[temperature_sensor voltage]
sensor_pin: PA4
sensor_type: v
gcode_id: Voltage
[adc_temperature current]
temperature1: 0
voltage1: 0
temperature2: 24
voltage2: 3.3
[temperature_sensor current]
sensor_pin: PA5
sensor_type: current
gcode_id: Current
It can do it!
Here is the invite to the Discord channel in case you would like to learn more or to adapt this high end, Linux board for your next 3D Printer adventure: https://discord.gg/esfv9jRs .
If you want more info. on the images, boards, and revisions:
1. https://wiki.iagent.no/wiki/Recore_A6
2. https://github.com/intelligent-agent/Refactor
Currently, I am learning about 3D Printing more and learning how to print better prints w/ PLA, PETG, and ABS. PLA, for this beginner here, seems the easiest. As so, me printing in PLA does not need a heated bed or a particular set of tests to nail a good print.


Comments
Please log in or sign up to comment.