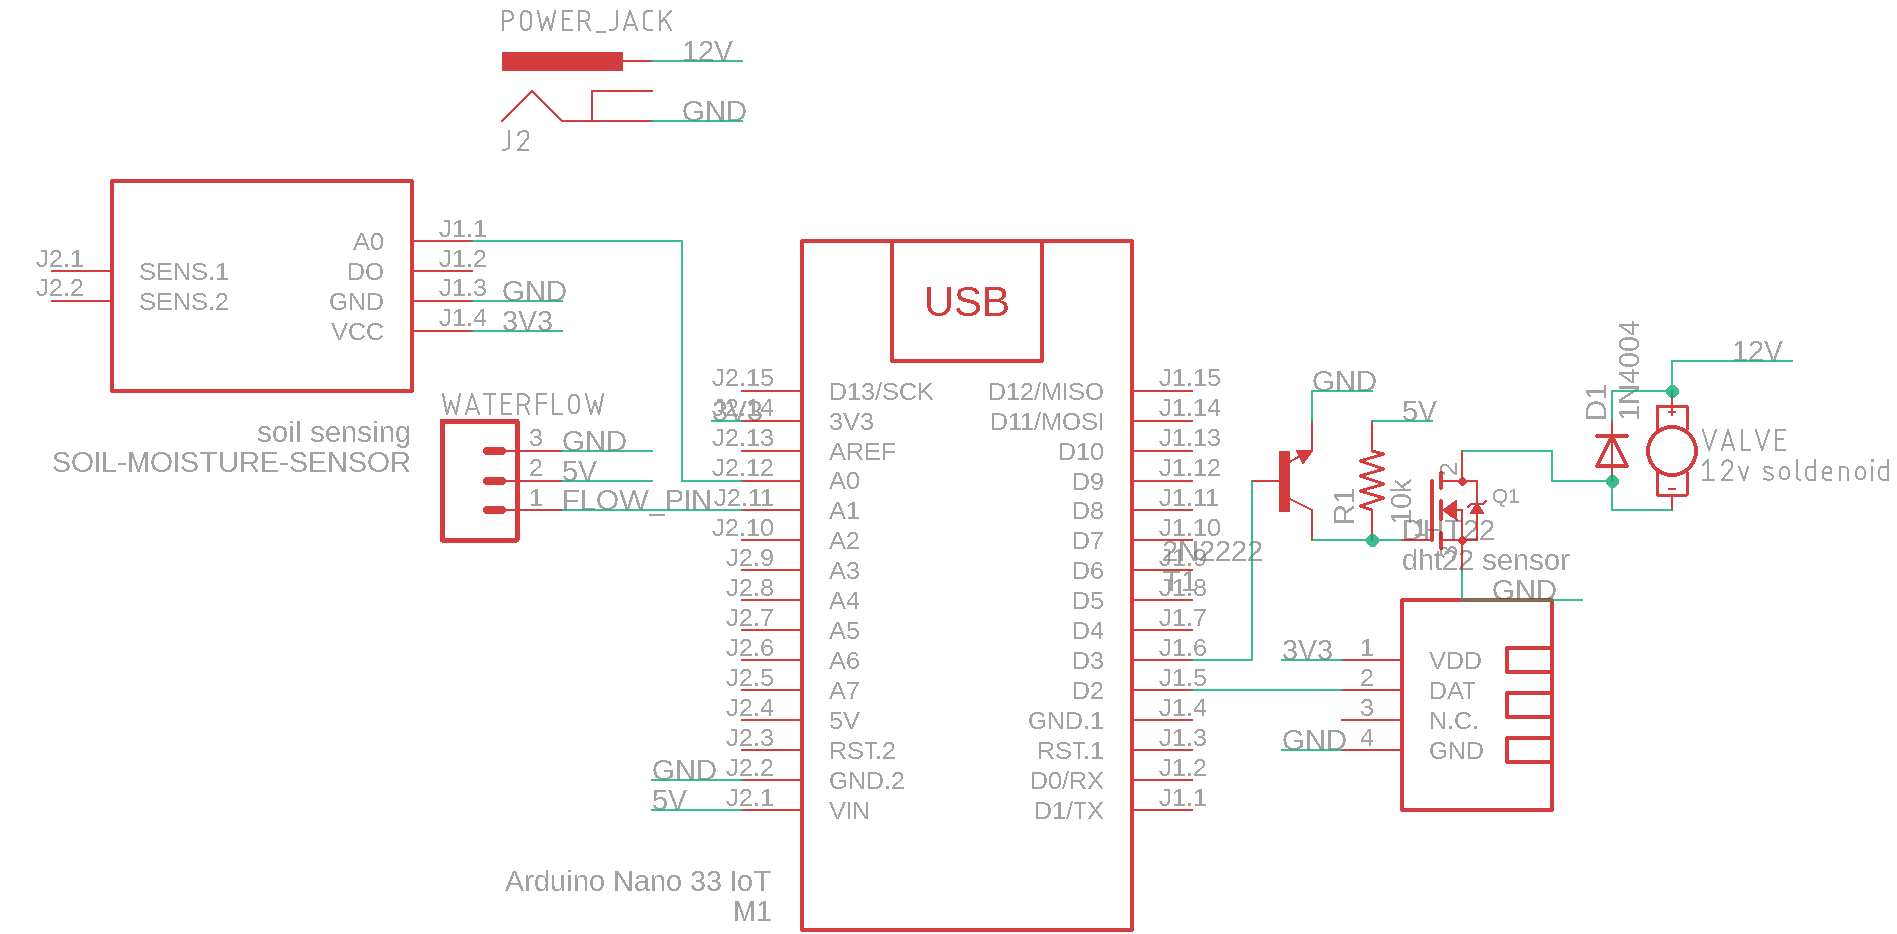
I wanted this project to expand on several of my previous projects, such as the Particle Photon Soil Moisture Monitor and the Azure Sphere Weather Station.
This time, however, I wanted the device to also be able to water plants and have telemetry data easily viewable on a cloud dashboard. Arduino recently released their new line of Arduino Nano boards, one of which has IoT and BLE, and can also integrate easily into their cloud service.
Before any measurements can be taken, the Arduino Nano 33 IoT board must be setup in the Arduino Cloud. To begin, go to the thing overview page and click the NEW THING button. Then, click on the Set up a Nano 33 IoT image.
Download and install the plugin, while making sure to install the necessary drivers and giving the software permissions. After that has been completed, give the board a name that is easily recognizable.
Upload the test sketch after entering in the necessary WiFi information on the Arduino Secrets tab. Now that it’s connected to the cloud, play around with it a bit and make sure the light toggles when given the ‘ON’ and ‘OFF’ commands.
And success! The device is now ready.
Configure the CloudThe Arduino Cloud IoT ecosystem stores projects as “Things”, and each Thing can have properties and even webhook integrations. A property is basically a cloud variable that can be viewed and/or changed by either the board itself or on the cloud. For my smart gardening system, I needed five properties: temperature, humidity, soil moisture, water flow rate, and a way to open or close the valve.
I clicked on ADD PROPERTY for each of these and entered in the relevant information. For example, I selected the data type “Relative humidity”, which automatically represents the floating-point value as a percentage.
I also set the value to range to 0-100, as a relative humidity percentage won’t go above 100%. Finally, I set the permission to Read Only and Update rate to every 10 seconds.
Here is an overview of all five of the properties in a list:
For measuring the temperature and humidity, I went the DHT22 sensor from DFRobot.
It is accurate and has an update rate of 1Hz, which is fast enough for this application. In order to control the flow of water, I needed an actuated valve. Thankfully, DFRobot carries a solenoid valve that operates at 12v, that when used in conjunction with a MOSFET, will work perfectly with the Arduino board.
Their soil moisture sensor simply outputs an analog value that is proportional to the amount of water in the soil, as resistance decreased when more water is present.
Finally, I needed a way to monitor the amount of water flowing through the hose, which is where the Water Flow Sensor comes into play.
It uses a hall-effect sensor that activates every time the internal rotor spins. In this case, 450 revolutions equate to one liter of water.
ProgrammingOverall, the programming for the smart gardening system is quite simple. Those properties that were configured earlier also live in the sketch. The thingProperties.h file adds them to the Arduino Cloud client, and it also stores the WiFi SSID and PSK.
The Arduino Nano 33 IoT board first connects to the Arduino IoT Cloud Service and then attaches pin A1 as an interrupt.
This is done because the flow meter works by sending pulses of high and low voltage, so it is necessary to count the number of times it goes from LOW to HIGH in a second with precision. In each call of the loop() function, the cloud client is first updated to send and check new information. Next, It updates the telemetry variables every 1500 seconds, and resets the pulse count to 0 every second, because the flow is measured in liters per second.
When the moisture level in the soil drops below a certain level, the valve is opened to allow water to flow through it, and then it is closed when the moisture level is at an acceptable amount.
Building a RigI started by connecting the valve to a garden hose with a PVC ¾” to ½” adapter. Next, I attached the solenoid valve to the flow meter with a ½” to ½” PVC piece. Lastly, I used a ½” to ¾” adapter to connect the flow meter to a length of PVC tubing and capped the end. Since it is a sprinkler, I also drilled several holes along the PVC pipe to allow water to shoot out.
To use this contraption, I set it outside, near my garden beds, pointed towards the plants. Then I inserted the soil moisture sensor into the garden soil and added power. The whole system worked wonderfully, as it was able to automatically switch on or off depending on the weather and I could see the data in real-time.


Comments
Please log in or sign up to comment.