

Hardware components | ||||||
 |
| × | 1 | |||
 |
| × | 1 | |||
| × | 1 | ||||
 |
| × | 1 | |||
 |
| × | 1 | |||
Holograms are awesome!
Lasers are awesome!
Remote-control tech is awesome!
LET'S PUT THEM ALL TOGETHER
The holograms I make—"Denisyuk" or "reflection" holograms—are 3D images captured in glass, which can be viewed using an ordinary point source of light (one where all the rays emanate from a single lamp). I use a kit that produces beautiful, ruby-red holograms.
But this kit has a few drawbacks. As with most holography setups, it requires a dark environment that's free of ambient red light (including white light that includes red wavelengths). I have a surprisingly hard time with this in SF!
Plus, if you go in search of such a place, you have to set up and break down the kit every time, fitting together the plastic pieces. The reflection hologram addition in particular includes a tower that holds the laser, also made from laser-cut pieces that don't always fit perfectly. And wobbles kill holograms!
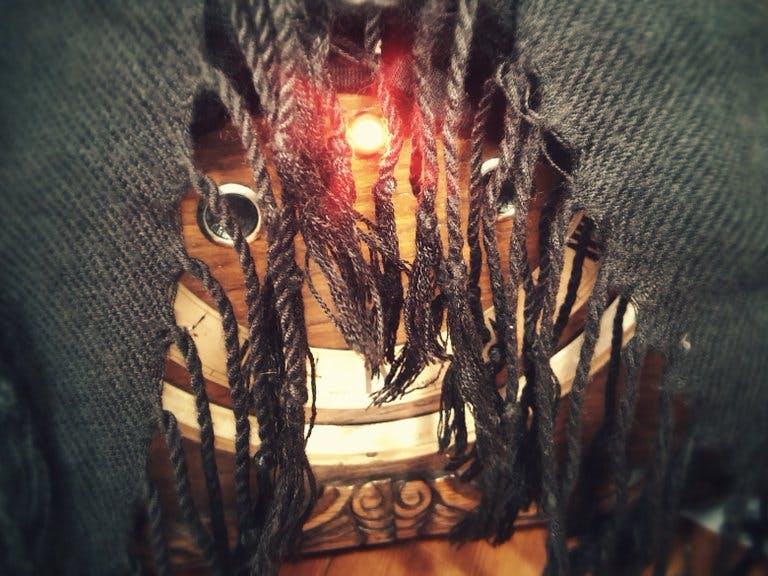
The HoloClock solves both of these problems. It's like a portable, tiny darkroom (or if you prefer, camera obscura). And it's pretty solid, with the plate and laser supported by structural wood and metal armature wire attached directly to the original carriage clock structure.
...So, what's a hologram now? Here's my super-old explanation, and a previous tutorial on using the Litiholo kit that we're adapting here. Lots of photos!
I initially built this with the Particle Photon, and you can certainly go that way, too.
I have an updated version, which runs on BLE and tends to function better in signal-heavy environments.
This project is heavily based on James Siegel's "Prestart" project. He did the heavy lifting to write code to make the AWS IoT Button push data to the Photon.
First, you'll want to take the diode laser from your LitiHolo kit and connect the red wire into pin D0, and the black wire to GND.
Scroll down this page, copy HoloClock.ino, paste it into the Particle cloud editor, and flash your Photon.
Finally, copy a couple of strings to a notepad and keep them handy: the Photon's device ID (find this via the "Devices" icon in the left sidebar for this), and your personal access token (via the "Settings" gear icon).
That's it!
Once you've got your hands on an IoT Button, follow James' tutorial for the full instructions, including the Lambda function; if you need more detail, check out Monica's in-depth guide to the initial setup process.
Basically, you'll first tell your IoT button which WiFi network to connect to and then set up a chain of objects, commands, and permissions to link everything together.
A couple of tips:
- When configuring your IoT button's WiFi network, use your phone's tethering, to keep it truly mobile. (Plus, if it's a sensitive application, you can keep tethering off to completely disable the button.)
- As you're wrapping up the button's initial setup, you'll have a choice between setting it to send a text, send an email, or do something custom. Pick the texting option: you can easily make sure that the button is working, for field debugging, and from here it's a very minor tweak to add in the Lambda function for Photon control.
You probably don't have a broken carriage clock sitting around, but any heavy, hollow thing with a matte black interior will do. I like this one 'cause it looks cool, has built-in doors, could potentially be used as a display as well as a shooting rig, and is nice and heavy to dampen vibrations.
I pulled out everything that makes it work – a.k.a. steampunk bait – and added a piece of square wooden dowel, painted black, to prop up the holography plate. A piece of sturdy aluminum armature wire holds the laser diode and its heat-sinking clip; all wires are threaded through a hole in the bottom that originally held the "BONGGGG" spring in place. I super-glued that up so everything would stay put when it's moved, and painted black over the glue.
There were two other holes, as well, which I plugged with Sugru.
Finally, I stuck some felt furniture feet to the bottom, in three spots since a tripod is always stable. No wobbling! And the felt will absorb vibration better than the existing wooden standoffs.
4. Get your holo on!Here's my original tutorial on using the Litiholo kit. The great thing is, this film is self-developing – like a Polaroid camera for holograms – and isn't super sensitive, so it requires longer exposure times than normal holo plates. But that means you can be a little more liberal with your choice of surroundings; I've made successful exposures with this enclosure in a room that wasn't light-sealed.
My first couple of successful exposures with this kit feature a bottle-cap I got in Berlin, with the famous bear on it. (It's from c-base!) I stuck it to a couple of hematite oblongs via their inherent magnetism, then anchored those to the base of the clock using neodymium disc magnets on the bottom. It worked like a charm! Super stable. :)


Comments