For quite awhile I've been meaning to learn about cryptocurrencies. So after seeing the Hackster.io contest Machine Money: Empowering Devices with Wallets with Iota in my news feed and happily having some time for projects, the two necessary, but not sufficient, components of new completed project were in place: incentive and time. The last, required element, was an idea!
As I scribbled down ideas and sketched them out, they all shared a fatal flaw: data sharing but not currency exchange. Back to the mental drawing board and some intensive naval gazing... What if...no...huh, nah..., maybe, yes, that's it.
One of my initial ideas was an exercise or activity tracker that would send your activity data to your health insurance provider for discounts on your benefits. A little bit artificial, and a little bit staid and sterile, not too much fun. Then I thought, the heck with insurance discounts, jelly beans! How many pedal-calories per Jelly Bean? How many iota per calorie per Jelly Bean? Too much nutritional science, relax, have fun with the M2M economy concept...M2M rhymes with M&M. Yes! That's it! Pedal an exercise bike, get M&M's! Fun, definitely will require much field testing to ensure, value transfer on the IOTA Tangle! And of course, M&M's are much healthier than Jelly Beans!
The Project in OutlineMy Iota Machine-2-Machine economy consists of 2 machines:
- Activity Counter - Raspberry Pi Zero W with a proximity sensor to detect pedal rotations.
- M&M's Dispenser - Raspberry Pi 3 - Model B in a pi-topCEED driving a servo motor.
Both Pi's will run the Python Iota library, PyOTA, using the examples from the Python Iota Workshop to help guide software development.
Prototyping Machine 2 - The Candy DispenserPrototyping began with Machine 2, the M&M's dispenser. Go figure... However, I started with the software, not the hardware.
My Pi 3 is still running Raspbian Stretch and Python 3.5.3. Installation was straight forward following the instructions on the workshop page.
The minimum function for the M&M's dispenser is to check its 'account' balance for the presence of 3 'new' Iota tokens. If 3 tokens are present, it will dispense M&M's to you. Why 3? It so happens that for whatever reason my 3D printed dispenser dispenses 3 M&M's, at least most of the time!
A seed is required for a machine to generate an 'account', or address. In fact, seeds are essential to the whole Iota system for transfer of value. Your seed is your unique identifier. Its consists of 81 characters(A-Z & 9 only), must be saved and never shared. Think of it like the name, number and security code on your credit card. It is your ultimate proof of ownership of a given amount of Iota.
Addresses are derived from seeds. Addresses are public must be shared to receive Iota tokens. You can have, but must if sending tokens, have many addresses corresponding to your single seed.
Seeds and AddressesThe following command line on the Raspberry Pi will generate a seed :
cat /dev/urandom |tr -dc A-Z9|head -c${1:-81}
Once we have a seed, we can obtain some Iota to experiment with. The Iota Foundation has provided the Iota Faucet which provides 1000 tokens at a pop to a given address. To receive these tokens, use the seed to generate an address.
I simply ran e04_generate_address.py, from the Python Iota Workshop:
'''
In this example we generate 1 address with a security level of 2 (default)
for a given seed. This is the first available, unused address for this seed.
'''
from iota import Iota
# This is a demonstration seed, always generate your own seed!
seed = 'YOUR SEED HERE'
api = Iota('https://nodes.devnet.thetangle.org:443', seed)
# We want the first address for this seed (index 0), make sure it hasn't been spent from before!
addresses = api.get_new_addresses(index=0, count=1, security_level=2, checksum=True)
address = addresses['addresses'][0]
print('\nThe first available address for your seed: %s' % address)
print('Go to https://faucet.devnet.iota.org and paste this address here to receive devnet tokens now\n\n')
In the code above, I changed the provided seed with my seed for Machine 02 and I also changed the Iota network to https://nodes.devnet.thetangle.org:443. Devnet is test bed network to use in testing Iota applications without risking real Iota. Both Machine 2, Machine 1(and my Trinity Wallet) will have their own seeds and therefore the ability to store, maintain and send value! 1 project, 2 Iota wallets!
After executing this script you can cut & paste it the generate address into your code or redirect it into a file to ease use, or both!
Use your browser and go back the Iota faucet, and cut and paste your way to some tokens!
The Python Iota Workshop contains the essential examples to get an Iota project up and running. I started the code for Machine 02 using the check balance example. I'll only highlight the essential lines of code here with the full listing in the code attachments sections below.
# ## iota Setup
print("Setting up iota now...")

seed = ''
api = Iota('https://nodes.devnet.thetangle.org:443',seed)

addrStr = 'KJJCIEYNUUDPOWRCIZTTXXEPFBNMIMUCAFRNRLWHOIXYGALBUVWQHEDGNLMBV9B9VAYIJEYPZJTNURWTD'
chkSumStr = 'KJJCIEYNUUDPOWRCIZTTXXEPFBNMIMUCAFRNRLWHOIXYGALBUVWQHEDGNLMBV9B9VAYIJEYPZJTNURWTDKPFZRXRPX'
I have blanked out the seed here, but not the address that was generated from it. For this script, I chose this option because Machine 2, will only need to receive tokens. To check the balance, create an Iota object called api here and pass it the network address and seed. The Iota object is then used to interact with your specific 'account'.
I also have the Check Sum, chkSumStr, variant of the address, this will be required to generate the QR code to accept coins from the Trinity Wallet(see section below).
def checkBalance():

    global oldBalance
    global CANDYCOST
    global redLED
    global greenLED

    currentBalance = api.get_account_data()['balance']
    if ((currentBalance-oldBalance) >= CANDYCOST):
        print("You earned some candy!")
        redLED.value = False
        greenLED.value = True
        oldBalance = currentBalance - 3
        dispense()
        time.sleep(3.0)
        greenLED.value = False
        redLED.value = True
     else:
        print("Sorry, not enough iota, exercise some more!")
        time.sleep(3.0)
The function, get_account_data(), returns a dictionary of 3 elements: A List of addresses, the balance as an int and a List of bundles. Here we just grab the balance and call it the "old" balance. Any new Iota in excess of this balance and greater than 3 or CANDYCOST, will count towards getting you M&M's after starting the Candy Dispenser up.
The global statements allow us to use these variables specified outside of the function, like a pass by reference. Ugly and a bit dangerous, but it works for this simple and short Python script.
That's about all I want to highlight from Machine 2 relevant to Iota.
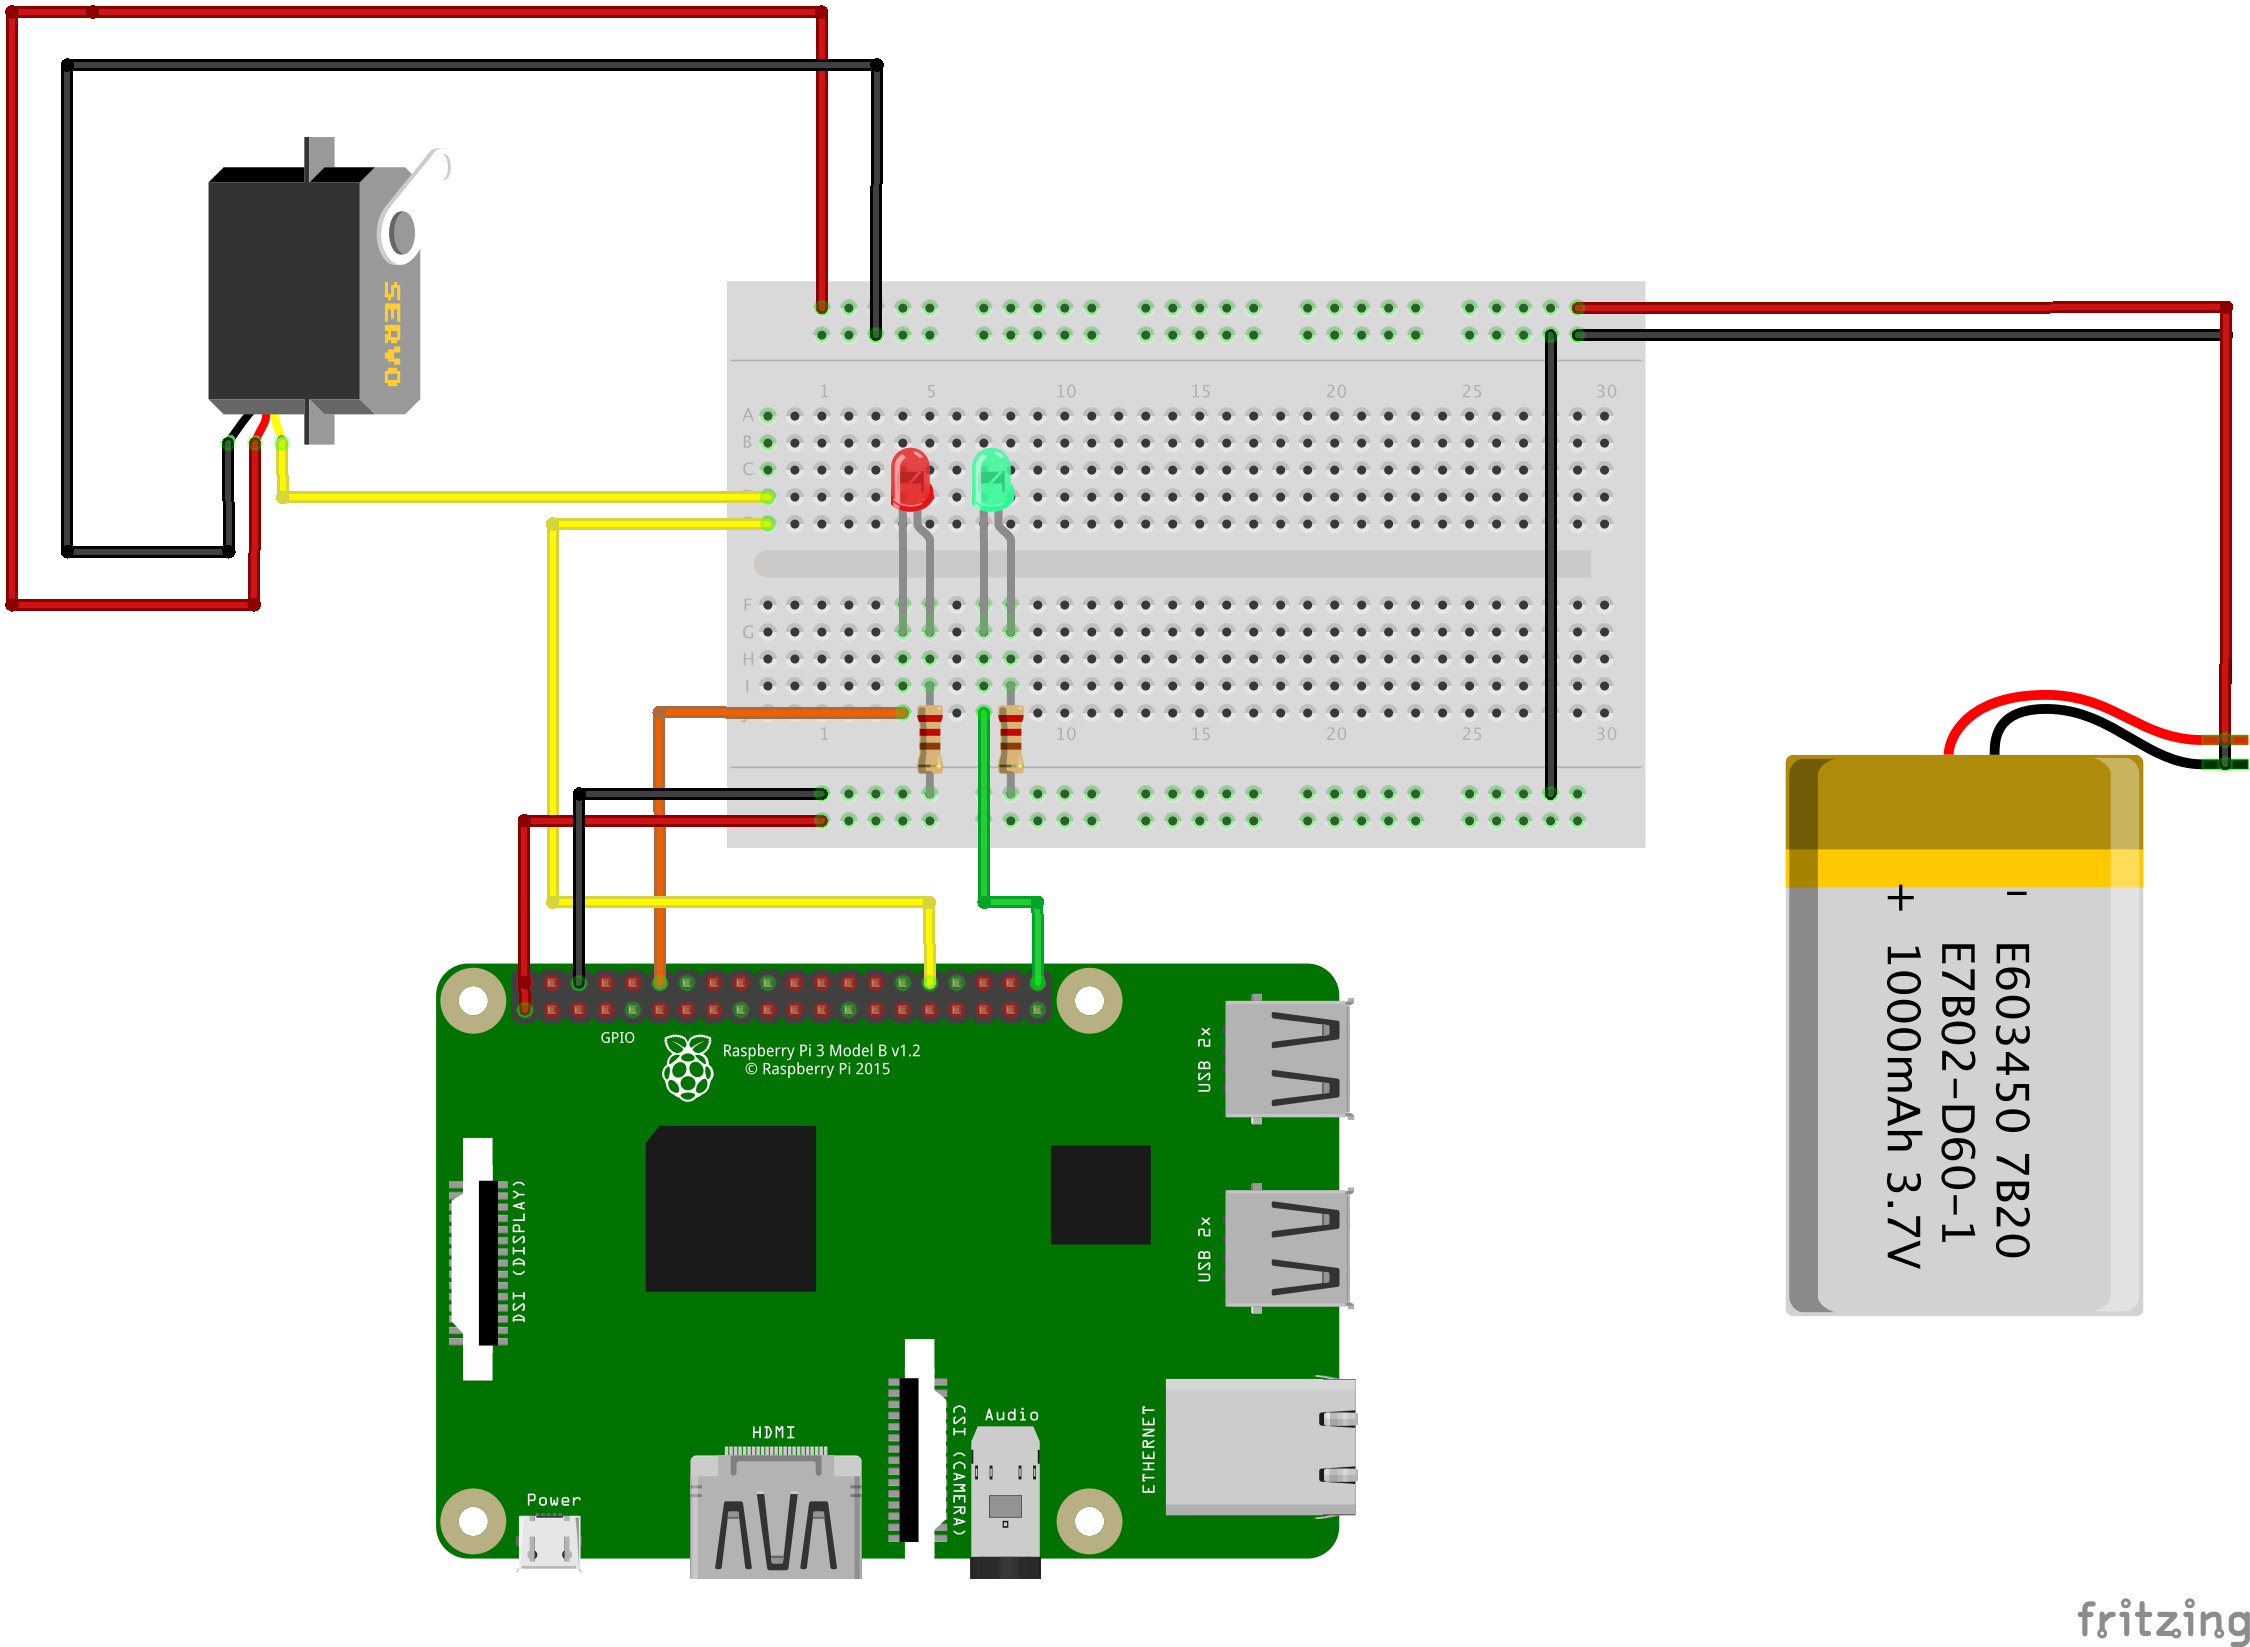
Machine 2 - The Hardware- 1 pi-topCeed screen & enclosure
- 2 pi-top Hub
- 3 Raspberry Pi B+
- 4 Candy Dispenser
- 5 Coffee
Machine two is 'embedded' within the pi-topCEED enclosure. I love working on my RPi with this device. It allows easy interaction, whether you are a windows/point-and-click type or a terminal window/command line type, or you can switch back and forth! You can also interact with the GPIO pins easy, either with the pi-topProto board or as I have by just plugging jumper wires directly into the hub as long as you have the pinout diagram for this!
Prototyping Machine 1 - The Activity CounterMachine 1 is the activity counter, and the code is even simpler( thanks to the PyOTA library!) then Machine 2.
The basic, minimum function of the Machine 1 is to count your activity level and send iota tokens after a certain amount of activity has been recorded.
Turning again to the Python Iota Workshop, I started from the e06_send_tokens.py code example, with these changes:
- The seed is the seed under which an address was generated to receive tokens from the devnet faucet for Machine 1.
- The address, machine02Address, is the address of Machine 2, the candy dispenser.
- The value is 3 for 3 iota
# seed of this device, MACHINE01(counter)
seed = ''
# Phase 01, permanent address of MACHINE02(dispenser)
machine02Address = 'KJJCIEYNUUDPOWRCIZTTXXEPFBNMIMUCAFRNRLWHOIXYGALBUVWQHEDGNLMBV9B9VAYIJEYPZJTNURWTD'
api = Iota('https://nodes.devnet.thetangle.org:443', seed)
Because we are likely to send many transactions each time the Python script is run, we need to shift the location of the transaction relevant code to within a while loop and remake a tx every time we exceed the number of pedal rotations to earn our Iota.
if (waveCount>9):
    greenLED.value = False
    redLED.value = True
    tx = ProposedTransaction(
         address=Address(machine02Address),
         message=TryteString.from_unicode('3i for some M&Ms!'),
         tag=Tag('MANDM'),
         value=3      )
    tx = api.prepare_transfer(transfers=[tx])
    result = api.send_trytes(tx['trytes'],depth=3, min_weight_magnitude=9)
In terms of our interaction with Iota, nothing else in the send tokens example code changes! The Python Workshop examples are truly powerful. Once the mechanism for recording pedal rotations is in place, you are done!
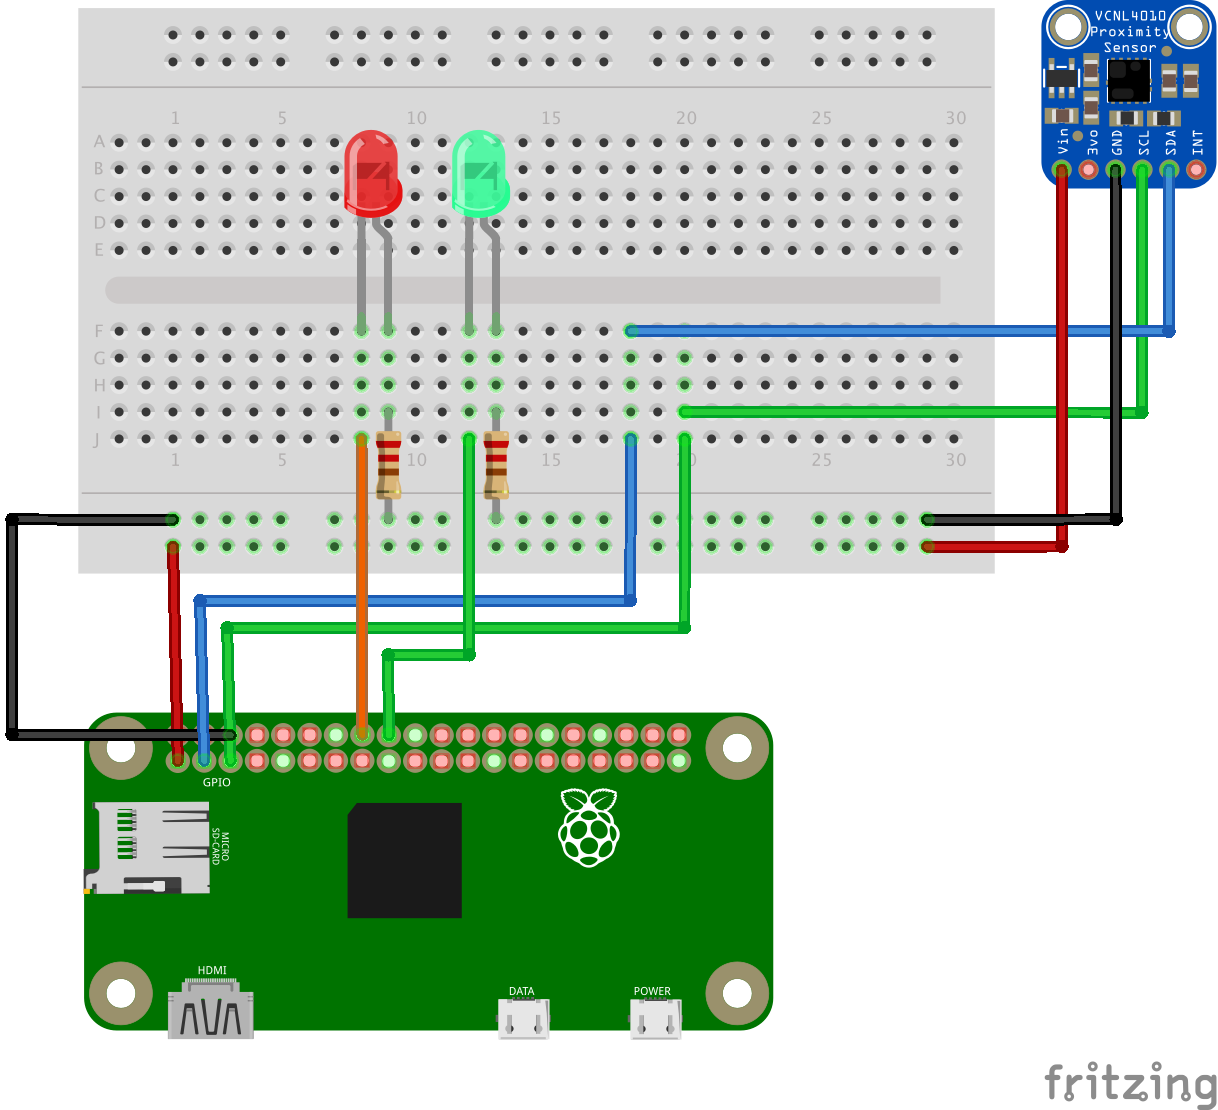
Machine 1 - The Hardware- 1 Raspberry Pi Zero W
- 2 Indicator LEDs on Breadboard
- 3 Adafruit vcnl4010 proximity sensor breakout board
Machine 1 uses a proximity sensor to detect pedal rotations. As the pedal approaches, it detects this and counts it. After a certain count, it transfers 3 Iota to the Candy Dispenser. Without a display, the LEDs help to indicate the state of Machine 1. Due to the fairly long time lag the Pi Zero W takes to interact with the devnet, the red LED helps to indicate when no further activity monitoring is going on and the green LED indicates that pedal measurements can proceed.
Prototype TestingWith our initial software written and debugged and our hardware prototypes up and running, we can run a desktop test before deploying to the "field."
The following shows us what happens when we ask for some candy and there are not enough tokens in Machine 2's account, address or wallet. Now we will do some 'exercises', wave our hand in front of the proximity sensor to simulate pedaling:
Let's find our transaction on the devnet tangle:
This is a detailed view of our transaction:
With both machines in place, we can begin testing our Machine 2 Machine economy with an actual exercise bike. The activity sensor, machine 1, is placed in front of the bike and the proximity sensor is placed near the pedal.
Since I am SSH'ing into machine 1, I can do this anywhere I am on a shared network. In the future, machine 1 should have its own interface and display. Once machine 1 is in place, we can start pedaling and collect our Iota in return for some "sweat equity."
It works! As the video demonstrates, once we reach 10 pedal revolutions, 3 iota are sent from Machine 1 to Machine 2, and we can then go to Machine 2 and collect our M&M;'(s)... usually 3 or so, but of course since I was filming this, only one was distributed from the candy dispenser!
Trinity WalletCryptocurrencies, unlike conventional currencies don't have a physical manifestation. What better way to prevent a double spend, than by having a physical object representing the value? A thing can't be in two places at once, unless it is counterfeit.
Like conventional currencies, it is convenient to have a physical, portable(an secure) store for cryptocurrencies. Trinity Wallet is the iota coin wallet. So, why not be able to not only exchange Iota between two machine, but also be able to use Iota to buy candy directly? Ok this is cheating. The Iota don't have to come from the exercise bike. The intent here is to learn(and eat more M&M's) and to experiment with Iota and to see how we could expand our M2M economy. As it is likely that any real world application of Iota like this would use the Trinity Wallet, this presents a great opportunity to experiment with it.
Here is what I found out setting this up:
- The Trinity Wallet is a fast and east to set-up and use on the iPhone.
- The interface and workflow is make sense
- You can use Iota from the Devnet! No cost to this to experiment.
In order for the Trinity Wallet to perform this transfer of Iota, it needs to have an address to send to. There are a few options for this. One way would be to have the machine display its address and have the Wallet holder type this directly into the Tinity Wallet app. Have you ever tried to type in 81 characters, A-Z, 9 and not make a mistake? So this is a bad idea. Another way, as show by Lewis Freiberg in his Pay For Coffee Iota project, is to have the device display it's address as a QR code and that's what I decided to do.
Using the Raspberry Pi embedded in the pi-topCEED device and having the Iota API written in Python makes this a snap to do.
We can use the, pyqrcode library. It's use is simple, works with Python3 and will allow you to quickly create a QR code image in a fee simple lines:
def acceptTokens(): qr = pyqrcode.create(chkSumStr) qr.png('./qr.png',scale=7) os.system('fim ./qr.png')
That's it, 3 lines of code to generate the QR code as a .png file. In order to do this, you must install the pypng library (but not import) as is clearly described in the pyqrcode documentation. Since I have built a simple, old-school command line interface for testing Machine 2, the simplest way I found to render the QR code from the.png image file was to issue call the program, fim, from the command line through the Python script.
os.system('fim ./qr.png')
FIM is an easy to install and free to use command line program for displaying images. From me it got the job done, so I could explore the more interesting aspects of the Iota M2M architecture.
Thoughts and ImprovementsThis was an exciting opportunity to learn about and gain a greater understanding or cryptocurrencies/distributed ledger technology applied to IoT! The fact that there is a Python api, makes software creation on the Raspberry Pi a snap. When you combine this with the ability to easily interact with GPIO and other hardware such as the adafruit vcnl4010 through the adafruit's CircuitPython project, makes this an ideal combination for Makers to prototype an Iota Iot system rapidly!
The additional ability to interact with Iota tokens at no cost on the devnet and utilize the Trinity Wallet facilitates the exploration of actual token transfers without the risk of capital loss.
Some improvements could be made are a way for Machine 2 to maintain state. One reason I avoided this or always checking for new Iota tokens was that the performance of my code was quite slow. So this is a combined area for improvement. Another issue is that the pedal proximity sensor could be tricked to earn Iota, because if the pedal is left in a position close to the sensor, it will continue to earn Iota! So I will need to compare two timed readings, and if the difference between is a certain amount, I can count a pedal. Small to no change between subsequent proximity measurements will then not generate a pedal count.
Other than test points, I am quite happy with the project and I look forward to experimenting Iota, PyOTA and my Trinity Wallet in the future!


Comments
Please log in or sign up to comment.