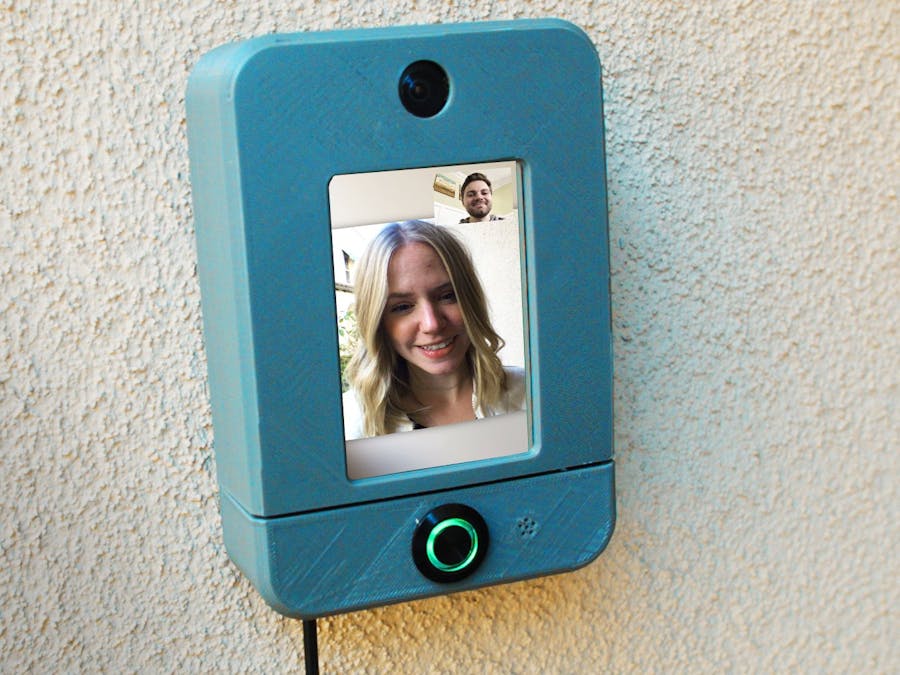
Need another way to social distance yourself during the COVID-19 outbreak? Make this smart doorbell system so that you don't have to interact with guests at your front door. The system can also be used as smart intercom system so that you can chat through internet calls with other people in your home or office.
The Raspberry Pi-powered Smart Doorbell opens a virtual meeting room for the guest when they press a button. It also sends a notification to your phone with a link to the same meeting room to chat with the guest. Make two of these doorbells and they can join the same meeting room to be used as a video intercom system.
Get the 3D printable part files for this project on our Patreon: https://www.patreon.com/posts/smart-doorlock-37735441
Check out the video so you can see how it works and how we built it:
Building the EnclosureThe enclosure was designed with CAD and printed with a 3D printer. The tolerances on our printer weren't very high, so we had to do some sanding and filing to make the parts fit properly together. Once we fixed a few areas on our prints, everything fit together well. If your parts aren't fitting properly, you might need to make a few adjustments. The enclosure is linked in the parts section of this post.
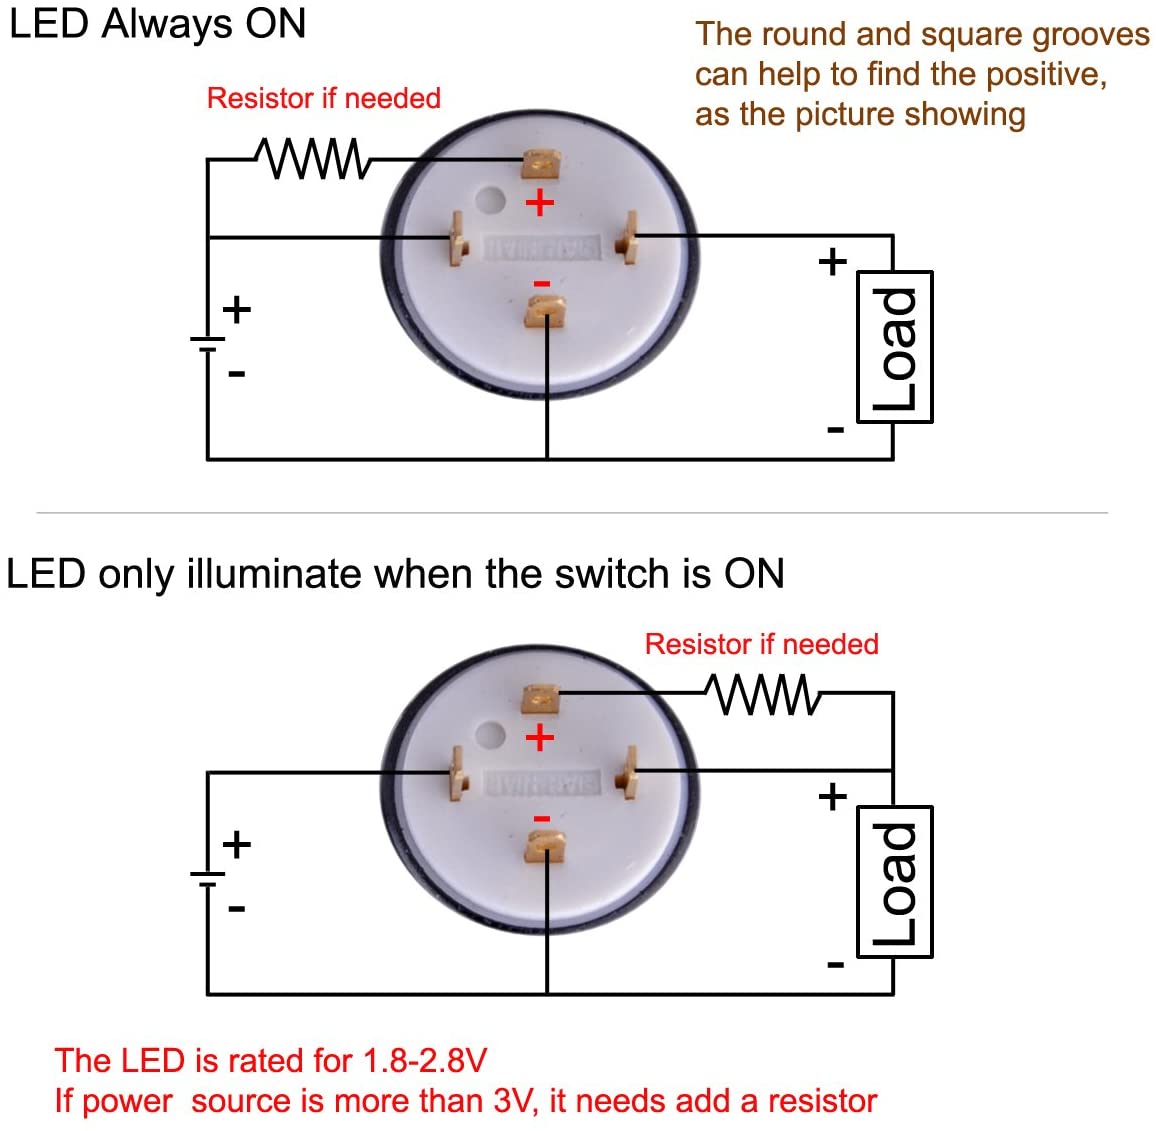
For the button, we used a momentary push switch. Ours came with an LED, so it required a few more wires than a normal button. To connect the button to the Raspberry Pi, we took four jumper wires and stripped the ends off one side of the wires (keeping the female connectors).
The LED on the button needed a resistor, so I soldered it to one of the wires. Then I connected all of the stripped wire ends to the button using the diagram that came with the button (linked in the diagram section).
The back section of the housing was printed in two parts because our print bed was too small. We filed down the edges so that they were flat and connected them with superglue. Superglue should be fine to connect the pieces because the Raspberry Pi helps hold the back together when it's attached to the housing.
Before attaching the Raspberry Pi, I plugged the mic into a USB port. You want to make sure it aligns with the holes on the front of the housing so that it can pick up audio. Next, we used some M2.5 screws to attach the Pi to the housing. The holes are not threaded when the parts come off the 3D printer, so we had to "tap" the holes by forcing the screws into the housing. The holes are slightly smaller than the screws, so they should fit snugly.
We're using a Raspberry Pi camera module to capture video. We ended up using an off-brand camera, but any Raspberry Pi camera with the ribbon connector should work.
I attached the camera to the housing using some M2 screws and connected the camera to the Pi with the ribbon cable. We had to bend the ribbon cable quite a bit to get it in place. Make sure you don't bend it too much and damage the connector.
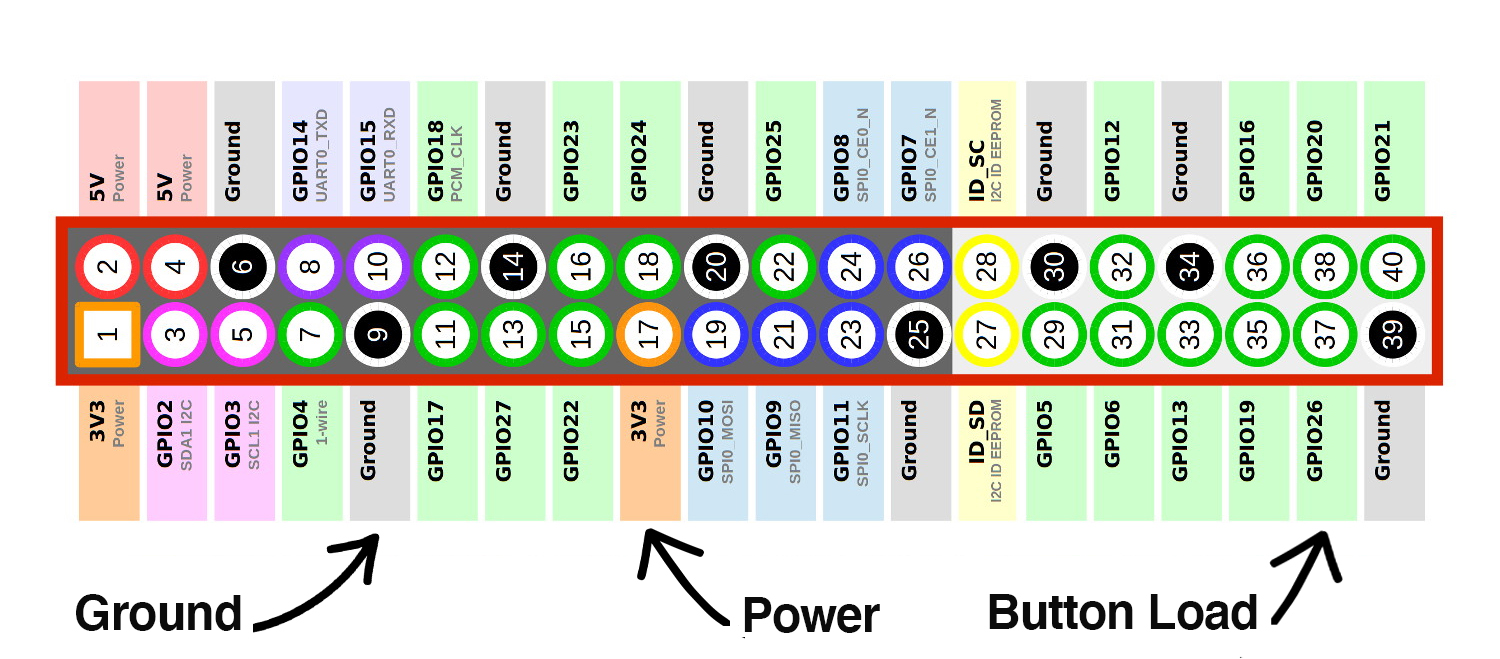
We didn't need to solder anything to the speaker/amplifier because it came with a JST connector. The Raspberry Pi 3 only has one 3.3v output and the LCD covered two other two Vout pins, so we stripped power wires for the button and the single power wire from the speaker and soldered them all together. I took the female header from the speaker wire I stripped earlier and soldered it to the three wires. This will plug into the 3.3v pin on the Raspberry Pi.
The white and black wires from the speaker needed to be soldered directly to the audio output on the LCD screen because there were no available audio pins on the Raspberry Pi. The black wire is the ground and connects to the outer pad on the audio output port. The white is the signal and connects to the middle pad.
Our screen had some female headers on the back that plugged directly into the pins on the Raspberry Pi. We had to bend the jumper wires quite a bit in order for the screen to fit. Lastly, we connected the speaker to the side of the top part of the enclosure with some M2.5 screws. The top part of the enclosure was fit to the bottom half (we had to make some minor adjustments by sanding the tabs on the top part with a file) and I screwed together the enclosure with some M4 screws.
We'll have to do run some commands on the Raspberry Pi to make the doorbell work. I connected the Raspberry Pi over VNC so that I didn't have to remove the Raspberry Pi from the enclosure. If you're not using VNC, make sure to do this before you screw the Raspberry Pi into the enclosure.
Enable the Camera
Enable the camera with raspi-config. In the terminal, type:
sudo raspi-configNavigate to Interfacing Options, then camera.
Select yes and reboot.
Test that the camera is working by running the following command in the terminal to save an image to your local directory:
sudo raspistill -o test.jpgIf this command raises an error and does not create an image, your camera might not be connected properly. Make sure to double check the camera to verify that it is connected properly.
Enable the MicrophoneOpen the sound input settings
alsamixer -c lPress F4 to open the capture settings and bump the level up to 100. Press Esc to exit.
Test the audio capture with the following command:
arecord --device=hw:1,0 --format S16_LE --rate 44100 -c1 test.wav -V monopress control-c to stop. It will generate a audio file in your local directory called test.wav
You can play the file with:
aplay test.wavStore the settings so that they persist on reboot.
sudo alsactl storeI'm using Jitsi Meet to create video calls because it's free and easy to use. Visit Jitsi Meet and configure the site to use your camera/microphone.
My settings were:
Camera: mmal service 16.1
Microphone: USB PnP Sound Device, USB Audio-Default Audio Device
You might want to test that the video call works by visiting the same link on your computer/phone. My Raspberry Pi 3 was a little laggy with video playback, so you might want to use a Raspberry Pi 4 instead because it has more memory/cpu power. I haven't verified that the code works on the Raspberry Pi 4, so use at your own risk.
Download the CodeI navigated to our git repository from my Raspberry Pi in the browser. On the repository, I clicked "Download Zip" to download a zip file with the code. I extracted the package to my home directory and them moved the doorbell.py file to /home/pi/doorbell.py.
You can test that the program works by running
python doorbell.pyfrom /home/pi.
To edit the file, install vim and open the file
apt-get install vim

vim doorbell.py
press, i to enter edit mode then make your changes. To exit, press esc then upper-case ZZ to save.
The variables for the code are documented at the top. Feel free to change any of these for your program.
Rotate the ScreenOpen the boot.txt file with vim:
sudo vim /boot/config.txtPress i to enter insert mode, then add a line
display_rotate=1press esc then ZZ to save and exit. Reboot.
Create an autostart directory
mkdir /home/pi/.config/autostartCreate a file to run the doorbell program
vim /home/pi/.config/autostart/doorbell.desktoppress i, then add the following to the file:
[Desktop Entry]
Type=Application
Name=Doorbell
Exec=python /home/pi/doorbell
Press esc and ZZ to save and exit.
*WARNING: This will make your local display unusable. Make sure you have a way to connect to the pi through VNC or SSH to remove this file if you want to stop the program from starting at boot.
Reboot.
If you have any issues getting the doorbell to start, please create an issue on this repository and the community will help you get it working.
A Note on SecurityAs a general rule of thumb, if someone has access to a USB port on your device, they can access anything on the device as well as the network the device is on. We did not design this doorbell to be secure, so you should make sure that your setup does not not expose any sensitive information.
For example, you might want to use public wifi for your doorbell or restrict network access at your router. You wouldn't want to expose any passwords in your filesystem on your Pi. You could create a server that sends emails and creates video calls instead of doing it from the Pi.
Done!Congrats! You now have a fully functional Smart Doorbell. Make sure to show it off to all of your friends. If you end up modifying the doorbell, send us a picture so we can share it with our followers!
Cheers,
Aaron @ Hacker Shack


Comments
Please log in or sign up to comment.