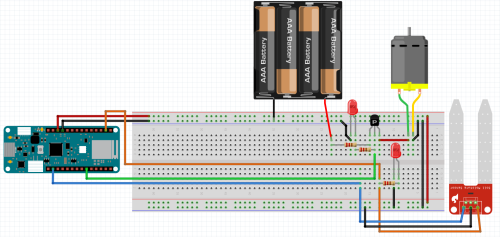
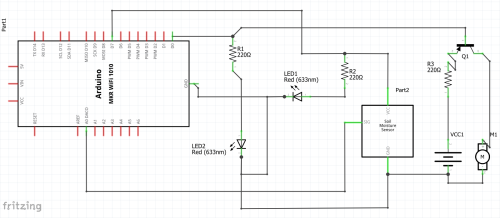
Farming and food production is a major aspect of society and everyday life is impacted directly by it. We are looking to create a small scale model monitoring and pumping system to help maintain the water level in plants grown in homes. Future additions can be atmospheric water and temperature monitoring. The project is designed to be a solution for lost crops, at least on a small scale, by carefully balancing the water levels within plants to ensure no loss due to over or under watering.
Process/StepsStep 1: Create the Circuit
Following the linked Fritzing Diagram or the Breadboard image to putting together the circuit.
Step 2: Cloud Interaction
Create things on IoT Cloud to setup the dashboard for the cloud connection
Start by creating the "thing" on the Arduino IoT Cloud. Then create your three variables; Information is given. View the dashboard image to see if the variable is "read only" or "read/write." Finally create the dashboard and link variables to the appropriate widgets.
Step 3: Code [.ino]
Copy the following code into the Arduino IDE...
/*
 Sketch generated by the Arduino IoT Cloud Thing "AutoGarden"
 https://create.arduino.cc/cloud/things/36881e31-0b15-4ae9-ad3d-c0bee1f0ea06
 Arduino IoT Cloud Variables description
 The following variables are automatically generated and updated when changes are made to the Thing
 int moisture;
 bool RunPump;
 Variables which are marked as READ/WRITE in the Cloud Thing will also have functions
 which are called when their values are changed from the Dashboard.
 These functions are generated with the Thing and added at the end of this sketch.
*/
#include "thingProperties.h"
#define PumpRunner 0 // set the pin for the pump
int val = 0; // returned value from soil moisture sensor
int soilPin = A0; // pin for reading from the soil moisture sensor
int soilPower = 7; // pin for powering the the soil moisture sensor.
int setMLevel;
void setup() {
 // Initialize serial and wait for port to open:
 Serial.begin(9600);
 // This delay gives the chance to wait for a Serial Monitor without blocking if none is found
 delay(1500);
 // Defined in thingProperties.h
 initProperties();
 // Connect to Arduino IoT Cloud
 ArduinoCloud.begin(ArduinoIoTPreferredConnection);
 /*
    The following function allows you to obtain more information
    related to the state of network and IoT Cloud connection and errors
    the higher number the more granular information you’ll get.
    The default is 0 (only errors).
    Maximum is 4
*/
 setDebugMessageLevel(2);
 ArduinoCloud.printDebugInfo();
 pinMode(PumpRunner, OUTPUT);
 pinMode(soilPower, OUTPUT);
 digitalWrite(soilPower, LOW);
}
void loop() {
 ArduinoCloud.update();
 // Your code here
 moisture = readSoil();
 moisture = map(moisture, 0, 700, 0, 100);
 Serial.println(moisture);
 digitalWrite(PumpRunner, LOW);
 delay(1000);
 if(moisture <= setMLevel && moisture >= 10){
   RunPump = true;
 }
 if(RunPump){
   digitalWrite(PumpRunner, HIGH);
   delay(1000); // pump takes a second or two to start up
   digitalWrite(PumpRunner, LOW);
   delay(1000); // one second delay so water can settle
   RunPump = false;
 }
 delay(1000);// remaining delay, go to value minus 3010
}
int readSoil(){
 digitalWrite(soilPower, HIGH);
 delay(10);
 val = analogRead(soilPin);
 digitalWrite(soilPower, LOW);
 return val;
}
Step 4: Properties Code
// Code generated by Arduino IoT Cloud, DO NOT EDIT.
#include <ArduinoIoTCloud.h>
#include <Arduino_ConnectionHandler.h>
const char THING_ID[] = "36881e31-0b15-4ae9-ad3d-c0bee1f0ea06";
const char SSID[]     = SECRET_SSID;    // Network SSID (name)
const char PASS[]     = SECRET_PASS;    // Network password (use for WPA, or use as key for WEP)
void onSetMLevelChange();
void onRunPumpChange();
int moisture;
int setMLevel;
bool RunPump;
void initProperties(){
 ArduinoCloud.setThingId(THING_ID);
 ArduinoCloud.addProperty(moisture, READ, ON_CHANGE, NULL);
 ArduinoCloud.addProperty(setMLevel, READWRITE, ON_CHANGE, onSetMLevelChange);
 ArduinoCloud.addProperty(RunPump, READWRITE, ON_CHANGE, onRunPumpChange);
}
WiFiConnectionHandler ArduinoIoTPreferredConnection(SSID, PASS);
Step 5: Set Up Internet Connection
In the "Secret" tab on the Arduino Editor, set your wireless network ID and password. Test and ensure that your device properly connects to the cloud.
RisksThere are a couple risks that are associated with running this project.
- The possibility of short circuiting: usage of water in this project poses a hazard and as such testing will likely be done as a “dry run.”
- The project results may not accurately work, as there is the potential to have inconsistent sensor readout or an inaccurate interpretation of the results.


_3u05Tpwasz.png?auto=compress%2Cformat&w=40&h=40&fit=fillmax&bg=fff&dpr=2)
Comments
Please log in or sign up to comment.