<<If the bees were to disappear off the face of the earth, man would only have four years left to live.>>( Albert Einstein.)
Prerequisites- Programming in C/C++ (for the microcontroller)
- PCB design (on Kicad, Altium,...)
- Knowledge in electronics (especially reading datasheets)
- Use software such as TTN, Ubidots and Beep
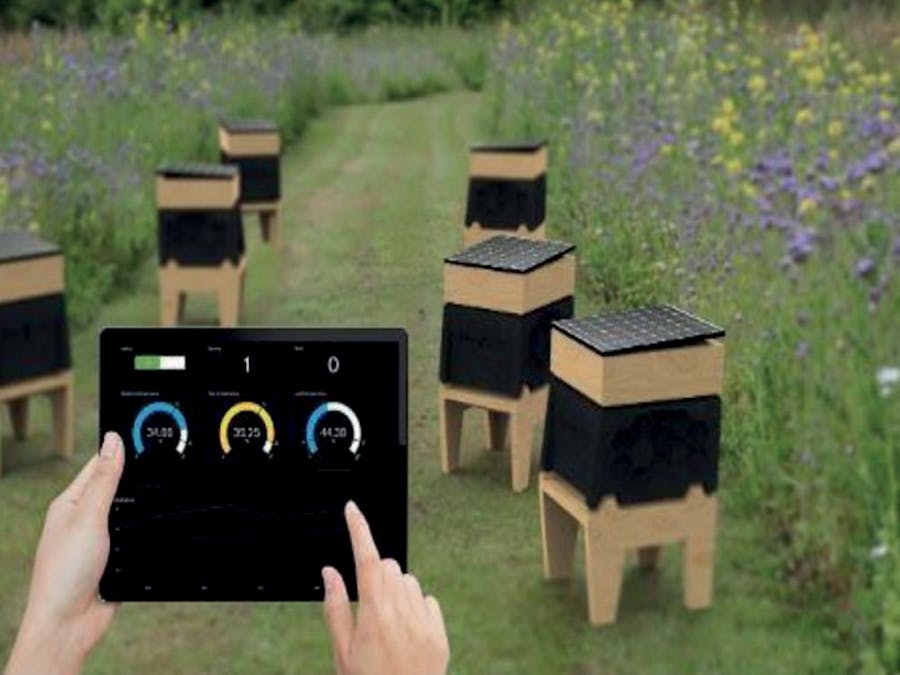
Our connected beehive project aims to monitor and improve the health of bee colonies. The general problem is the increasing disappearance of bee populations, which is a major issue for agriculture and biodiversity.
The connected beehive uses sensors to track the parameters of the hive, such as temperature, humidity, and weight, and transmit this data to an application for beekeepers to monitor colonies remotely. In case of problems, beekeepers can intervene quickly to save the colonies. This will help better understand the needs of bees and protect colonies against diseases and pests.
In short, our project aims to contribute to the preservation of bee populations by helping beekeepers better monitor and protect colonies.
Overall project visionOur connected beehive project uses a combination of sensors to track the parameters of the hive. To measure temperature, we use a high-precision temperature sensor that is installed both inside and outside of the hive. The sensors are connected to a microcontroller that processes the data and transmits it to a wireless communication board using Lora network (a network that allows for the Internet of things), and then the data is sent to a web application (in our case we used Ubidots and then Beep). The weight data is also transmitted via the wireless communication board.
These web platforms will allow beekeepers to view data in real-time, track trends, and receive alerts in case of problems. Beekeepers can also set thresholds for different parameters, so they are alerted when values exceed a certain level.
In summary, our connected beehive project uses a combination of sensors to track the parameters of the hive, such as temperature, humidity, weight, and autonomy of our surveillance system, and transmits the data to a web application for beekeepers to monitor colonies remotely. Beekeepers can set alerts for different parameters and use the data to take measures to protect bee colonies.
Architecture of Our System:
In order to develop our project, we will thoroughly document the operation of each sensor and the PCBs we created, as well as the process of data transmission and the alerts generated by the system. To begin, we identified a list of necessary data and procured the corresponding sensors and hardware. We then conducted tests on each sensor individually, before moving on to assemble and test the entire system using a solderless breadboard.
B) Sensorsb.1) Microcontroller
For our Microcontroller, we Arduino use MKRWAN 1310.
The Arduino MKRWAN 1310 is a small microcontroller board based on the SAMD21 Cortex-M0+ 32bit low power ARM processor. It is designed for use with the Arduino MKR series of boards and is equipped with a number of features such as Low Energy (BLE) connectivity and a wide range of I/O pins for connecting various sensors and actuators. It is also equipped with a battery management system that allows for long battery life and a wide range of power management options. This microcontroller is commonly used for IoT projects and other low-power applications.
b.2) Humidity
To monitor humidity, we used DHT22 sensors, one for indoor and one for outdoor use. To protect the outside sensor, especially from rain, we use 3D-printed a case whose design we found on https://www.thingiverse.com/thing:4080321.(Datasheet link: https://www.gotronic.fr/art-module-capteur-t-et-humidite-sen-dht22-31502.htm, tab technical specifications sheet)
b.3) Temperature
screw terminal :
For the interior temperature, we used temperature probes that are long enough so that we could place the box under the hive where it would be protected from the elements and still be able to insert the probes where they need to be.
b.4) Weight
The HX711 weight sensor is a precision 24-bit analog-to-digital converter (ADC) designed for weigh scales and industrial control applications to interface directly with a bridge sensor. It is capable of reading both dynamic and static weights with high resolution and accuracy. The HX711 can be used with load cells with a full-scale range of up to several hundred kilograms. It can communicate with a microcontroller via a two-wire interface (clock and data) and provides an easy-to-use input for weight measurements in various applications.
To keep track of the weight of the hive, we chose to use a strain gauge, attached to a metal stand, with an amplifier so that the data can be correctly interpreted.
b.5) Brightness
(Datasheet link:Solar panel: https://www.gotronic.fr/art-cellule-solaire-sol2w-18995.htm, tab technical datasheet /
The Card LiPo Rider Pro appears to be a device that can charge, discharge, and balance LiPo batteries. It can be used to maintain and prolong the life of LiPo batteries used in various applications such as drones, RC cars, and other hobby devices.
In order to measure the exterior brightness, we decided to use the solar panel (whose other purpose is to recharge the system's).
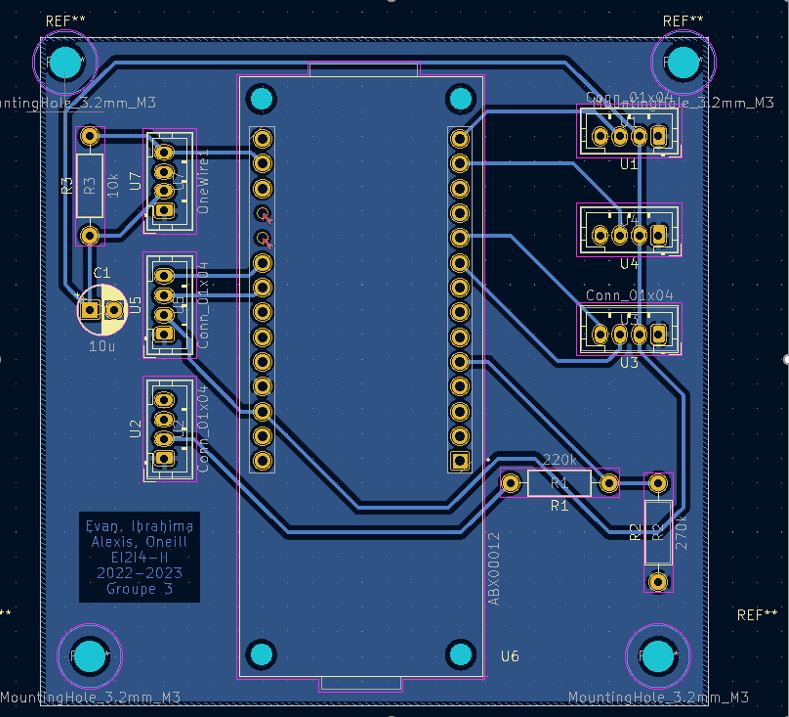
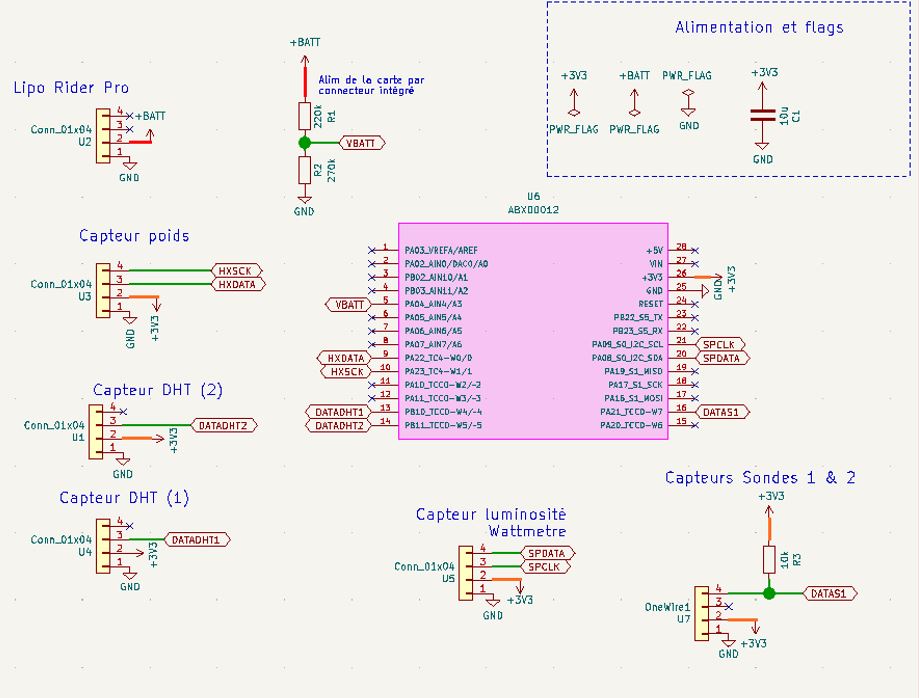
C) PCBDuring this project we made our PCB with KICAD.To create this PCB, the initial steps involved creating an electrical diagram of the system to be printed, selecting the appropriate component footprints, generating a netlist, and designing the PCB by placing the various components and designing the trace routing to ensure they do not cross and are compact enough to fit within the waterproof enclosure. After printing the PCB, a continuity check was performed to verify the accuracy of the printing, the components were soldered, and the fully assembled system was tested.
Once the system was fully operational, we encased it in a robust plastic housing that is able to withstand a range of temperature conditions. To make the housing waterproof, we drilled holes in the case and inserted cable glands through which we ran waterproof cables. The cables were extended by soldering and using heat-shrink tubing. Additionally, to secure all the components in place, we created a custom rack using 3D-printing technology. The design files for the rack can be found in the appendix.
Once this part is done, we assembled our different codes written in C (code for each sensor) you can find it in the attached files.
You will find the code for each sensor and our final in our git, link is here :
https://github.com/ibrahimaGoumballa/RUCHE-CONNECTEE
F) DATATRANSMISSIONTo transmit the data collected by the sensors, we used the LoRaWAN network via a LoRa transmitter and receiver module, and added a Molex antenna to increase the range of the system. The steps taken included:
- Connecting our device to the LoRaWAN network (LPWAN) with its AppEUI, DevEUI and AppKey credentials.
- Transferring data from TTN to Ubidots first.
- Transferring data from TTN to BEEP using a webhook.
- Formatting data using the payload formatter.
- Transferring data from our microcontroller to BEEP.
- Setting up a user interface on the BEEP platform to display the data sent from the hive every 10 minutes.
one open point was to setup up alerts on the BEEP website by choosing a measurement value and a threshold.
Here are some examples illustrating our results on these different platforms used :
- Data on Beep
Once we were finished, we went to do the installation and we were able to let our systems run for about two weeks.
FINAL RESULTS
Here is ou final result, as a user now we can see the data that we provide forme the hive and the graphics giving us the evolution of our system.
Overall, this project provided us with a valuable experience in designing and constructing embedded systems. We had the opportunity to create a system from start to finish that addressed a specific real-world need.
During the project, we were able to successfully achieve our goals while also gaining new skills such as programming Arduino boards, utilizing the LoraWAN network, designing, printing and testing printed circuit boards (PCBs), modeling and 3D-printing custom parts, optimizing the power consumption and battery life of an embedded system, and setting up a user interface on Ubidots and Beep.
Not only did this project allow us to apply our theoretical knowledge, but it also helped to expand our skill set from both a technical and managerial perspective. We were able to organize tasks efficiently and use standardized tools to manage and track the progress of the project.
We thank Mr Douze and Mr Sylvain teachers who supervised us during our project. You can find their contacts below
Contacts:IBRAHIMA GOUMBALLA :
EVAN FERREIRA
ALEXIS TANGUY
ONEILL TESTAN
Mr. Yann Douze
Mr. Sylvain


_4YUDWziWQ8.png?auto=compress%2Cformat&w=48&h=48&fit=fill&bg=ffffff)


_Ujn5WoVOOu.png?auto=compress%2Cformat&w=40&h=40&fit=fillmax&bg=fff&dpr=2)


Comments
Please log in or sign up to comment.