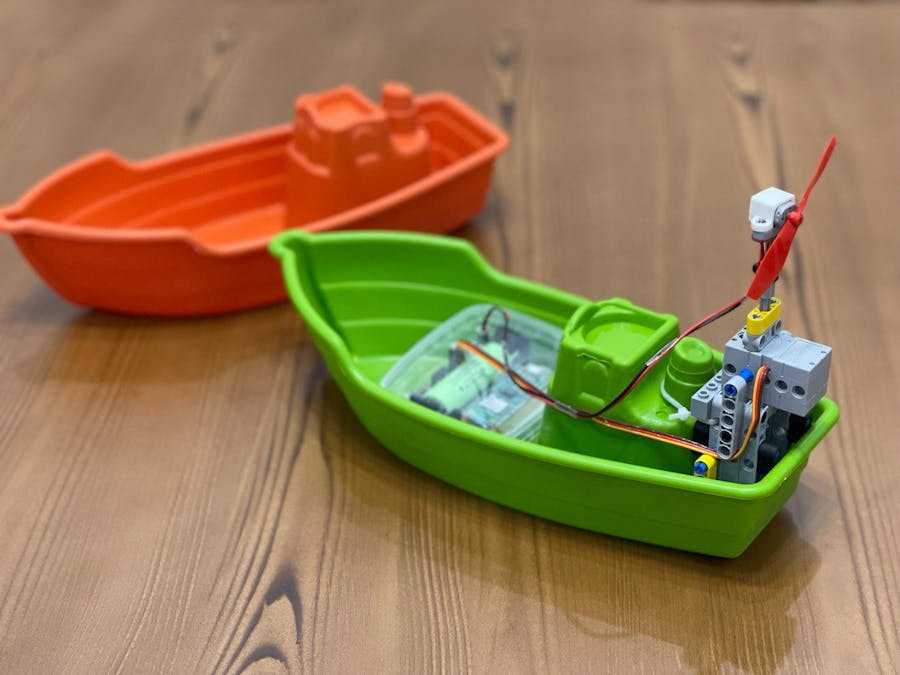
In this project, we will learn about making a toy boat controlled via Wi-Fi with the help of Elecfreaks Wukong2040 Breakout Board and Raspberry Pi Pico W. This article can be the best gift to your children. stay with me.
Elecfreaks Wukong 2040 is a multifunctional breakout board designed for Raspberry Pi Pico and Pico W. It is equipped with interfaces for four DC motors, up to twelve servos, a buzzer, A\B buttons, RGB “Rainbow” lights, a Reset button, etc. The board can be powered by a single 18650 3.7V LiPo battery and integrates a power management IC that monitors the battery level and can also charge the battery via a USB charger. Battery life is typically 60 minutes per charge but can last over 120 minutes depending on the load. It uses a standard 7 × 11 square building block frame as the base, which can expand various vivid shapes for Wukong 2040 Raspberry Pi Breakout Board.
Features- Onboard buzzer, A\B button, rainbow light, reset button, and other components, with high integration and powerful functions.
- It supports large-capacity 18650 batteries, onboard intelligent power management chips and power indicators, allowing learners to get rid of power troubles and enjoy the fun of creation anytime, anywhere.
- Expand up to 14 general-purpose IO pins, and lead out the I2C interface separately, which greatly facilitates learners to connect various peripherals.
- Standard building block frame base for easy structure building.
- Support multiple programming methods: MicroBlock, Python, C, and C++.
- Rich learning cases.
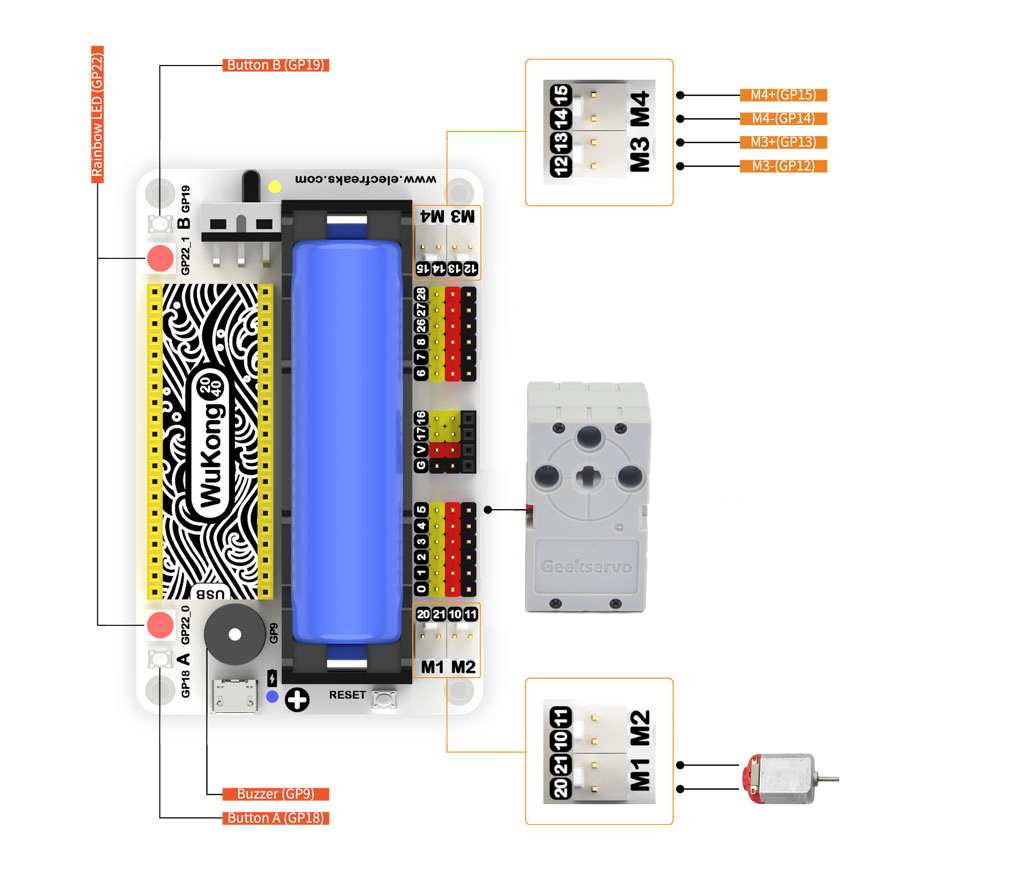
In the picture below, you can see the complete specifications of the board.
One of the important features of Wukong2040 is the ability to simultaneously control 4 DC motors and 12 servos, which distinguishes it from other boards.
In terms of programming, Wukong2040 supports a wide range of programming languages such as: MicroBlocks, CircuitPython, Arduino, etc. which makes learning easy for beginners and speeds up the programming process.
The DC motor and servo are installed on the toy boat and the wires are connected to Wukong2040, then the boat can be controlled through the web server and Wi-Fi.
The operation mechanism is very simple, the rotation of the propeller connected to the DC motor makes the boat move and the servo movement makes the boat turn left and right.
Programming EnvironmentFor this project, I chose Arduino as the programming environment. After installing and running Arduino, first follow this link, It adds required libraries and Raspberry Pi Pico Arduino core to Arduino. TheRaspberry Pi Pico Arduino coreis a boards manager maintained on GitHub by user Earle F Philhower. This core covers not only the original Pico and the Pico W but also includes pretty well every RP2040-based board that you can find and is frequently updated.
Preparation of DC motor and servoI disassembled an L9110 fan module and removed its DC motor. The reason for this is that thanks to the use of Wukong2040 in this project, (which itself has 4 separate YX-75V15 drivers), there is no need to use the L9110 driver again.
I removed the DC motor and its bracket and I soldered two wires to the DC motor.
And installed it on a Lego structure as shown below. For this, I used the same bolts and nuts, I just added some small plastic washers.
I also installed a servo to rotate the DC motor. For this purpose, I used an GeekServo 360°, which is completely compatible with Lego structures.
We connect the DC motor to pins 20 and 21 and the servo to pin number 5.
For the toy boat, I purchased the following plastic boat from a local store. There are different models on the internet or AliExpress, you can even use a piece of unilite or foam. Using several plastic bottles together can also be a good option. If you have trouble finding the plastic boat, let me know via private message.
To install the DC motor and servo to the boat, I designed a simple Lego structure according to the picture below.
All parts are now ready for final installation on the boat.
You can use any design you have in mind or you can use pieces of wood or foam. I used some rubber and gelatin pieces of Lego to fix the Lego structure. (The black part in the picture below) Finally, I attached the structure to the boat with a plastic fastener.
And finally, install the 18650 battery on the Wukong2040. To protect the Wukong2040 from water, I put it in a plastic box with a lid.
Upload the following codes to the board. I also included a ready-made version for convenience. Just create a hotspot with the SSID idreams and password 98765432 on your mobile phone and make sure the mobile phone is connected to the Internet.
/*******************************************************************************
*
* Wukong2040 Toy Boat
* Build a wifi controlled toy boat with Wukong2040 and Raspberry Pi Pico W
*
******************************************************************************/
// Include WiFi and Servo libraries
#include <WiFi.h>
#include <Servo.h>
// Create a servo object
Servo myservo;
// Servo GPIO pin
static const int servoPin = 5;
// GPIO the motors are attached to
static const int M1forwardPin = 20;
static const int M1backwardPin = 21;
// Network credentials
const char* ssid = "idreams";
const char* password = "98765432";
// Web server on port 80 (http)
WiFiServer server(80);
// Variable to store the HTTP request
String header;
// Decode HTTP GET value
String ServoValueStr = String(5);
int pos1 = 0;
int pos2 = 0;
String SpeedValueStr = String(5);
int pos3 = 0;
int pos4 = 0;
// Current time
unsigned long currentTime = millis();
// Previous time
unsigned long previousTime = 0;
// Define timeout time in milliseconds (example: 2000ms = 2s)
const long timeoutTime = 2000;
void setup() {
// Attach to servo and define minimum and maximum positions
// Modify as required
myservo.attach(servoPin, 600, 2400);
// Start serial
Serial.begin(115200);
// Connect to Wi-Fi network with SSID and password
WiFi.begin(ssid, password);
while (WiFi.status() != WL_CONNECTED) {
delay(500);
Serial.print(".");
}
// Print local IP address and start web server
Serial.println("");
Serial.println("Pico W is connected!");
Serial.print("Assigned IP address: ");
Serial.println(WiFi.localIP());
server.begin();
}
void forward(int SPEED) {
analogWrite(M1forwardPin, SPEED);
analogWrite(M1backwardPin, 0);
}
void backward(int SPEED) {
analogWrite(M1backwardPin, SPEED);
analogWrite(M1forwardPin, 0);
}
void stopMotors() {
analogWrite(M1forwardPin, 0);
analogWrite(M1backwardPin, 0);
}
void loop(){
// Listen for incoming clients
WiFiClient client = server.available();
// Client Connected
if (client) {
// Set timer references
currentTime = millis();
previousTime = currentTime;
// Print to serial port
Serial.println("New Client.");
// String to hold data from client
String currentLine = "";
// Do while client is connected
while (client.connected() && currentTime - previousTime <= timeoutTime) {
currentTime = millis();
if (client.available()) { // if there's bytes to read from the client,
char c = client.read(); // read a byte, then
Serial.write(c); // print it out the serial monitor
header += c;
if (c == '\n') { // if the byte is a newline character
// if the current line is blank, you got two newline characters in a row.
// that's the end of the client HTTP request, so send a response:
if (currentLine.length() == 0) {
// HTTP headers always start with a response code (e.g. HTTP/1.1 200 OK) and a content-type
client.println("HTTP/1.1 200 OK");
client.println("Content-type:text/html");
client.println("Connection: close");
client.println();
// Display the HTML web page
// HTML Header
client.println("<!DOCTYPE html><html>");
client.println("<head><meta name=\"viewport\" content=\"width=device-width, initial-scale=1, maximum-scale=1.0, user-scalable=0\">");
client.println("<link rel=\"icon\" href=\"data:,\">");
// CSS - Modify as desired
client.println("<style>body { text-align: center; font-family: \"Trebuchet MS\", Arial; margin-left:auto; margin-right:auto; }");
client.println(".slider { -webkit-appearance: none; width: 300px; height: 25px; border-radius: 10px; background: #ffffff; outline: none; opacity: 0.9;-webkit-transition: .2s; transition: opacity .2s;}");
client.println(".slider::-webkit-slider-thumb {-webkit-appearance: none; appearance: none; width: 35px; height: 35px; border-radius: 50%; background: #ff3410; cursor: pointer; }");
client.println(".vertical-heighest-first { -webkit-transform:rotate(270deg); -moz-transform:rotate(270deg); -o-transform:rotate(270deg); -ms-transform:rotate(270deg); transform:rotate(270deg); }");
client.println(".row-container {display: flex; flex-direction: row; justify-content: center; align-items: center;}");
client.println(".button {width: 135px; border: 0; font-family: \"Trebuchet MS\"; font-weight: bold; background-color: #fff200; box-shadow: inset 2px 2px 3px #b2b2b2, inset -2px -2px 3px #000; padding: 10px 25px; text-align: center; display: inline-block; border-radius: 5px; font-size: 16px; margin: 10px 25px; cursor: pointer;}");
client.println(".button:hover {background-color: #F1C40F;}");
client.println(".button:active{box-shadow: inset 2px 2px 3px #000, inset -2px -2px 3px #b2b2b2;}</style>");
// Get JQuery
client.println("<script src=\"https://ajax.googleapis.com/ajax/libs/jquery/3.3.1/jquery.min.js\"></script>");
// Page background
client.println("</head><body style=\"background-color:#00BFFF;\">");
// Position display
client.println("<h2 style=\"color:#ffffff;\">Servo Position: <span id=\"servoPos\"></span>°</h2>");
// Slider control
client.println("<input type=\"range\" min=\"70\" max=\"106\" class=\"slider\" id=\"servoSlider\" onchange=\"servo(this.value)\" value=\""+ServoValueStr+"\"/>");
client.println("<br/><br/><br/><br/><br/><br/><br/><br/><br/><br/>");
client.println("<input type=\"range\" min=\"50\" max=\"255\" class=\"slider vertical-heighest-first\" id=\"motorSlider\" onchange=\"motorVal(this.value)\" value=\""+SpeedValueStr+"\"/>");
client.println("<br/><br/><br/><br/><br/><br/><br/><br/>");
client.println("<h2 style=\"color:#ffffff;\">Throttle: <span id=\"MotorValue\"></span></h2>");
client.println("<div class=\"row-container\"><button class=\"button\" id=\"reverse-btn\" onmousedown=\"motorVal(456)\" onmouseup=\"motorVal(456)\">Reverse</button>");
client.println("<button class=\"button\" id=\"stop-btn\" onmousedown=\"motorVal(0)\" onmouseup=\"motorVal(0)\">STOP</button></div>");
// Javascript
client.println("<script>var slider = document.getElementById(\"servoSlider\");");
client.println("var servoP = document.getElementById(\"servoPos\"); servoP.innerHTML = slider.value;");
client.println("slider.oninput = function() { slider.value = this.value; servoP.innerHTML = this.value; }");
client.println("var MotorsliderV = document.getElementById(\"motorSlider\");");
client.println("var MotorV = document.getElementById(\"MotorValue\"); MotorV.innerHTML = MotorsliderV.value;");
client.println("MotorsliderV.oninput = function() { MotorsliderV.value = this.value; MotorV.innerHTML = this.value; }");
client.println("$.ajaxSetup({timeout:1000});");
client.println("function servo(pos) {$.get(\"/?value=\" + pos + \"&\");}");
client.println("function motorVal(speed) { $.get(\"/?Mvalue=\" + speed + \"&\");}");
client.println("{Connection: close};</script>");
// End page
client.println("</body></html>");
//------------------------------------
// GET data
if(header.indexOf("GET /?value=") >= 0) {
pos3 = header.indexOf('=');
pos4 = header.indexOf('&');
// String with motor position
ServoValueStr = header.substring(pos3+1, pos4);
// Move servo into position
myservo.write(ServoValueStr.toInt());
// Print value to serial monitor
Serial.print("Servo Pos = ");
Serial.println(ServoValueStr);
}
//------------------------------------
// GET data
if(header.indexOf("GET /?Mvalue=") >= 0) {
pos1 = header.indexOf('=');
pos2 = header.indexOf('&');
SpeedValueStr = header.substring(pos1+1, pos2);
int SpeedVal = SpeedValueStr.toInt();
if (SpeedVal <= 70){stopMotors();}
else if (SpeedVal == 456){backward(130);}
else {forward(SpeedVal);}
// Print value to serial monitor
Serial.print("Speed value = ");
Serial.println(SpeedValueStr);
}
// The HTTP response ends with another blank line
client.println();
// Break out of the while loop
break;
} else {
// New lline is received, clear currentLine
currentLine = "";
}
} else if (c != '\r') { // if you got anything else but a carriage return character,
currentLine += c; // add it to the end of the currentLine
}
}
}
// Clear the header variable
header = "";
// Close the connection
client.stop();
Serial.println("Client disconnected.");
Serial.println("");
}
}After connecting the Wukong2040 to the mobile phone, you can see the IP address by referring to the hotspot settings.
⚠️ Remember this IP to call the web server in the web browser.
After entering the IP in the Chrome browser, the following screen will be displayed.
The upper slider is used to turn the servo left and right, This slider makes the boat move left and right. Also the middle slider is used as the amount of throttle.
Two emergency buttons STOP and Reverse can be seen at the bottom of the screen. The STOP button is intended for quick shutdown of the DC motor and the Reverse button is intended for the reverse movement of the motor.
⚠️ Never move the throttle slider to the end and do not use the maximum power of the motor (255 is the maximum speed of the DC motor), in this case, the propeller may break. You can liit the maximum amount of slider movement in codes.
The video below shows the movement of the boat in a pond.
I hope you enjoy building this project.


Comments
Please log in or sign up to comment.