One issue we have frequently at the Taipei Hackerspace is that people don't know when we are open. Our basic rule is simple: whenever a keyholder member is in the Hackerspace, anyone/everyone can come in. In practice, though people never really know if anyone's there.
They could give a call to the space, or even send an email to the mailing list, while the people I know usually end up asking me directly - hey, anyone's at the space at the moment? Since I don't always know the answer, the search was on for a better - maybe more technological or hackish solution: let's build an electronic check-in/out system that will show the current status on out website.
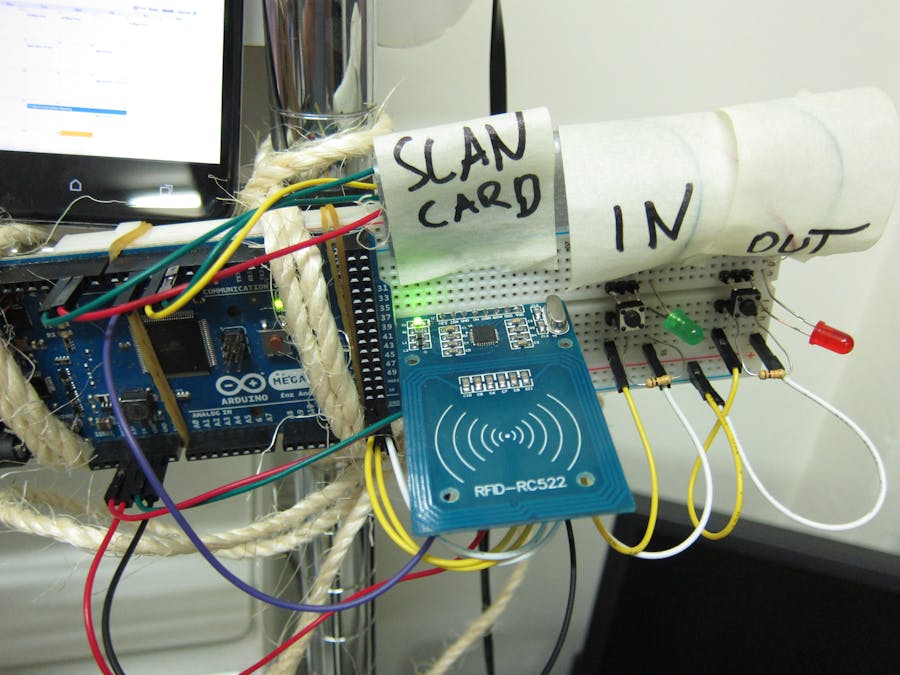
The main idea is that in Taipei pretty much everyone has an EasyCard, an 13.56MHz RFID card that is used for all public transport in the city and a lot more. The RC522 card-antenna module seems to be able to read the card pretty well, and all I need to get off it is the the ID number which is pretty straightforward (after digging the Arduino forums for source code).
The project in a nutshell is:
- Use Arduino Mega with an RC522 board to get the ID number of a given EasyCard
- Use witches to get whether the person is checking in or out
- Use LEDs to provide some feedback and basic user interface for the hardware
- Node.js server to communicate with the Arduino, interface the check-in/out database, and provide API and real-time access to the data
- Create a bit of interface on the website to display the check-in status
Now let me dig into the different parts in detail.
RFID
The RC522 module has 8 pins, and Arduino can use the SPI library to communicate with it. I used Arduino Mega ADK, because the SPI pins are conveniently accessible, unlike e.g. the Leonardo, for which I would have had to make some new cables or headers. The RC522(pin number)->Mega(pin number) connections are done such that:
- SA(1) → SS(53)
- SCK(2) → SCK(52)
- MOSI(3) → MOSI(51)
- MISO(4) → MISO(50)
- (5) not connected
- GND(6) → GND
- RST(8) → (any digital pin)
- +3.3V(8) → +3.3V
The source code to talk to the card is from a blog, and originally from a tech shop in China, I guess (based on the big bunch of Simplified Chinese comments).
Switches and Visual Feedback
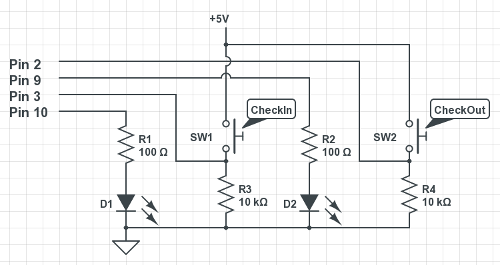
I wanted to make as simple interface for the card reader as possible. Added this pair of switches and LEDs (the D1 being green, and D2 being red). After the Arduino received a card ID from the reader, the LEDs are blinked to prompt people to press either the Check In or Check Out buttons. If they press either of them, the corresponding LED is blinked very brightly for a bit, and the card ID and check-in/out event is sent to the connected computer via serial connection
The (very basic) circuit for the check-in/out buttons and visual feedback LEDs. "Pins" refer to the Arduino pins used in the current version
If no button press occurs within 10 seconds or so, the reading is discarded and the card reader goes back to listening mode.
Webserver
Node.js is very useful to make quick web services, and its library support is not too bad at all, although it's not all smooth sailing: their documentation is often scarce at best. Nevertheless it was the fastest one to get things up and running, since I have used before almost all required components.
The server communicates with Arduino via the serialport library. I'm more used to Python's pyserial, though in this case it was very handy that serialport can emit read events, thus the server can just wait until there's something to read and run some functions on the incoming data. In my experience, serialport wouldn't be good for every corner case I came across in serial-land, but in this setup works beautifully.
I chose SQLite3 to store the data, using the sqlite3 library. There are a bunch of others, had to look around which one is still being developed. This particular library is not too bad, though I found myself fighting the lack of documentation and asynchronicity quite a bit. The resulting code is pretty ugly I'm sure, in some places inefficient because I didn't know how to get to the result I wanted in a less roundabout way, still it seems to work and that is what matters for a prototype.
First I made a simple REST API to query the currently checked-in people, and later added (real-time) push updates via socket.io, to make it nicer. It's brilliant that without any polling, all clients can be updated once someone signs in or out.
Since this code is running on a different computer than our main web server, had to play around with the Access-Control-Allow-Origin header, and adjusting the settings of our router to make it accessible for the web correctly.
Tried to add a pretty-much self-contained script that the front-end can load, and it handles everything, just need an appropriate HTML span or div element to display the information.
The result is pretty good, as long as the card-reader does not crash. Originally the results were displayed in a table, but wanted to make it more human, so here's the format I ended up with:
There can also be people with no name, they just show up something like "Right now there are three people checked in the Hackerspace: Greg, and two other people."
SpaceAPI
There's also a project called Space API for an unified specification to expose information regarding the space itself (
This check-in gadget is integrated with our the Taipei Hackerspace's Space API endpoint to, showing our opening status, so can be used with e.g. the My Hackerspaces Android app, or with the other applications listed on the Space API site.
It lives!
Here's a quick demonstration video of how does it work:
So you can check out our website at https://taipeihack.org/#open for the live results, and drop in if you are in the neighbourhood if there's anyone in the 'space.
The whole source code is shared in a Github repository: the Arduino sketch, the server script, and any additional files. I'm sure there are a lot of things that could be improved about it...
Original writeup: Electronic check-in at the Taipei Hackerspace


_wzec989qrF.jpg?auto=compress%2Cformat&w=48&h=48&fit=fill&bg=ffffff)


Comments
Please log in or sign up to comment.