


Hardware components | ||||||
 |
| × | 1 | |||
| × | 1 | ||||
A previous project created the ProtoSpring board for the VAB-600 Springboard to support quicker prototyping. Since then it was put to good use for just that: I've tested how the I2C bus works, and created a new device.
The inspiration for that new device comes from Tindie, the indie hardware marketplace. Browsing existing hardware I've found Hashlet, a secure authentication cryptographic device made for BeagleBone Black and Raspberry Pi by Cryptotronix. It looked interesting, it's open source hardware, and I hope that Springboard users can take advantage interesting too, so decided to make a "remix" of the original board. It's also good process to learning about hardware too! :)
Hashlet is based on the Atmel ATSHA204A chip, which is a "secure authentication and validation device", with use cases such as:
• Network and Computer Access Control
• Key Exchange for Encrypted Downloads
• Authenticated/Encrypted Communications for Control Networks
The chip's using the I2C bus, or a single-wire interface. Since Springboard front pin headers already give access to the I2C-0 bus and they are broken out on ProtoSpring, I chose that version of the chip. I2C is pretty simple in theory: just need a ground line, a clock line, and a data line to communicate; devices have addresses and can be talked to individually, while multiple devices can be on a single bus. In practice there are a lot of subtleties, though.
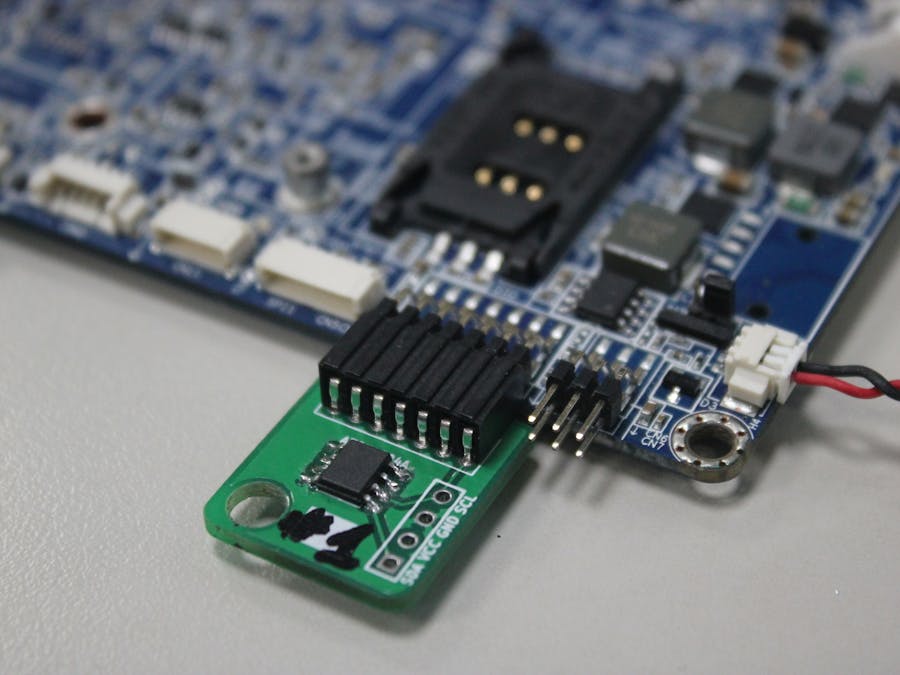
First run on the prototyping board
Since the chip required pretty much no additional electronics, it was pretty easy to set up. ProtoSpring also had a SOIC24 area, where I could fit the SOIC8 version of the chip. It worked, though barely. Looks like the SOIC24 footprint in the KiCad libraries are wider than the SOIC8, so the leads were just about touching the pads.
Other wires are connected to a socket that slid onto the pins I've already added (for another project) to ProtoSpring. This way the chip can be easily disconnected from the board, even if it stays soldered on.
Since it was my very first time with the I2C bus, I needed a bit of help with initial debugging: used Dangerous Prototypes' BusPirate v4 board, which worked like a charm (after a firmware upgrade:). BusPirate could identify the chip, and begin to talk to it a bit, which is enough to know we are on the right track. It also has an "I2C sniffing" mode to log all the data passing through the I2C bus - unfortunately that function does not work at the high speed of the I2C on Springboard (100/400kHz, sniffing works up to ~75kHz).
Hardware Design
The electronic schematic is pretty simple, there's only one incoming pin header, the ATSHA204A chip, and a debug pin header.
It cannot be much more straightforward, and there are not many free parameters that I could adjust about the schematic. The only part that I could really adjust is the pinout of the debug connector. There I used a recommendation I've read only about interleaving the clock (SCL) and signal (SCA) lines with the power. This also helped a bit with the PCB layout.
The PCB is quite simple too, though there's a lot more freedom for the designer. I wanted to make it as small as practically possible, but still making it useful. Most of the dimensions is set by the board-to-board connect header (2x7 set of 2.00mm pins), and the debug pins (1x4 row of 2.54mm/0.1" pins). The IC sits squarely in the center. The PCB is has 2 layers, the top power plane is ground, the bottom is VCC (which is 3.3V in this case, that being the only power line available on this connector).
A couple of little features were added for usability. I've added a hole (4.5mm dia) that can be used for keychain-mounting the final device. There's also a labeling area, where the user can mark each device for distinguishability.
The whole design took about 2 days going back and forth about some layout choices. The source code (including the Gerber files) is available on Github, and is under CC-BY-SA-3.0 as the original Hashlet.
The final version, or v1, was printed by Seeed Studio's Fusion PCB service. Took about a week including delivery. Here's the result:
The assembly is not too bad, though I think I have a bit to learn to make good-looking surface-mount solder joints. :)
Software and Usage
Cryptotronix has also written software to talk to the Hashlet and utilize all its functions over the I2C bus. Kudos for that, looking at the device spec sheet, I can barely imagine how big work that must have been...
Before I could use that, though, had to get through some hardware issues. By default the Springboard BSP sets the I2C bus to high speed (ie. 400kHz), and there I had difficulty reliably communicating with the Hashlet. After some discussion with the engineers, they gave me the right u-boot setting to switch to normal speed (ie. 100kHz). In the u-boot menu have to:
setenv wmt.i2c.param 0:0,1:0
To keep this setting over reboots, also have to do a "saveenv" afterwards. The meaning of the code is to set both the I2C-0 bus, and the I2C-1 bus to normal speed. Setting the former to normal, while keeping the latter at high speed would be "0:0,1:1". The default is "0:1,1:1".
With this change the communication became rock solid, and could start to experiment with the hashlet.
It can provide a random number source, can run MAC and HMAC-256, can store one-time-writable bits, and a lot more (see the Github repo's description).
Future
Hashlet for Springboard is now available on Tindie.
I can think of a few hardware design improvements. Josh, the original designer of the Hashlet reminded me that it's always good to have some decoupling capacitors on the power line. Also could add spots for optional extra pull-up resistors for possibly reaching 400kHz (one of the semi-hidden nuances of the I2C bus to get them right). Trying out the keychain hole, it could be possibly smaller a bit, and the PCB itself could be made thicker (e.g. 2mm instead of the default 1.6mm) for more mechanical strength if I think it will be used with keychains...
On the software side, I really hope to enable Hashlet on the upstream kernel, not just the BSP's 3.0.8 version. I have an experimental patch to use VAB-600 with the latest kernel that goes some way towards this goal (enabling the board and the I2C bus), but the I2C-WMT driver still seem to need some work... Cryptotronix is also working on a kernel driver so the chip can be used without dedicated software (if I got that right), and that would be awesome for unlocking more of the potential of this board...


Comments
Please log in or sign up to comment.