

Hardware components | ||||||
_ztBMuBhMHo.jpg?auto=compress%2Cformat&w=48&h=48&fit=fill&bg=ffffff) |
| × | 1 | |||
| × | 1 | ||||
Software apps and online services | ||||||
 |
| |||||
Hand tools and fabrication machines | ||||||
 |
| |||||
When I was a child, I was fascinated by drones and always wanted to have one. But they were not so common those days and quite expensive too. My brother once got a small cheap RC helicopter and we used to fly it almost every day till it's battery completely died. We were not competent enough to open it up and change the battery. So, that was it, my first and only experience with RC! But now, with a sound knowledge of electronics and lots of resources available on the internet, I want to build my own drone. Also, I am into photography as well and so I am planning to mount a camera onto it to get some cool shots from the above! But building a drone is one thing and flying it properly without crashing is totally a different thing. That's why I decided to build a small drone using Arduino to get a feel of the controls.
So, in this tutorial, I will be building an RC transmitter using theNRF24L01 radio module.
Let's get started!
Supplies1x ATMega328P microcontroller (with bootloader)
1x NRF24 Radio Transceiver and 1x with antennae
1x FT232RL USB to UART module for programming ATMega328 chip
1x 16 MHz Resonator
2x 3.3V Adapter Board for NRF24 module
Step 1: The PlanI did some research on the internet since I am very new to the RC world. I came across Electronoob's YouTube channel which has some great content on this topic. He has built a small drone using brushed DC motors which in fact inspired me to build my own. I will be following his build and making changes as per my needs.
Any radio-controlled system basically has two important components viz. Transmitter and Receiver. The transmitter is what you hold in the hand and move the knobs/joystick to control the drone. It 'transmits' the data which consists of the position of joysticks, switches, knobs, etc to the receiver. The receiver is what sits on the drone, listens to the incoming data from the transmitter and processes it in a way that the motors, servos, etc on the drone understands it. The communication between these two happens using radio waves. The NRF24 radio transceiver (transmitter + receiver) is responsible for the radio waves. To increase the range of the transmitter, we can buy a separate NRF24 module which comes with the amplifier and an antenna. However, we can use the normal module for the receiver. As long as the waves are able to reach the receiver, it will work just fine. So that's all the basic things you need to know. You can read all other good stuff on Electronoob's blog.
My plan is to build the drone in two parts. First I will make the transmitter and then the drone itself which will have the receiver built-in.
Step 2: Designing the PCBI got my PCBs manufactured from JLCPCB! Get your PCBs beautifully fabricated from JLCPCB for just 2$! The schematic has been attached and Gerber files can be downloaded from here.
The most important and necessary controls are throttle, yaw, roll, and pitch. These analog inputs will be provided by two 2-axis joysticks. I have added two 10k potentiometers to which other helpful controls like throttle trim, pitch trim, etc can be assigned. I have also used two switches to provide digital inputs which then can be used to toggle between different flight modes. For beginners like me, these inputs are sufficient to get started.
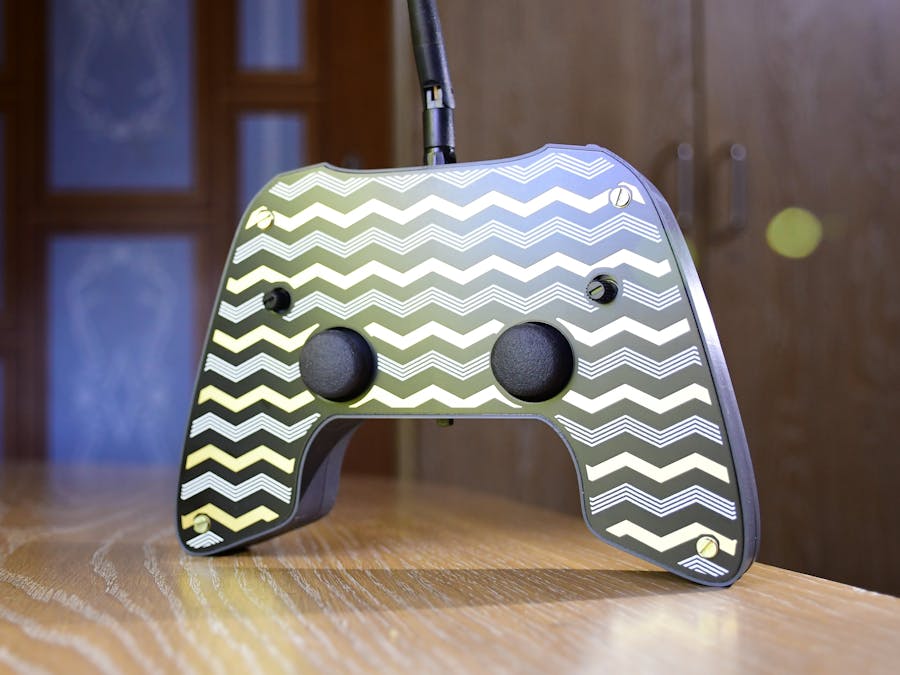
Arduino will be the brains of this build. You could use almost any Arduino development board like Nano. But to keep everything neat and tidy I decided to use the ATMega328P microcontroller directly on the PCB. First, I drew the outline of the shape of the controller in Fusion 360. I made sure it feels comfortable in hand and all the controls are easily accessible. Once I was happy with the shape, I imported it as DWG file in Altium Designer. I then made the connections as usual. I was about to call it a day when it struck me that I could design yet another PCB to go on top of the other one as a front cover. It would be more comfortable to hold too. Also, why not make a simple PCB art to make it look cool since doing this is a piece of cake in Altium Designer. Click here to get a free trial of Altium Designer. I asked my friend who is an artist (@swirls_of_solace) to create something which will look good on it and she didn't disappoint!
I have provided a female header connector to program the microcontroller using the RS232 FTDI breakout board. To be able to program it using the Arduino IDE, the bootloader should be burned onto it prior to soldering on PCB. I had salvaged the microcontroller from a Nano so it was already present. You can find many tutorials on the internet for burning the bootloader.
The most important and tricky part of this project is to power the NRF24 module correctly. The module works on 3.3V and can lead to current surges when powering ON or while transmitting the data. So, appropriate capacitors should be connected across the power rails. While testing the circuit I had used an AMS1117 3.3V power adapter board specially made for NRF24 modules and it had worked flawlessly. So I just recreated that circuit for this project.
Finally, this circuit will be powered by a 2-cell LiPo battery.
Step 3: AssemblyI used the same outline, which I had used to make the PCB, to create the body around it. The body is again divided into two parts. The battery will be placed between the bottom PCB and the body. I have used threaded inserts for the screws. Everything will go together as shown in the picture and be held together by 4 M3 screws.
I printed the parts in Grey PLA using Creality Ender 3
I have included the STL files.
Step 4: Time for Some CodeOnce you have assembled everything, connect the RS232L FTDI programmer to the port and upload the code provided. The only difference between mine and Electronoob's code is the pinout. I have connected the inputs to slightly different pins. That's the only change you need to do before uploading the code.
There are a few more changes that need to be done once the drone is built.
I have attached mine here.
Step 5: Enjoy!To test out our transmitter, I made a receiver on a breadboard using another Arduino (Uno) and a few servo(s) attached to the output to test out each channel. The NRF24 module connections are exactly the same as the transmitter. Connect the servo as follows:
VCC - 5V
GND - GND
SIG - D2/3/4/5/6/7
Here's a test code for the receiver:
/* Receiver code for the Arduino Radio control with PWM output
*
*  THIS ONLY WORKS WITH ATMEGA328p registers!!!!
*  It gives a nice PWM output on pins D2, D3, D4, D5, D6 and D7. Still working on it...
*
*  Install the NRF24 library to your IDE
*  Import the servo library as well
* Upload this code to the Arduino UNO
* Connect a NRF24 module to it:

Module // Arduino UNO

GND    ->   GND
Vcc    ->   3.3V
CE     ->   D9
CSN    ->   D10
CLK    ->   D13
MOSI   ->   D11
MISO   ->   D12
This code receive 6 channels and create a PWM output for each one on D2, D3, D4, D5, D6 and D7
Please, like share and subscribe : https://www.youtube.com/c/ELECTRONOOBS
*/
#include <SPI.h>
#include <nRF24L01.h>
#include <RF24.h>
#include <Servo.h>
//Define widths
int pwm_width_2 = 0;
int pwm_width_3 = 0;
int pwm_width_4 = 0;
int pwm_width_5 = 0;
int pwm_width_6 = 0;
int pwm_width_7 = 0;
Servo PWM2;
Servo PWM3;
Servo PWM4;
Servo PWM5;
Servo PWM6;
Servo PWM7;
//We could use up to 32 channels
struct MyData {
byte throttle;      //We define each byte of data input, in this case just 6 channels
byte yaw;
byte pitch;
byte roll;
byte AUX1;
byte AUX2;
};
MyData data;
const uint64_t pipeIn = 0xE8E8F0F0E1LL;     //Remember that this code is the same as in the transmitter
RF24 radio(9, 10);
void resetData()
{
//We define the inicial value of each data input
//3 potenciometers will be in the middle position so 127 is the middle from 254
data.throttle = 127;
data.yaw = 127;
data.pitch = 127;
data.roll = 127;
data.AUX1 = 0;
data.AUX2 = 0;
}
/**************************************************/
void setup()
{
//Set the pins for each PWM signal
//PWM2.attach(2);
//PWM3.attach(3);
PWM4.attach(4);
PWM5.attach(5);
PWM6.attach(6);
PWM7.attach(7);
//Serial.begin(9600);
//Configure the NRF24 module
resetData();
radio.begin();
radio.setAutoAck(false);
radio.setDataRate(RF24_250KBPS);
radio.openReadingPipe(1,pipeIn);

//we start the radio comunication
radio.startListening();
}
/**************************************************/
unsigned long lastRecvTime = 0;
void recvData()
{
while ( radio.available() ) {
radio.read(&data, sizeof(MyData));
lastRecvTime = millis(); //here we receive the data
}
}
/**************************************************/
void loop()
{
recvData();
unsigned long now = millis();
//Here we check if we've lost signal, if we did we reset the values
if ( now - lastRecvTime > 1000 ) {
// Signal lost?
resetData();
}
pwm_width_2 =  map(data.throttle, 0, 255, 540, 2400);     //PWM value on digital pin D2
pwm_width_3 =  map(data.yaw, 0, 255, 540, 2400);     //PWM value on digital pin D3
pwm_width_4 = map(data.pitch, 0, 255, 540, 2400);     //PWM value on digital pin D4
pwm_width_5 = map(data.roll, 0, 255, 540, 2400);     //PWM value on digital pin D5
pwm_width_6 = map(data.AUX1, 0, 1, 540, 2400);     //PWM value on digital pin D6
pwm_width_7 = map(data.AUX2, 0, 1, 540, 2400);     //PWM value on digital pin D7
//Now we write the PWM signal using the servo function
PWM2.writeMicroseconds(pwm_width_2);
PWM3.writeMicroseconds(pwm_width_3);
PWM4.writeMicroseconds(pwm_width_4);
PWM5.writeMicroseconds(pwm_width_5);
PWM6.writeMicroseconds(pwm_width_6);
PWM7.writeMicroseconds(pwm_width_7);
}//Loop end
If you have done everything right, then you should be able to control the servos using the joysticks on the controller. The next step is to build the drone itself and control it with this receiver.
Thank you for sticking to the end. I hope you all love this project. If you did, please make sure you subscribe to my YouTube channel for more such projects.


Comments