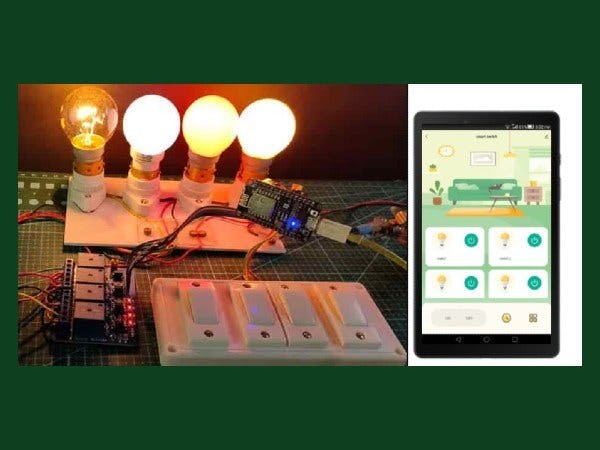
We always look for smart things to live one step ahead of others even if it is decorating your own home as a smart home. But there are some critical things while choosing smart home products, which one will be better and low cost, and more flexible to use? In this article, I will discuss how you can make smart home products on your own which can help you save your money and how you can also become a smart home products developer to earn money or start your carrier/ business with it.
About the Project :Today we are going to build an electrical load controlling project with relay, Arduino, and ESP32 to control 4 electrical appliances. Alternatively, you can use Tuya CBU Wi-Fi & Bluetooth module and Esp32. To make the device tiny and light-weight tuya module will be the best to use. Or you can use two esp32 one for the communication module and the other one for load control. Here on this project.
Required Components and Software :Hardware –- Wemos D1 Mini / Esp32 ( Communication Module)
- ESP32/ ESP8266 / Arduino Uno ( Load Controlling Module)
- 4 Channel Relay Board
- Connecting Wires
- Electrical Loads or light bulb
- Tuya Smart App
- Arduino IDE
- Tuya IoT Developer Account
- Tuya PMS Account
- TYDA Application
- CP210x Driver
Tuya is an IoT Cloud Platform that lets you connect your devices to the internet. They provide developers with a one-stop IoT PaaS-level solution that contains hardware development tools, global cloud services, and smart business platform development. Many popular smart home device manufacturers use Tuya’s platform for their appliances. You can also join Tuya as an IOT Product Developer or start a Business by Signing Up On the Tuya IoT Platform.
Tuya IoT Platform Working Process:Tuya IoT Platform is the main thing this type of Smart home project that communicates with the devices and the controlling apps back and forth. Once you click a button to turn on a switch to turn on a light bulb in Tuya smart app, it sends the request to the Tuya IoT Platform. Once the Tuya IoT platform gets the request, it sends the signal to the communication module in the hardware section. In the hardware section, there are three main sections,
- Communication Module that communicates with the Tuya IoT platform.
- Controlling board, that gets the signal from the communication module and controls the device to do the coolest stuff.
To build a smart home project or to develop a smart home/IoT product you will need to create a developer account on the Tuya IoT Platform. Go to Tuya.com and click the “Go to IoT Platform” As shown in the image below.
After you click the button you will land on the login/signup page, from there you fill the form and create the account.
Building a Smart Home Product In Tuya IoT Platform :Once you logged in you will land on a page that looks like this-
Click the Create Button to create an IoT product. After clicking the button you will lad on the page like this-
Today I’m going to build a switch so, I will be selecting the switch. You will select the types according to your needs.
Once you click the switch option, you will land on this page. As I am building my own IoT devices with some open-source modules I will select the Custom solution option.
In the Custom solution tab, there will be only one option to click-
In Step 3 you will need to fill in the information of your product like the name and the model of your product and the communication mode wi-fi and Bluetooth/ Wi-fi and many more. Once you completed filling in all the info click the Create button.
After creating the product you will land on a page where you will get lots of functionality to choose from for your switch. AS I just need to do the switching of my four loads, I have selected 4 switches from the left panel. Once you finish the selection click the ok button As shown in the image-
After clicking the “ok” button you will need to copy the PID of your product and have to mail the PID to devops@tuya.com from the mail account you have used to register in the Tuya IoT Platform.
After sending the PID you will get a Token from Tuya, keep it safe to use it for activation. Once you got the token, you will need to create an account to Tyua PMS
After you logged in go to Production Management >> Work Order Management >> Activation Code Verification. Paste the token here and click on Confirm.
Once you clicked the confirm button you get a pop-up message of successful activation.
Hardware setup and Firmware Burning :Step 1: Required Software InstallationTo start the work you need to download some packages and software Like TYDA Software, C210X Driver. You can download both files from here.
After downloading the package install the driver and TYDA Application like other software and driver.
Step 2: Tyda App SetupAfter Successful installation, open the Application, Select the setup option from the File menu select the burning baud rate 921600 and testing baud rate 9600 and leave the rest of the configurations as default. then click on the ok button as below.
After that, click on the Enter token button. Don’t forget to check the download firmware box is checked also in the workstation dropdown, you have selected “Burning Authorization” then inter the token you have got from Tuya DEV mail nad click ok, shown as below-
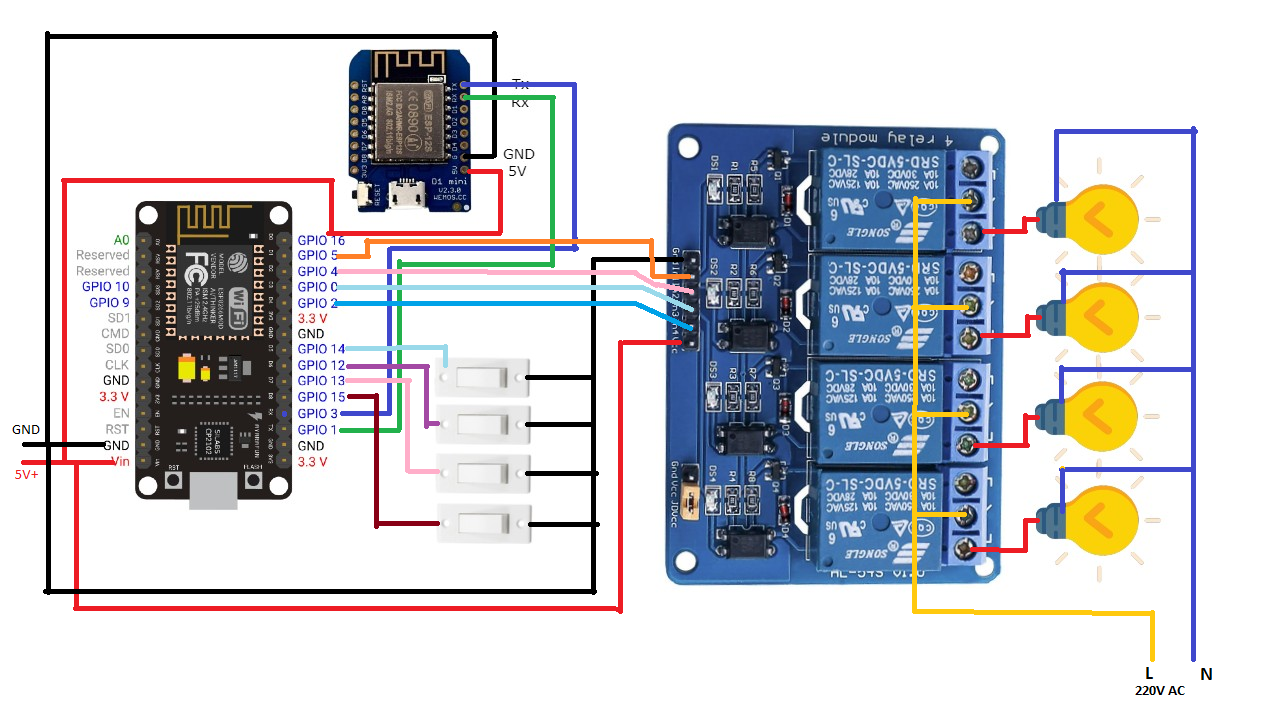
And now connect the ESP32/ESP8266/ Wemos D1 Mini, whichever module you want to use as a communication module. I’m using Wemos D1 Mini as shown in the Circuit diagram. Then select the correct COM port that is connected with the module. Click the Run Button once you see the ready text on the yellow screen.
Once the Buring of authorization code is completed and the yellow screen gets green, remove the module from your PC.
Controller Programming:Step 1: Arduino IDE InstallationNow we will start working on the controlling board, I have used ESP8266 as a controlling board. To do the programming you will need Arduino IDE software, if you don’t have the software then download Arduino IDE and install it.
Step 2: Tuya Wifi Library InstallationAfter installing the IDE open the IDE and click on Tools > Manage Libraries, a pop-up window, in this window type in the search bar “Tuya” and hit enter as shown below-
Once you have installed the library, there will be some pre-build programs/ sketches for the module. But we need to restart the IDE. After restart, click the File→ Example→ Tuya_WiFi_MCU_SDK → Start, you will get the pre-build/ demo starch there.
Step 3:Now, connect the ESP8266 with your PC and then click the “ Tool” button on the top bar select the correct COM port where the ESP8266 module is connected, and then Upload the sketch.
Step 4: Tuya Smart App Installation & ControllingDownload the Tuya Smart life App from thePlay Store / Apple Store. Once you install the app you will need to signup for an account. Put your mail address it will send you a 6 digit confirmation code to verify your account. Put the code correctly in the app then set the password.
Then go to the Tuya IoT Platform, select the product you have created then the device panel to choose an App UI for your product. I have selected this one-
Now when you are on this page, grab your mobile phone and open “ Tuya Smart App ”. Then click the red plus Button beside the little mic.
It will take you to this page- Click the scan icon as shown below
Then scan the QR code from the Tuya IoT Platform. Upon successful scanning, a device tab will appear in your Tuya smart App. Click on the tab-
Once you click it, you will see an interface like this- the UI you have selected in the Tuya IoT Platform. I have got this one as I had selected it, you can also develop your own app.
It is really a cool & interactive interface, you can turn all lights at once lights are on it will show up like this-
Adding Device to Tuya Smart APP:
From this article, we have learned how to build a smart product using the tuya IoT Platform with some cheap open-source IoT/ electronics modules. Now it’s time to get more benefits/ profits from The tuya IoT Platform.
Once you have joined the Tuya IoT Platform as an IoT developer you can use it to build your own smart home products or you can build for others as we now we know some developer is controlling 6-8 devices with One esp8266 and Wemos D1 Mini because those are really to fit in at the back of your home switchboard.
You can be an Independent IoT developer who helps people to build smart IoT products also you can develop a package for a home automation system and sell it to your local area.
So, let’s build some cool and smart IoT products with the Tuya IoT Platform.
Useful Links:


Comments