We are going to;
Connect the following wireless nodes to Azure Sphere;
- A wireless hall effect sensor to monitor a door open/close status,
- 3x wireless Pressure, Temperature & Humility sensors,
- A wireless tracker.
- Any of the above can also be used for control via GPIO or UART output.
We will use a GPIO controlled LED to indicate state and illustrate Azure IoT Central control.
Configure the Azure Sphere as a transparent gateway for Sensor & Control data between Azure IoT Central and the internal node network.
Configure an IoT Central dashboard to display sensor data and provide a simple control.
OverviewA distributed data system is any system of communicating nodes that each maintains data objects accessible as a single, coherent, data system. Our company, Koliada, maintains a Distributed Data System (EtherDATA) designed for the transparent access and management of distributed and replicated data objects on small embedded devices. This project uses Azure Sphere and Azure IoT Central to effectively monitor and control wireless sensor nodes with the help of EtherDATA.
The system consists of Azure IoT Central, a secure Azure cloud platform product, Azure Sphere, a secure IoT Gateway device and EtherDATA, a distributed data system that abstracts data access to a set of wireless sensor nodes arranged as a wireless mesh. The mesh is managed by EtherMESH, an embedded mesh protocol also maintained by Koliada for small, low power, embedded devices.
Sensor and control data is distributed through the wireless mesh using EtherDATA including a mesh gateway device connected to Azure Sphere using JSON over UART. The Sphere forwards data between the mesh and Azure IoT Central for remote monitoring and control.
Links to details of all the component parts are available at the end of this document.
Azure
Azure Microsoft's public cloud computing platform. It provides a range of cloud services, including those for compute, analytics, storage and networking. Users can pick and choose from these services to develop and scale new applications, or run existing applications, in the public cloud.
This project specifically uses the Azure IoT central service.
Azure IoT Central
Azure IoT Central is a fully managed IoT software-as-a-service solution that makes it easy to create products that connect the physical and digital worlds. You can bring your connected product vision to life by:
• Deriving new insights from connected devices to enable better products and experiences for your customers.
• Creating new business opportunities for business.
The Azure IoT Central has four personas who interact with an Azure IoT Central application:
• A builder is responsible for defining the types of devices that connect to the application and customizing the application for the operator.
• An operator manages the devices connected to the application.
• An administrator is responsible for administrative tasks such as managing users and roles within the application.
• A device developer creates the code that runs on a device connected to your application.
Azure Sphere
Azure Sphere is a secured, high-level application platform with built-in communication and security features for internet-connected devices. It comprises a secured, connected, crossover micro controller unit (MCU), a custom high-level Linux-based operating system (OS), and a cloud-based security service that provides continuous, renewable security.
The Azure Sphere hardware, software, and Security Service enable unique, integrated approaches to device maintenance, control, and security. The hardware architecture provides a fundamentally secured computing base for connected devices, allowing you to focus on your product.
The software architecture, with a secured custom OS kernel running atop the Microsoft-written Security Monitor, similarly enables you to concentrate your software efforts on value-added IoT and device-specific features.
The advantage of using the Azure Sphere as part of this project is that it provides a highly secure gateway to an internal network of sensors and controllers. Using Sphere allows the internal network to be lower complexity, lower cost, and significantly lower power, without compromising the security of the overall system.
EtherDATA
EtherDATA is a data definition, storage and access system that addresses the needs of data replication and communication across small, distributed, nodes using a simple data definition paradigm. EtherDATA addresses the following architectural precepts;
Logical Data Independence
EtherDATA data objects are described and accessed via a data schema.
Physical Data Independence
EtherDATA data objects are stored and referenced by a logical to physical mapping defined by the system and made available to the application as a system service.
Network Transparency
EtherDATA can be implemented over a variety of networking technologies including, but not limited to TCP/IP, Ethernet and Wireless using a variety of node architectures. The details of communication and node architecture are hidden from the application.
Replication Transparency
Data replication improves the locality of reference and improves the redundancy of access in the event of failure. EtherDATA data objects can be transparently replicated across nodes, or groups of nodes, in a network.
Fragmentation Transparency
Small-embedded systems do not have the resources to store all the data accessible by the system and any database must be fragmented across the network nodes. EtherDATA hides this fragmentation from the application.
EtherDATA does not provide relational database management facilities. It is designed specifically to easily abstract data references for small, heterogeneous systems. In an 8051, EtherDATA can be deployed in as few as 5k bytes ROM and negligible RAM footprint (< 128 bytes).
In this project, EtherDATA uses Koliada’s underlying wireless mesh technology, EtherMESH, for mesh networking connectivity.
EtherMESH
A mesh network is a type of network topology where each node must not only capture and disseminate its own data, but also serve as a relay for other nodes.
EtherMESH;
Is a homogeneous mesh of heterogeneous nodes
- All frames can reach all nodes
Uses an optimized flood fill algorithm for dynamic routing and propagation
- Single ‘broadcast’ transmission reaches all local nodes reducing RF ‘chatter’.
- Simple store & forward architecture.
- Patent pending optimizations for traffic management
- Eliminates the need for specific node types
A self synchronizing communications
- Significantly reduces configuration requirements.
- Eliminates the need to be awake for any longer than necessary to communicate.
For the purposes of our project, EtherMESH provides the following key features;
1. Low Power consumption
2. Ease of deployment, and
3. Ease of management.
KoliadaES
KoliadaES is a homogeneous modular embedded system for heterogeneous embedded development. It is both a paradigm for embedded systems development and implementation.
We used E3 Embeddeds PIEP boards and KoliadaES to quickly bring up the data nodes.
PIEP
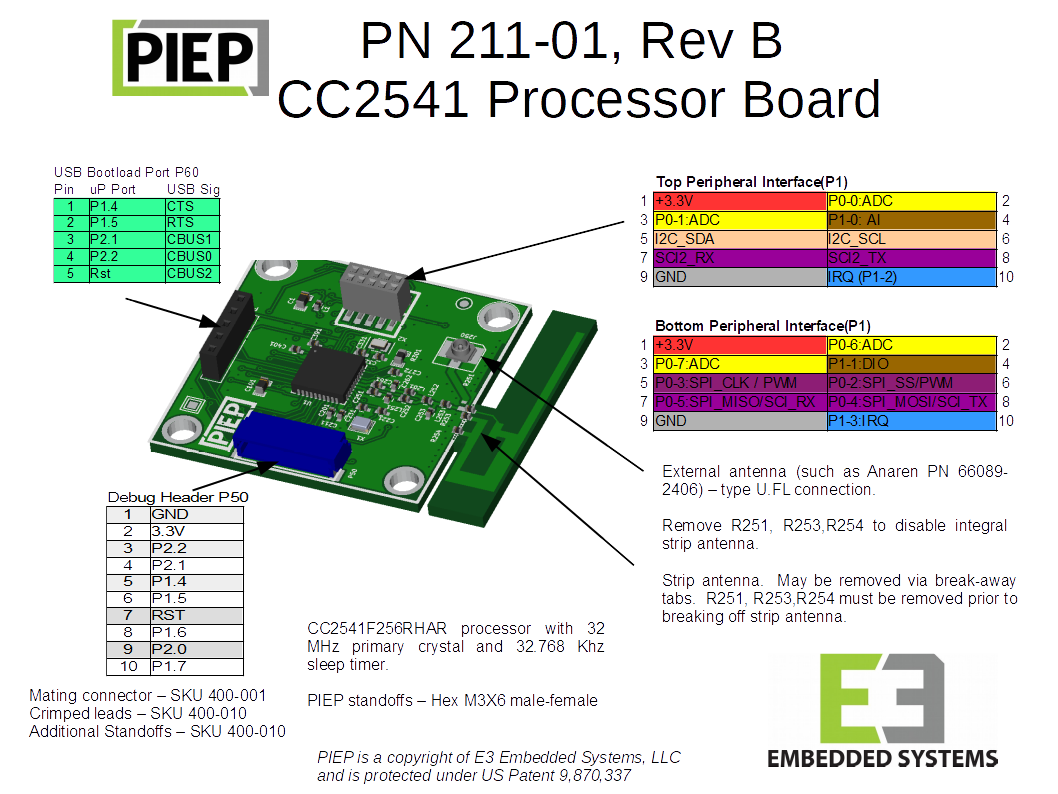
The potential of KoliadaES, a modular embedded system, is leveraged by PIEP - the Processor Independent Embedded Platform, a modular hardware system from E3 Embedded.
PIEP system consists of multiple stackable boards of different kinds be it a processor or a peripheral or a breakout boards which are interchangeable.
A change in MCU architecture is achieved by a by simply replacing the processor board and, when using KoliadaES, leveraging the same source code and the same peripherals.
Hardware and Software RequirementsIn order to get setup with this project, we need.
1. To set up the end Gateway - Azure sphere device
Hardware
- Azure sphere MT3620 kit
- PIEP-KOLIADA station stack x 1
Any PIEP Processor Board
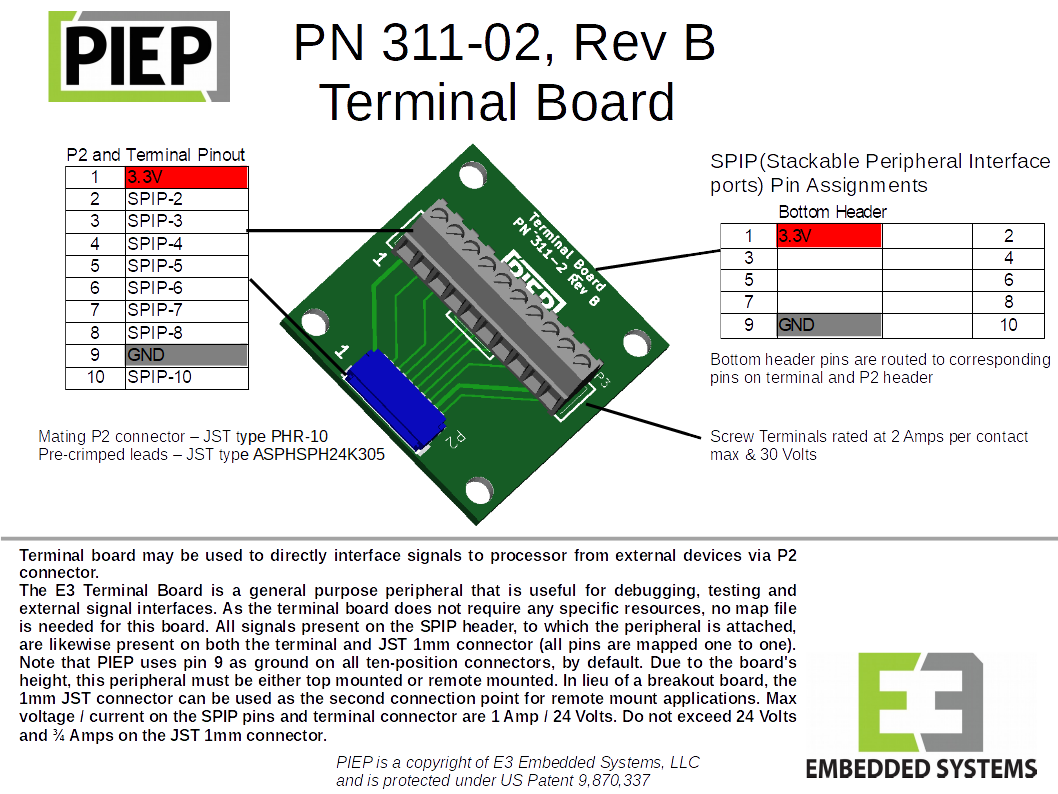
Terminal Board
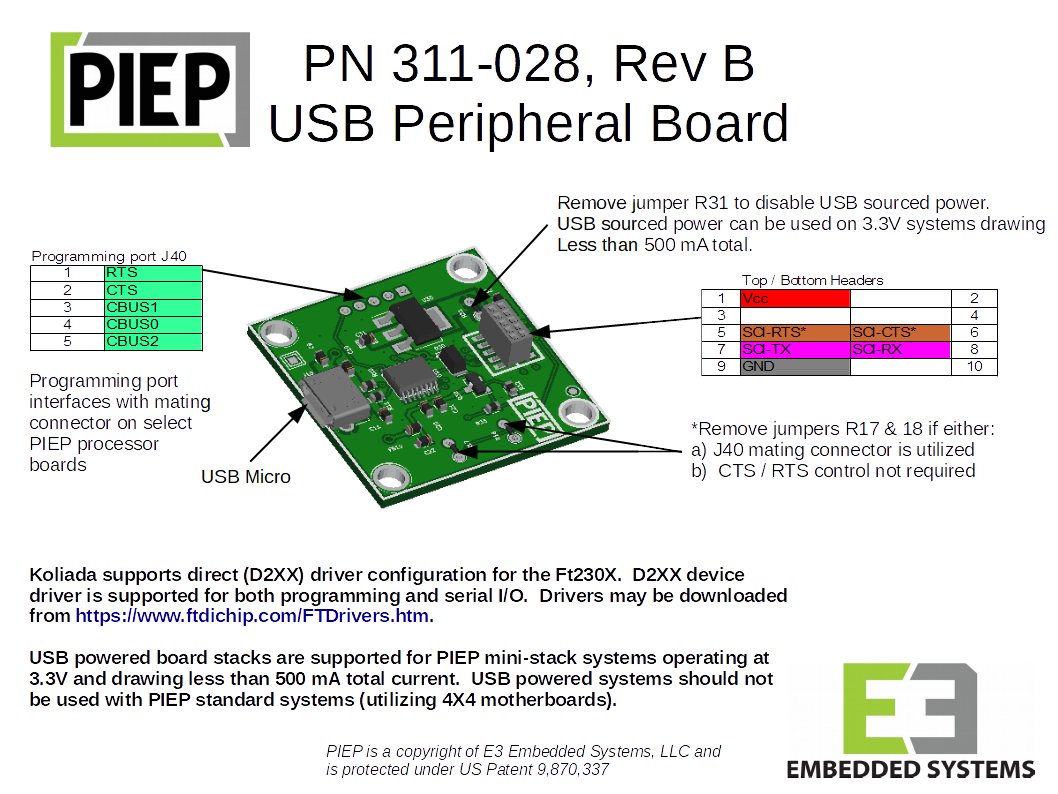
USB Board
Software
• Windows 10 version 1607 or later
• Azure Cloud Services (Azure IoT Central)
Tools
• Visual Studio VS2017 15.9+ or VS 2019 16.04+
• Azure Sphere SDK for visual studio
• Azure sphere developer command prompt
2. To set up the KoliadaES systems
Hardware
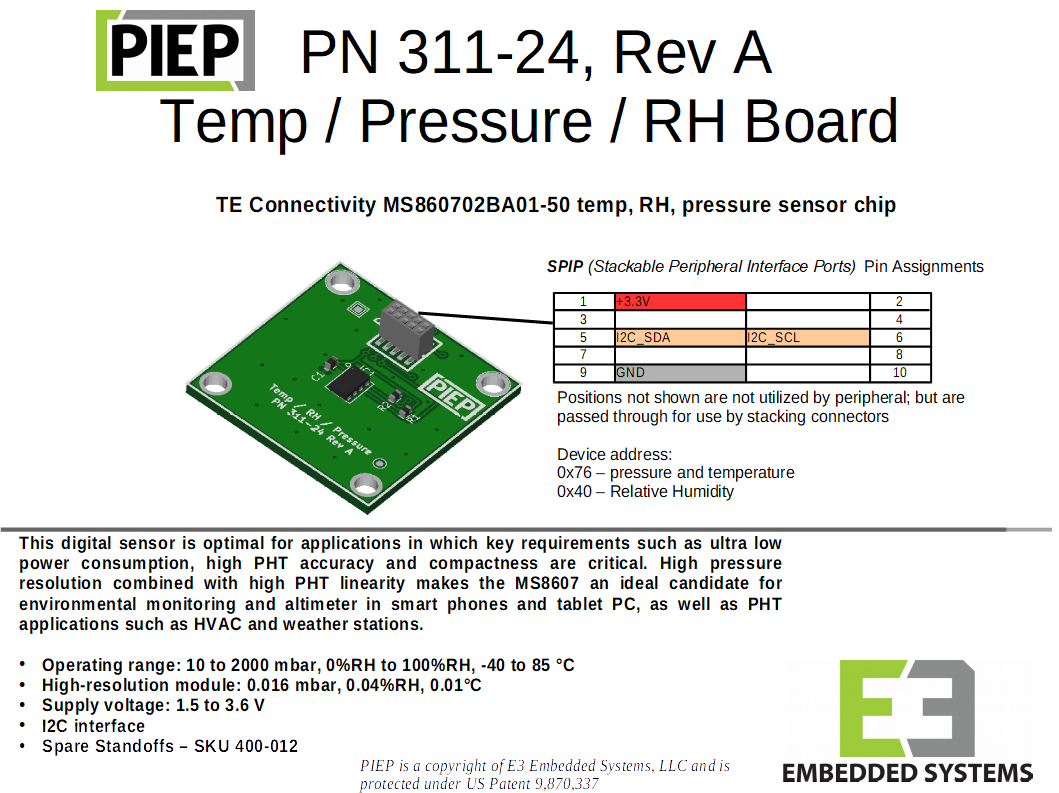
• EtherDATA Pressure/Temperature/Humidity stack x 3
Any PIEP Processor Board
Temp/RH/Pressure Board
USB Board
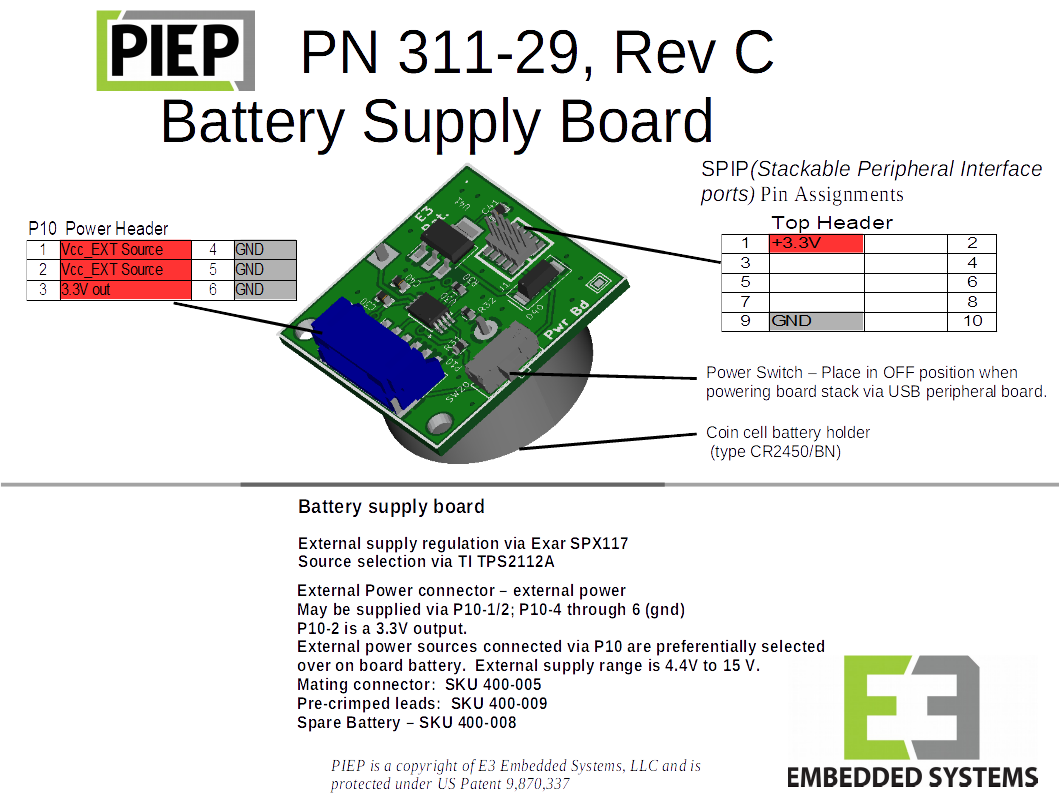
Battery Board
• EtherDATA Tracker stack x 1
Any PIEP Processor Board
Battery Board
USB Board
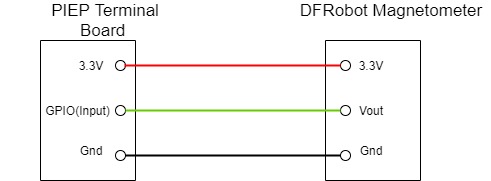
• EtherDATA magnetometer stack x 1
Any PIEP Processor Board
Terminal board
Battery Board
USB Board
• EtherDATA Station stack x 1
Any PIEP Processor Board
Terminal board
USB Board
• External magnetometer sensor
Software
• Windows 10 version 1607 or later
• KoliadaES SDK
• Visual Studio Code (or any make based IDE)
Tools
• Visual Code Version 1.39 or higher (or any make based IDE)
• KoliadaES SDK
In our deployment we used the PIEP Mini TI CC2541 processor board, but any wireless enabled, KoliadaES supported, MCU can be used with the same application code.
Building the SystemThe system consists of a set of wireless sensor nodes that are actively measuring and communicating their data with each other using KoliadaES’s proprietary mesh protocol (EtherMESH) and a distributed data system (EtherDATA). EtherDATA is integrated with Azure sphere to forward this data to the Azure IoT central database.
The key components are
• Three Pressure/Temperature/Humidity nodes that record PHT data every 30 seconds.
• A tracker node that is used to track the location of an asset or a person. etc. that records data every 10 seconds.
• A magnetometer (magnet sensor) used to track the door or gate state.
Note: All of these communicate their data over the mesh network as soon as there is a new sensor reading or battery value.
• A station node (part of the mesh network) collects all of the sensor and battery data from the above nodes and communicates it to
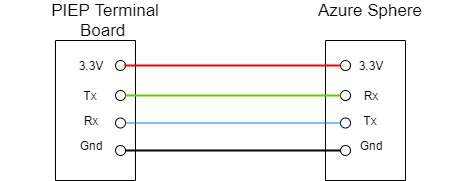
• Azure Sphere device (over UART or Serial communication). Azure Sphere has the capability to push this sensor that it has received from the PIEP Koliada station to the Azure IoT Central Database.
• The Azure IoT Central provides access to a web based dashboard that populates the above received sensor data that can be monitored remotely using any web browser.
Building the PIEP-KoliadaES-Sphere-Azure System
Step 1
Download and install KoliadaESDK(TM).
Follow the KoliadaESDK instructions for installation (https://docs.koliada.com).
Step 2
Assembly instructions for the PIEP Nodes
Before you get started with assembling the PIEP boards make sure that each of these boards are stacked on top of each other and the header pins are aligned as shown below.
Use screws for stacking all the boards to keep them intact.
Now let us stack the boards necessary for this project.
- PHT (Pressure/Temperature/Humidity ) stack
- Tracker Stack
- Magnetometer Stack
- Station stack
Dowloading KoliadaES to the built PIEP Nodes
You will find all the mesh node code on our KoliadaES examples page (https://docs.koliada.com).
Build and flash the projects provided for each node. Note that different projects need different binary components. The project manifest is used by the loader to determine which binaries are needed for each node device.
Once you have programmed each PIEP stack, turn the nodes on – they will form a mesh running EtherDATA.
Now you need to establish the connection between the nodes and the Azure Sphere which can then push the data to the Azure IoT central for remote monitoring.
Step 3 - Setting up an Azure Account
If you do not already have one, Microsoft also provides documentation on using Azure, as well as the service we use, Azure IoT Central. Azure IoT Central allows users to manage their IoT devices remotely, as well as offering statistics and visuals to help represent the collected data.
After you have an account, Create an IoT Central Service and follow the instructions here provided by Microsoft to authorize your Azure Sphere.
Now you can create the IoT central Dashboard
To prepare Azure IoT Central dashboard to display humidity, temperature, pressure, battery, door data from the wireless sensor nodes, you need to follow the instructions given here.
Step 4 - Connecting the Station Stack to Azure Sphere
One of the projects in Step 2 builds a system for connecting the EtherDATA mesh to the Azure Sphere.
Now you have established the connection between Azure Sphere and EtherDATA and the meshnetwork. The wireless sensor network is successfully forwarding its data to Azure sphere. In order for the adapter program to connect your device to your IoT Central service and forward all of the data collected on the Station Stack you need to setup an Azure Cloud account and Azure IoT central service.
You can separately verify the data collection by connecting the Station Stack’s Terminal Board to a UART-USB adapter plugged in to a PC and running any terminal program at 115200 baud. You will see JSON strings being emitted;
This shows data from various nodes (nodes are a group of one node) according to the schema defined for EtherDATA; batteryValue, eValue (Temp, Humidity & Pressure) and DoorState (for more details on the EtherDATA schema see below).
Step 5 - Setting up Azure Sphere
To start getting set up, follow Microsoft’s documentation Azure Sphere Setup. This link will walk you through the steps on installing the Azure Sphere SDK and getting your device ready for application deployment.
Side load our attached Program onto your Azure Sphere
Follow the instructions from Microsoft on Sideloading an application. Use the provided Github code to have your Azure Sphere ready to use the KoliadaES Adapter program.
Now you have setup everything that’s required for this project.
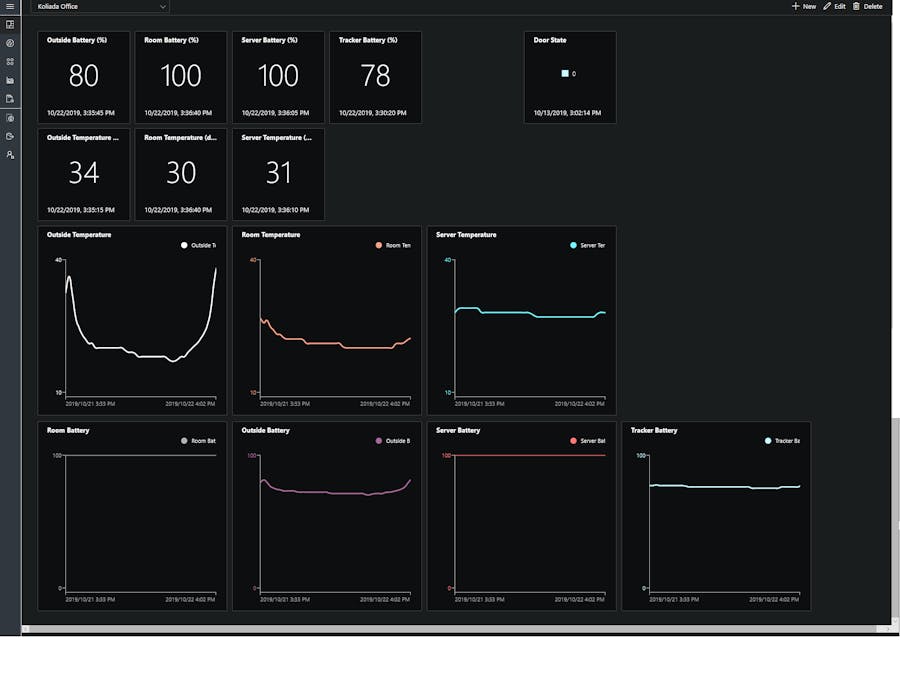
What’s happening?Now all of the wireless sensor nodes are sampling data and distributing that data throughout the mesh. This data is then forwarded through the station node to azure sphere via serial communication. The sphere runs a connection module to connect to Azure services and it pushes the data it received (from the station node) to the Azure IoT Central database. Now you can see your dashboard being updated with live data as shown below.
You should see the following behavior:-
• The Temperature, Pressure, Humidity and the battery data from all the three nodes should be updated on the dashboard every 30 seconds and the plots for the most recent data can be seen as well.
• The DoorState (Magnetometer data) is updated every time the state changes. In our case we attached the sensor to a magnetic door and DoorState is updated every time the door is opened or closed.
The Temperature, Pressure and Humidity stacks can be placed in different locations up to 50m range of any other mesh node. Here we have one monitoring the house room temperature placed on a glass coffee table.
The second PHT stack is placed in the server system shelf to monitor the server temperature.
The third PHT stack is placed outside the house on the patio to monitor the ambient outside temperature.
The magnetometer is attached to the door to send a signal when the door is opened or closed.
The tracker device is placed in a backpack to track whether the backpack is in the house and also provide the history of when the backpack was taken out and into the house.
The station node is connected serially to the Azure Sphere. It forwards data between the mesh nodes and the Azure Sphere and thus Azure IoT Central.
This system provides a great framework for secure monitoring and control of multiple individual wireless nodes. Data and control UI can be accessed from a PC or a mobile phone. Since all of the data is forwarded to the Azure IoT Central, it is convenient for remote monitoring and control from any part of the world.
Code ExplanationEtherDATA (DISTRIBUTED DATA) – Setting up Node Data
EtherDATA uses a meta data file (.ddl) to describe managed data objects. We specify a set of monitoring and control objects per the example shown here;
UInt8 batteryValue
{
description "current (uncalibrated) battery value";
access readonly;
units "/4096";// raw 12 bit value
}

int eValue[3]
{
description "Current Humidity Sensor Value";
access readonly;
units "% or deg or mbar";
}

byte deviceType
{
description "Device Type";
// 1 - station
// 2 - tracker
// 3 - DoorSensor
// 4 - PHT
access readonly;
}

byte DoorData
{
description "Door values";
access readonly;
}
EtherDATA objects are globally defined and must be the same for all nodes in the mesh. Network global definition allows EtherDATA to access and manage data objects from any node.
In the application, we then use the EtherDATA API to publish data objects, from the specific nodes, through the network as shown here;
dbPublish(eValue);		// for PHT nodes only
dbPublish(batteryValue);	// all nodes have a battery
dbPublish(buttonData);		// for nodes with buttons
Only PHT nodes have the sensors for pressure, temperature and humidity and thus dbPublish(eValue) needs to be called only from the PHT nodes. They are the nodes publishing PHT data.
Similarly, the magnetometer node uses dbPublish(DoorData) and dbPublish(batteryvalue) is used on all nodes using a battery.
dbPublish merely tells EtherDATA to publish the data object when it becomes available, it remains up to the application to determine when that is.
The following command sets/updates the data object value upon every sample from the sensors.
dbSet(eValue, data);		// PHT nodes
dbSet(batteryValue, data);	// all nodes
dbSet(DoorData, data);		// magnetometer node
dbSet(buttonData, data);	// button nodes
The value of the data item will be derived from the underlying system using system interfaces to the GPIO, ADC, SPI, UART and similar. Typically samples are taken a timer event handler and the dbSet function called to post the data to EtherDATA for distribution.
Finally the station node needs to include the following configuration code in order to receive all the updated data from the other sensor nodes.
dbSubscribe(“*”,eValue, callback);
dbSubscribe(“*”,batteryValue, callback);
dbSubscribe(“*”,DoorData, callback);
dbSubscribe(“*”,buttonData, callback);
As mentioned earlier all EtherDATA objects are globally defined and this allows any node in an EtherDATA system to be accessed and managed the same way in all nodes.
Aside from some basic setup and event handling, described in the project files, and though a lot more could be said to describe EtherDATA, EtherMESH and KoliadaES, this pretty much summarizes the setup of the mesh nodes.
Azure Sphere - Setting up the IoT Central database connection
The Azure SDK main.c file contains the necessary initialization for setting up the connection handle to the Azure IoT Central. The Azure IoT Central/Hub defines are shown here;
#include "parson.h" // used to parse Device Twin messages.
// Azure IoT Hub/Central defines.
#define SCOPEID_LENGTH 20
static char scopeId[SCOPEID_LENGTH]; // ScopeId for the Azure IoT Central application, set in // app_manifest.json, CmdArgs
static IOTHUB_DEVICE_CLIENT_LL_HANDLE iothubClientHandle = NULL;
static const int keepalivePeriodSeconds = 20;
static bool iothubAuthenticated = false;
static void SendMessageCallback(IOTHUB_CLIENT_CONFIRMATION_RESULT result, void *context);
static void ReceiveHubMessage(IOTHUB_CLIENT_CONFIRMATION_RESULT result, const unsigned char *payload, size_t payloadSize, void *userContextCallback);
static void TwinCallback(DEVICE_TWIN_UPDATE_STATE updateState, const unsigned char *payload,
size_t payloadSize, void *userContextCallback);
static void TwinReportBoolState(const char *propertyName, bool propertyValue);
static void ReportStatusCallback(int result, void *context);
static const char *GetReasonString(IOTHUB_CLIENT_CONNECTION_STATUS_REASON reason);
static const char *getAzureSphereProvisioningResultString(
AZURE_SPHERE_PROV_RETURN_VALUE provisioningResult);
The connection strings for the Azure account and scope ID is set as shown here;
int main(int argc, char *argv[])
{
Log_Debug("IoT Hub/Central Application starting.\n");
mydoorstate[0] = '0';
if (argc == 2) {
Log_Debug("Setting Azure Scope ID %s\n", argv[1]);
strncpy(scopeId, argv[1], SCOPEID_LENGTH);
}
else {
Log_Debug("ScopeId needs to be set in the app_manifest CmdArgs\n");
return -1;
}
Log_Debug("UART application starting.\n");
if (InitPeripheralsAndHandlers() != 0) {
terminationRequired = true;
}
// Main loop
while (!terminationRequired) {
if (WaitForEventAndCallHandler(epollFd) != 0) {
terminationRequired = true;
}
}
ClosePeripheralsAndHandlers();
Log_Debug("Application exiting.\n");
return 0;
}
The InitPeripheralsAndHandlers initializes the UART and waits for the UART Event(i.e. the data to be received from the station node).
static void UartEventHandler(EventData *eventData)This event handler does the necessary parsing whenever it receives data from the station node through UART as shown here;
{
const size_t receiveBufferSize = 128;
uint8_t receiveBuffer[receiveBufferSize + 1]; // allow extra byte for string  termination
ssize_t bytesRead = -1;
for (int i = 0; i < 32767 && bytesRead == -1; i++) {
bytesRead = read(uartFd, receiveBuffer, receiveBufferSize);
}
if (bytesRead < 0) {
Log_Debug("ERROR: Could not read UART: %s (%d).\n", strerror(errno),  errno);
terminationRequired = true;
return;
}
The parsed datatype (PHT value, battery or doorstate) and node name is then identified and the corresponding data is pushed to Azure IoT Central as shown here;
SendRoomTemperature(evalue1);
SendRoomHumidity(evalue2);
SendRoomPressure(evalue3);


static void SendRoomTemperature(const unsigned char *value)
{
static char eventBuffer[100] = { 0 };
static const char *EventMsgTemplate = "{ \"RoomTemp\": \"%s\"}";
int len = snprintf(eventBuffer, sizeof(eventBuffer), EventMsgTemplate, value);
if (len < 0)
return;
IOTHUB_MESSAGE_HANDLE messageHandle = IoTHubMessage_CreateFromString(eventBuffer);
if (messageHandle == 0) {
Log_Debug("WARNING: unable to create a new IoTHubMessage\n");
return;
}
if (IoTHubDeviceClient_LL_SendEventAsync(iothubClientHandle, messageHandle, SendMessageCallback,
/*&callback_param*/ 0) != IOTHUB_CLIENT_OK) {
Log_Debug("WARNING: failed to hand over the message to IoTHubClient\n");
}
else {
//Log_Debug("INFO: IoTHubClient accepted the message for delivery\n");
}
IoTHubMessage_Destroy(messageHandle);
}
That sums up the mesh → Azure forwarding responsibility of Azure Sphere device. Similar mechanisms in reverse take control requests and forward them to the mesh.
Now the rest is on the Azure Central. Since a device was already prepared in advance on the IoT Central (that mimics our setup) the IoT Central knows the setup and is awaiting for all data (PHT value, battery or doorstate) to come in.
SummaryWith no prior knowledge of Azure Sphere or Azure IoT Central, it took about 5 days to bring up the described nodes, configure the Azure Sphere to move data between the mesh and Azure IoT Central.
In suitable containers, the PIEP hardware is designed for robust field deployment and arbitrary user interaction. The PIEP boards are readily reduced to custom, user spec’d, hardware with no code changes required. PIEP plus KoliadaES provides a simple way to prototype robustly and, as desired, move to production without extensive production engineering time & costs.
We have multiple similar mesh deployments fielding data and control in home, industrial and healthcare settings. Azure Sphere allows us to simply and securely connect these networks to the internet.
LinksVisual Studio;
• Installing Visual Studio Code
Azure;
• Getting started and using Azure IoT Central
Azure Sphere;
• Getting started with Azure sphere
• Setting up device and installing Azure SDK
• Adding Telemetry measurments
PIEP;
EtherDATA & KoliadaES;
Customizing the EtherDATA applicationThis distributed data system is plug and play and easy to use for a variety of applications. For more details on how to start creating/customizing new applications with KoliadaES, please contact us via http://www.koliada.com






Comments
Please log in or sign up to comment.