


Hardware components | ||||||
 |
| × | 1 | |||
| × | 1 | ||||
| × | 1 | ||||
 |
| × | 1 | |||
| × | 1 | ||||
| × | 1 | ||||
| × | 1 | ||||
Software apps and online services | ||||||
 |
| |||||
 |
| |||||
As a new product on the market, the Sony's Spresense board provides significant Arduino compatibility with some key built in capabilities. In order to check Arduino compatibility and explore the built in GPS/GNSS, I ported one of my Arduino UNO projects over to the Spresense.
This project is a pared down Arduino variation of an operating, outdoor, self-sustaining weather station. The station is a solar-powered Stevenson screen, which results can be seen on ThingSpeak channel 71933.
The following is just the core electronics for sensory reading and internet posting capability. It is intended to inspire and guide you on your own integration with Spresense, for which you might find your own variations. This article does not cover the aspects of the Stevenson screen housing and solar capabilities.
Like all projects of this kind, you may encounter issues relative to hardware or software component variations for which you may need to investigate further and resolve.
Basics of the ProjectBefore we view and consider porting to the Spresense, the basics of the project must be understood. The weather station has two essential parts; reading and processing of data, and reporting readings.
- Three sensory readings will be taken from two boards. The temperature and barometric pressure from the BMP180 board, and ambient light read from an Light Dependent Resistor (LDR) board.
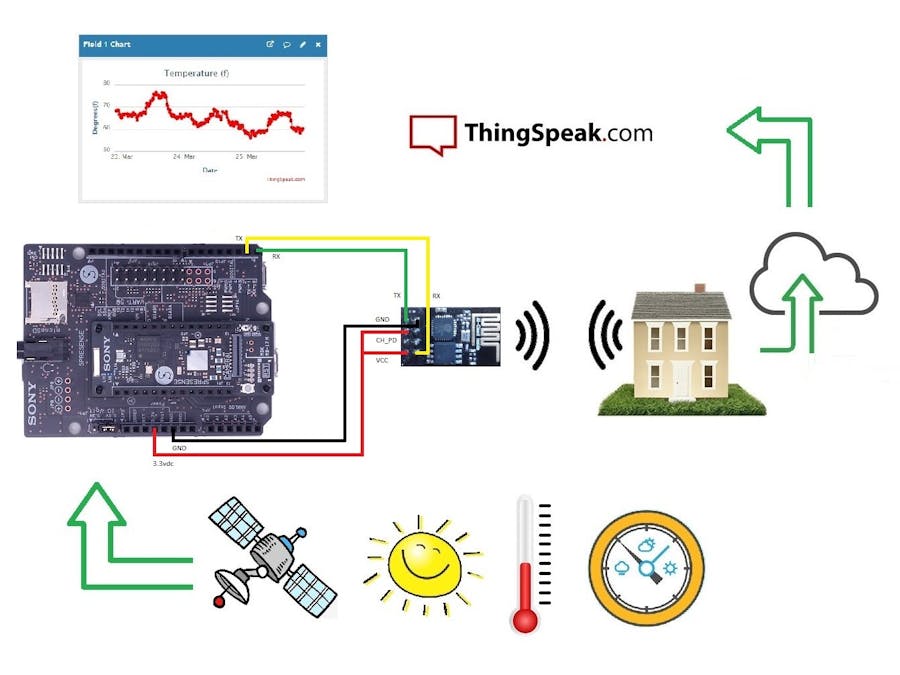
- Reporting of data will be process by using a ESP8266-01 to connect wirelessly to a network and subsequently post data on a hosting provider; in this case, ThingSpeak.
I will first cover the ESP8266-01 and ThingSpeak integration first in order to more easily discuss sensor integration.
ESP8266-01 - WiFi Connection
First, prepare your wiring as follows. Using the two red jumpers, you will need to splice them together so one end has a single male pin, and the other end has two female connectors. The single make pin will connect to the 3.3V DC on the Spresense board.
Next, connect the ESP8266. Typical wiring to an UNO would result in using SofwareSerial library, as the standard RX/TX pins are shared with the IDE monitoring. Since the Spresense is enhanced with two separate UARTs, the limitations requiring SoftwareSerial is removed. For the Spresense, D0/D1 are used for RX/TX which is UART2, and the IDE Monitor is tied directly to the USB port; UART1.
Spresense      Color     ESP8266     UNO
3.3vdc         Red       VCC         3.3vdc
3.3vdc         Red       CH_CD       3.3vdc
GND            Black     GND         GND
D0(RX)         Green     TX          D10(RX) SoftwareSerial
D1(TX)         Yellow    RX          D11(TX) SoftwareSerial
The pins and wiring is the same for both. The small grey wire is not necessary for operation (only for special programming/flashing)
The pins and wiring to both above is the same. The small grey wire is not necessary for operation, however required for programming or flashing if necessary. Since there are many different ESP8266-01 on the market pre-flashing may be necessary. The one used and recommended here is a black ESP8266-01 1M wireless transceiver, which is pre-flashed with a defaulted baud rate of 115200.
ThingSpeak
For IoT data collection and reporting, you will need to set up an account on ThingSpeak. The process will not be covered here and can be followed on there site at https://thingspeak.com/. It is recommended you review the concept of channel and how data collection and reporting is achieved before continuing.
After setting up an account on ThingSpeak, you will need to set up channels. Channels represent your data stores. Each channel still have a unique number, and a unique API key. The channel number is used for locating the data store on the internet, and the API key is used for reading and posting data to/from ThingSpeak. The below screens represent channels, and API key settings.
Each channel can be defined with a number of settings. These settings help define the channel, and establish the fields to be saved associated with the channel.
Once all is set up and programmed properly, the expected results will show on the private tab within the channel as follows:
ThingSpeak is a very easy cloud data store to prototype or actively use for your project. There is an IoT reference and help information directly available, and many of the graphs can be customized using MATLAB capabilities.
The sample code provide with this article will run through 3 levels of connectivity; first to connect to the ESP8266, second to connect with the local wifi, and third to connect and post to your ThingSpeak channel. It is the second and third level that will require specific configuration.
Modify the provided code in the following areas:
#define SSID "hostname"			// Hostname of wifi AP
#define PASS "en338sir"			// Encrypted password of wifi AP
#define APIKEY "********HIUSUF75"	// API Write Key on TS Channel
The hostname/SSID is easily applied, however this code does contain an encryption routine to set PASS value. By reversing the logic of the decryption routine you can determine how to encrypt your password. Regardless, the code can be changed to simply by-pass this altogether. The last element here is the APIKEY. This key is “write” API key on the ThingSpeak channel.
BMP180 - Temperature and Barometric Pressure
The BMP180 is a simple I2C device on the market that will acquire Temperature and Barometric pressure readings. The wiring of the BMP180 for both an Arduino UNO and Sony's Spresense is below. For the Spresense, wiring of SCL and SDA are different than the UNO. Spresense uses to digital pins D14(SDA) and D15(SCL), as apposed to the UNO's A4 and A5.
UNO      SPRESENSE      Color      BMP180
GND      GND            Black      GND
3.3vdc   3.3vdc         Red        3.3vdc
A4       D14            White      SDA
A5       D15            Blue       SCL
To support the programing, there are a few good libraries out there for the BMP180; one sourced from Adafruit, and the other from SparkFun. The Adafruit functions are easy to use, but a little less sophisticated and less open sourced. Whereas, the SparkFun library is a little more operationally thought out, however a bit complex. I considered the SparkFun a better developed library and prefer it over the Adafruit version.
Include supporting libraries, instantiate library functions, and setup. In this case, using the SparkFun library SFE_BMP180.
#include <SFE_BMP180.h>       // Include SparkFun library for
#include <Wire.h>             // Include the synchronous Wire library
SFE_BMP180 bmp180;            // Instantiate the BMP library functions
#define ALTITUDE 213.36       // Default
void setup(){
  if (bmp180.begin()) {
    Serial.println("BMP180: Sensor is OK");
    BMPfailure = false;
  }else{
    BMPfailure = true;
  }
}
Within the loop and before posting data, you will need to convert as required. Values returned are in Celsius for Temperature, and millibars for Pressure. The data then can then be carried forward to post on ThingSpeak. Note the difference here with the requirement of multiple functions used to get just temperature and pressure this makes the use more versatile.
void loop(){
 double tempT, tempP;                // Used for bmp180 function calls
 bmpStatus = bmp180.startTemperature();
 if (bmpStatus != 0){
  delay(bmpStatus);                  // Wait for measurement to complete
  bmpStatus = bmp180.getTemperature(tempT);
  if (bmpStatus != 0){
   xTemp = ((tempT*9.0)/5.0)+32.0;   // Read Celsius convert Fahrenheit
   bmpStatus = bmp180.startPressure(3); // Set oversampling 0-... (10)
   if (bmpStatus != 0){
    delay(bmpStatus);                // Wait for measurement to complete
    bmpStatus = bmp180.getPressure(tempP,tempT);
    if (bmpStatus != 0){
      xPres = tempP;
      xPres = bmp180.sealevel(tempP,ALTITUDE); // Compensate for Altitude
    }else{
      xPres = 0.0;
      Serial.println("BMP180: Error retrieving Pressure; 0mb used!");
    }
   }else{
    xPres = 0.0;
    Serial.println("BMP180: Error Starting Pressure readings; 0mb used!");
   }
  }else{
   xTemp = 0.0;
   Serial.println("BMP180: Error retrieving Temperature; 0.0F used!");
  }
 }else{
  xTemp = 0.0;
  Serial.println("BMP180: Error Starting Temperature readings; 0.0F used!");
 }
Now, posting this on ThingSpeak will require you to change/set fields within the channel settings as well as reflecting the change in the code as follows. In this example, fields 1 and 3 were used:
cmd += "&field1=";   sprintf(buff,"%.2f",xTemp);     cmd += buff;
cmd += "&field3=";   sprintf(buff,"%.2f",xPres);     cmd += buff;
LDR/Photocell - Ambient Light
Is it night or the middle of the day? Understanding ambient light supports its corollaries such as dawn and dusk, overcast or partly cloudy. The following Light Dependent Resistor (LDR) is a simple circuit for which you can wire up directly with a resistor, or create a breakout board like illustrated. Regardless the wiring is the same on the UNO and the Spresense, and the code simple.
UNO        Spresense     Color      LDR sensor
GND        GND           Black      GND
A0         A0            White      Data
3.3vdc     3.3vdc        Red        3.3vdc
Initialize with any available analog pin.
#define CELPIN A0 // Analog pin for the LDR (Ambient Light)
Within the loop and before posting data, you will need to get the ambient light reading. Depending on the type of LDR used, your readings will vary. I believe in this example I used a 100kohm LDR with a 10kohm resistor. Tied together with 3.3vdc voltage, grounded, and the tap connected to A0 (or available analog pin), reading should fall between 0 and 1000.
xLite = analogRead(CELPIN); // Read Ambient Light from Analog pin
Now posting this on ThingSpeak will require you to change/set field within the channel settings as well as reflecting the change in the code as follows. In this example, field 4 was used and since this is an integer value, no float formation conversions was required:
cmd += "&field4="; cmd += xLite;
Example of ambient light readings posted to ThingSpeak. If you notice the Temperature postings show a similar decline to the ambient light; as the sunsets, the temperature drops.
Within the code the following are operation modes defined in the beginning of the program. Each, when defined or not, can provide control in a delivered/compiled executable.
- BROADCAST – Used to allow connection and postings to the internet. Turn off for testing other code without having to exercise this process.
- MONITOR – Is used to support IDE monitoring, as the program is in motion
- POST_PERIOD – Represents the cyclical delay between each sensor reading/posting
At this time, the basic weather station should be operational and posting readings on ThingSpeak. If not posting, check all wiring and programming elements.
Even though this is a simple demonstration, I currently keep operational wireless, self-sustaining weather station. This status was recently re-platformed from and Arduino ProMini to an Arduino UNO, reducing the number of integrated wiring. The operating weather station data has been made available on ThingSpeak, and is subject to change at any time as this is always under some change.
Regardless, the basic platform will also support other ideas for data hosting/reporting; some examples may include:
- Remote Electricity or Solar panel system monitoring
- Remote Agriculture field water flow monitoring
- Remote Geological/Geothermal measurements
- Remote Fish tank or Green house monitoring
- And much more…
Wait, please don't stop here. The purpose of this is not only to re-platform the weather station from an UNO to a SPRESENSE, but to also incorporate some added capability of the SPRESENSE board.
Spresense Added CapabilityThe following is a basic change to incorporate Spresense capabilities into this project.
1. GNSS satellite connection and geo location data will be exercised and posted to ThingSpeak as longitude and latitude fields (field7 and field8); this will support storing readings for the benefit of a mobile sensory platform. Longitude and Latitude fields should not be confused with the channel setting fields with the same name.
2. The onboard LEDs on the Spresense main board are used to provide a further visual que to operational activity without needing the IDE display monitor.
Spresense - Onboard LEDs
The Spresense is really two boards the main board is a thumb size board which sits on the larger extention board. On whole, the platform is physically the dimensions as the Arduino UNO. Its smaller main board, offers 4 status LEDs; numbered 0 - 3.
Turning these LEDs on an off is as simple as executing Led_On(LED0); or Led_Off(LED0); and are represented as follows:
LED    When Off     When On
0
1
2
3
Spresense - GNSS/GPS Geolocating
The Spresense is delivered with a sample sketch for reading GPS/GNSS satellite data. Deconstructing and applying the GPS example sketch, the following was added to the Basic sketch discussed to additionally capture and populate Latitude and Longitude. In this example code was added as follows:
Include the GNSS library
#include <GNSS.h>              // Include the Sony Spritzer GPS library
SpGnss gnss;                   // Set the alias to the library functions
SpNavData *pNavData;           // Pointer for NavData
char caString[36];             // Character Array for formatting String
float xLong = 0.0;             // Default Longitude         0.0
float xLati = 0.0;             // Default Latitude          0.0
Instantiate and set up the library functions for use and open the GNSS radio for listening
void setup(){
 gnss.setDebugMode(PrintInfo);      // Put GPS readings into a debug mode
 int r;
 r = gnss.begin();                  // Initialize GNSS handling
 if (r != 0){                       // Error encountered
  Serial.print("GNSS: Unable to initialize! (");Serial.print(r);Serial.println(")");
 }else{
  r = gnss.start(COLD_START);       // Start GNSS listening
  if (r != 0){                      // Error encountered
    Serial.print("GNSS: Unable to start! (");Serial.print(r);Serial.println(")");
  }else{
    Serial.println("GNSS: Is online/listening"); // GSNN is online
  }
 }
}
The following is a core routine to check for Satellites and pull data if available
// --- Satellite check ------------------------------------------------
boolean getNavData(SpNavData *pNavData){
  boolean ret;
  if (pNavData->posDataExist == 0)  {
    Serial.println("GNSS: Position is not yet fixed");
    ret = false;
  }else{
    ret = true;
  }
  return ret;
}
Within the loop and before posting data, you will want to check if the satellite is available to pull data. The data can then be carried forward to post on ThingSpeak. Remember, posting this data with other sensory reading is what we want. We are not posting the “channel setting” longitude and latitude values as channel setting values assume a stationary platform location. The approach used here has practical use on moving platforms; like a ship on open water or storm chasing in the Midwest.
void loop(){
// --- Get location -----------------------------------------------------
  if (gnss.waitUpdate(-1)){           // Have an update?
    SpNavData NavData;
    gnss.getNavData(&NavData);        // Receive in Nav data if available
    if (getNavData(&NavData)){        // There is data!
      pNavData = &NavData;
      xLong = pNavData->longitude;
      xLati = pNavData->latitude;
      Serial.print("GNSS: Found Satellite! ");
      sprintf(caString, "%3.6f, %3.6f\0", pNavData->longitude, pNavData->latitude);
      Serial.println(caString);
    }else{
      Serial.println("GNSS: No satellite discovered");  // No satellite
      xLong = 0.0;                    // Default if not read longitude
      xLati = 0.0;                    // Default if not read latitude
    }
  }else{
    Serial.println("GNSS: Data not updated");  // Catch if data not updated
  }
}
Now posting this on ThingSpeak will require you to change/set fields within the channel settings as well as reflecting the change in the code as follows. In this example, fields 7 & 8 were used:
cmd += "&field7=";   sprintf(buff,"%.6f",xLong);     cmd += buff;
cmd += "&field8=";   sprintf(buff,"%.6f",xLati);     cmd += buff;
*As reading location was actually stationary, the nature of geo locating shows some variation. These variations can be a result of triangulation between rotating satellites over time, radio strength and number of satellites picked up, and other variations.
ConclusionPorting code the Sony's Spresense is rather easy, there are however some changes that might need to be applied, and some are called out here. Others, can be referenced in their online documentation.
Although I have incorporated using the onboard GPS/GNSS into this project, the Spresense offers other capabilities that can be explored; such as onboard SD card, MP3 read/play capability, various forms of speaker control and more.
With these features, Spresense provides another angle for IoT development and future exploration.
For more information on the Spresense, see the following:


Comments