

Hardware components | ||||||
| × | 1 | ||||
| × | 3 | ||||
| × | 6 | ||||
| × | 1 | ||||
| × | 1 | ||||
| × | 1 | ||||
 |
| × | 1 | |||
Software apps and online services | ||||||
 |
| |||||
 |
| |||||
Hand tools and fabrication machines | ||||||
 |
| |||||
| ||||||
Abraham and I designed this badge for the soldering challenge during the Jalisco Maker Faire.
It seems soldering challenge is becoming a thing :P this Hackster badge is a blinky one but we used SMD components.
Used Inskscape and the svg2Shenzhen extension to create the "art" and import it to KiCAD.
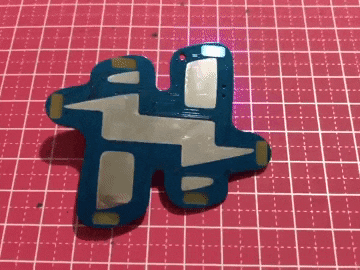
This Hackster badge has a HASL finish on blue solder mask, 6 blue LEDs controlled by ATTINY13 and powered with a CR2032 battery.
Made super large pads so it would be easier to solder.
Most of the components were samples from Avnet suppliers.
-Microchip: ATTINY.
-Vishay: resistors and capacitor.
-TE connectivity: slide switch and programming header.
So part of the PCB art includes these suppliers' logo and Hackster's.
Based on previous experience we weren't sure the silkscreen would meet our expectations, so we decided to build 5 boards for starters.
And the result:
I didn't like it very much so I made the silkscreen a little bit bigger hoping this would make the details look better. And changed the battery footprint.
And the board:
The Jalisco Maker Faire was a 2 day event and the soldering area was available for people who wanted to solder a pin or badge. They had some soldering irons and a lot of volunteers
They had other badges too.
This was the Maker Faire pin.
We showcased a bunch of projects we have done during the last couple of years, made some games so people who pass by our stand could get the Hackster badge and other fun prizes (stickers, Arduino boards, other badges).
One of the games was the fishing game, basically you need to fish all fish before time up.
And a winner.
It was a popular game!
I changed the silkscreen so many times I forgot the simple purpose of it: orientation of the LEDs, so it was hard to know how to place the LEDs we asked the participants to take a picture of our soldered board. Please see instructions further on.
This guy did a great work.
We've used ATTINY85 in the past so it didn't occur to me to even check libraries or registers for the ATTINY13, the AVR low power library I was using in other projects of ATTINY85 didn't work for ATTINY13 and due date was the day after tomorrow x_x in the end, I used the Arduino AVR C watchdog example and hoped for the best, it kinda worked just skipped the random function because ATTINY13, well just has 1KB of flash :/
The code just turns on each LED infinitely I am unsure of the power consumption but we tested over 15 hours and so far so good even with blue LEDs which have higher power consumption.
I had so little time to take pictures that I missed people soldering the Hackster badge. But, here are more pics of people soldering stuff,.
I think it was a fun project to build :) but if it's your first time soldering you have to take your time and use tweezers to hold the pieces.
If you want to make one yourself or custom the program, please follow the following procedure:
1. Get your Hackster Badge Soldered according to the picture. Remember that the LEDs are being soldered backwards with the light side facing against the PCB causing the light being diffused by the PCB material, also double check the orientation of the LED cathode.
2. Solder a couple of 1 x 3 0.1" standard pin headers in the locations of J1. Insert a CR2032 battery to the holder.
3. If you have an Atmel ICE programmer, download Atmel studio from the Microchip site: https://www.microchip.com/mplab/avr-support/atmel-studio-7 and install it.
4. Download the attached file "attiny13_code.ino.hex" located in the attachments section.
5. Connect the Atmel ICE programmer to a USB port. Connect ISP cable to the AVR port of the programmer and the other side to the badge header. The cable header has a notch that should be oriented according to the picture:
6. Slide left the switch to turn on the board. The programmer will turn on a green light indicating power ok.
5. Launch Atmel Studio.
6. Go to Tools -> Device Programming.
6. A new window opens. Type "ATtiny13" on the device text box, then click on Apply. Finally click on the read button and get sure the Device signature and Target Voltage are being read from the device:
7. Fuses programming. Go to the Fuses tab, uncheck the LOW.CKDIV8 check box and click on Program.
8. Memory programming. Go to Memories tab, browse for the "attiny13_code.ino.hex" file, then click on Program. Some seconds later your badge will blink its LEDs. You can close Atmel Studio now.
Please comment if you still have questions n_n


Comments