


Hardware components | ||||||
 |
| × | 4 | |||
| × | 1 | ||||
| × | 1 | ||||
 |
| × | 1 | |||
 |
| × | 1 | |||
 |
| × | 1 | |||
 |
| × | 1 | |||
| × | 1 | ||||
Hand tools and fabrication machines | ||||||
 |
| |||||
 |
| |||||
I’ve always loved Pokémon and have been playing recently on my iPad through emulators. Even though emulator devices works well, I want a more compact device that has physical buttons for a more enjoyable experience, and Bluetooth to connect any audio devices remotely to. Throughout the project, I ran into many obstacles relating to the emulator integration and screen. I will continue troubleshooting the emulator issues I ran into. I hope to create a 3D printed shell in my own time and utilize the PCB to fully create the device to use!
BackgroundOn other emulators, I really enjoyed playing romhacks for pokemon (basically fan-edited games) such as Pokemon Radical Red and Pokemon Heart Gold. I found that most rom-hacks were based off of Fire-Red, and so I looked into the best ways to emulate the GameBoy Advance. After searching different sources, I found that Visualboyadvance was my best bet, but that RetroArch was a popular frontend for emulators and decided to explore both options. My biggest challenge would be to integrate my individual parts into the emulator, something I definitely learned on the way. When looking through the previous projects for inspiration, I found many Arduino-based gaming devices using ArduBoy software and Raspberry Pi-based devices using RetroPi. However, there was little information utilizing the PocketBeagle. I mostly took inspiration from Max Thrun, who had created a BeagleBone Gaming Cape which was very well done with its own custom PCB (https://bear24rw.blogspot.com/2013/07/beaglebone-gamingcape.html). While his design was very well thoughtout, it had difficulties actually playing the games and was made almost 10 years ago. My goals here were pretty straightforward: 1) run the emulator; 2) Utilize improved controllers; 3). connect audio devices with Bluetooth.
Building the Current Version of the ProjectPocketBeagle Setup
In terms of part selection, I utilized the PocketBeagle due to the compact size, number of pins, and requirement within our class. I had experimented with Linux as an operating system in high school and found it extremely difficult to learn so this definitely was a challenging experience. For $25, the PocketBeagle is very affordable and still allows for complex device setup, with almost every part being very customizable.
Setting up the PocketBeagle is relatively straightforward. First, I soldered all the pins onto the bridge. DO NOT solder it upside down like I did. Functionally, it works, but resetting it and interfacing with the expansion pins was frustrating because it was flipped over. After that, I followed the standard procedures to connect my device to my computer and to internet via USB.
Buttons and Joystick
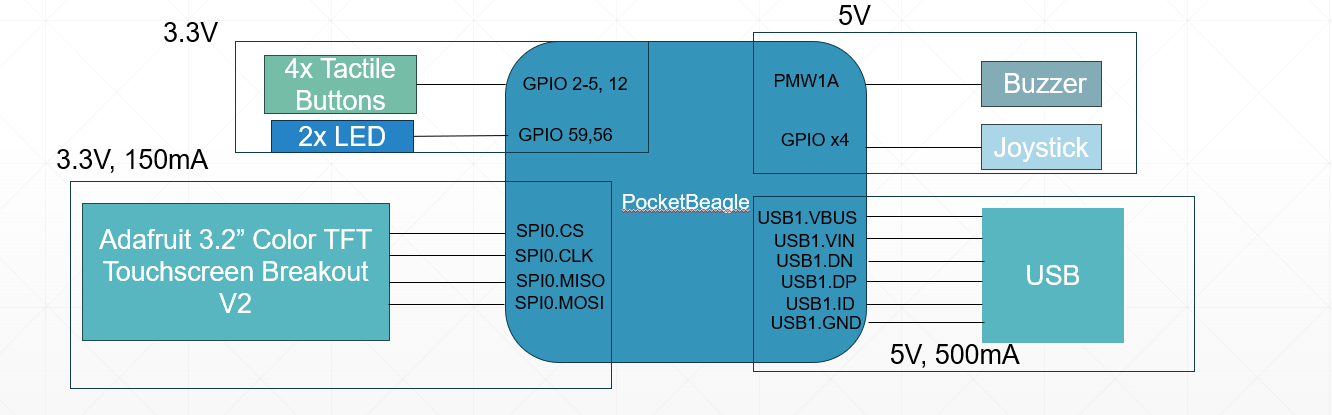
I utilized 4 buttons and 1 joystick to emulate the GameBoy controls. Hooking up the buttons was very straightforward, as I set them up in an active high configuration (one leg connected to ground, the other to 3.3V with GPIO pin), and connected them to a GPIO pin. The Joystick was more challenging because of the ports on the PocketBeagle. The Joystick requires 5V or 3.3V. However, the PocketBeagle only takes has two 3.3V analog input pins, one of which I had to utilize for the SPI screen. Due to this, I created a voltage divider with two 1k Ohm resistors for each analog input (VRX and VRY), which then were input directly into the 1.8V Analog inputs. I used a 3.3V input for VCC, which was able to work well. To test that these work,
LED
Hooking up the LEDs were very straightforward, with the + (longer) leg going to GPIO and the shorter leg connected to ground.
Bluetooth
Setting up Bluetooth was straightforward. I followed this guide on the beagleboard website. After connecting my USB adaptor to the PocketBeagle and inserting the Bluetooth adapter, I followed the following steps to connect to a Bluetooth speaker.
debian@beaglebone:/var/lib/cloud9$ bluetoothctl

[NEW] Controller 38:D2:69:DA:F0:39 beaglebone [default]

[bluetooth]# power on

Changing power on succeeded

[bluetooth]# agent on

Agent registered

[bluetooth]# default-agent

Default agent request successful

[bluetooth]# scan on

Discovery started

[CHG] Controller 38:D2:69:DA:F0:39 Discovering: yes

[NEW] Device 04:52:C7:A7:10:5F Bose Mini II SoundLink

[NEW] Device 43:88:48:B8:62:1A BS-01

[bluetooth]# pair 43:88:48:B8:62:1A

Attempting to pair with 43:88:48:B8:62:1A

[CHG] Device 43:88:48:B8:62:1A Connected: yes

[CHG] Device 43:88:48:B8:62:1A UUIDs: 00001101-0000-1000-8000-00805f9b34fb

[CHG] Device 43:88:48:B8:62:1A UUIDs: 0000110b-0000-1000-8000-00805f9b34fb

[CHG] Device 43:88:48:B8:62:1A UUIDs: 0000110e-0000-1000-8000-00805f9b34fb

[CHG] Device 43:88:48:B8:62:1A UUIDs: 0000111e-0000-1000-8000-00805f9b34fb

[CHG] Device 43:88:48:B8:62:1A ServicesResolved: yes

[CHG] Device 43:88:48:B8:62:1A Paired: yes

Pairing successful

[CHG] Device 43:88:48:B8:62:1A ServicesResolved: no

[CHG] Device 43:88:48:B8:62:1A Connected: no

[bluetooth]# connect 43:88:48:B8:62:1A

Attempting to connect to 43:88:48:B8:62:1A

[CHG] Device 04:52:C7:A7:10:5F RSSI: -51

[CHG] Device 43:88:48:B8:62:1A Connected: yes

Connection successful

[BS-01]# scan off

[BS-01]# exit
SPI Screen
The biggest challenge during this was the screen. Initially, I selected a 3.5 in TFT SPI screen with an ILI 9488 chipset. Because it was much more budget friendly compared to the other similarly sized screens, I thought it was a very good deal. However, there are very few drivers for the ILI9488 display specifically for the PocketBeagle, and I had to dig through many posts to find compatible drivers. Working with Dr. Welsh, I was able to find drivers that work (but displayed artifacting) using the following code from this source. Using the code in the repository, I was able to display a few different colors that would refresh multiple times each second. However, there was artifacting (2 faulty lines on the screen) that must be fixed.
# Initialize Framebuffer for SPI screen
sudo modprobe fbtft_device name=flexfb gpios=reset:87,dc:89,cs:5 speed=24000000 &&\
sudo modprobe flexfb width=480 height=480 buswidth=8 init=\
-1,0x01,\
-2,120,\
-1,0x36,0xE8,\
-1,0x3A,0x66,\
-1,0x21,\
-1,0x11,\
-2,120,\
-1,0x29,\
-2,20,\
-1,0x13,\
-3
To confirm that the framebuffer is setup, run dmesg in terminal and you should see the following message
[ 4556.313774] fbtft_device: module is from the staging directory, the quality is unknown, you have been warned.
[ 4556.315604] fbtft_device: GPIOS used by 'flexfb':
[ 4556.315622] fbtft_device: 'reset' = GPIO203
[ 4556.315628] fbtft_device: 'dc' = GPIO1
[ 4556.315634] fbtft_device: 'led' = GPIO0
[ 4556.315640] fbtft_device: 'cs' = GPIO67
[ 4556.315666] spi spi0.0: flexfb spi0.0 40000kHz 8 bits mode=0x00
[ 4556.441204] flexfb: module is from the staging directory, the quality is unknown, you have been warned.
[ 4556.948816] graphics fb1: flexfb frame buffer, 480x480, 450 KiB video memory, 4 KiB buffer memory, fps=20, spi0.0 at 40 MHzTesting with Adafruit's ILI9341 2.8in screen yielded much better results (shout out Sunny for letting me use her screen). Using the below code, I was able to setup the frame buffer and push pictures to the screen!
First, run these two lines first and see if the screen displays anything
sudo modprobe fbtft_device name=adafruit28 debug=7 verbose=3 gpios=dc:89,reset:87You should be able to see the screen buffer folder within /dev/fb0. To get something onto the screen, use and you should see static on the screen.
cat /dev/urandom > /dev/fb0One problem I faced was that the PocketBeagle would never startup properly with IL9488 screen connected, meaning that I would need to disconnect my screen whenever I wanted to reboot my PocketBeagle. Because the current draw shouldn't be too high from the components I selected, I figured there was some issues booting up due with the current draw from the USB.
Emulator Troubles
The biggest challenge I faced was actually getting an emulator to run. I tried my setup with Retroarch, visualboyadvance-m, desmume and Advance MAME with little success.
To install retroarch, I tried two methods using apt and snap store. In order to install using apt, sudo apt install retroarch, which did not have any issues installing. However, I would always encounter the same problems as seen below. I messed around with the retroarch.cfg file with little success. Similar problems occured when running through the snap store.
debian@beaglebone:~$ retroarch
error: XDG_RUNTIME_DIR not set in the environment.
error: XDG_RUNTIME_DIR not set in the environment.
Segmentation fault
Next, I looked into visualboyadvance-m, which seemed to be the most promising emulator since it had the best compatibility in debian. I installed first through the snap store, which yielded another segmentation fault. I tried editing the configurations for the snap store, which did not have much documentation. In order to manually connect, you can't really specify which device is required. Most of it is reliant on the system's default, which I could also not figure out. In the end, I gave up with snap store and tried to compile the game itself.
debian@beaglebone:~ snap run visualboyadvance-m
mkdir: cannot create directory ‘/run/user/1000’: Permission denied
Segmentation fault
Compiling visualboyadvance-m from github turned out to be extremely frustrating as well. Following the directions (https://github.com/visualboyadvance-m/visualboyadvance-m), I tried to compile the device and ran out of memory. I was able to compile it overnight by creating a swap space on my hard drive using this link (https://www.cyberciti.biz/faq/linux-add-a-swap-file-howto/), but this took extremely long to finish. After compiling it, I could not find the actual visualboyadvance-m run file. After looking through the github and forum posts, I really could not figure out how to actually run the game, as visualboyadvance-m command did not work. Even after searching through the build location, I did not find anything to start the program.
I also tried with the debian package using sudo apt install visualboyadvance. This worked well enough, but I encountered following issue and could not find a good fix for the solution. I had added my own VisualBoyAdvance.cfg and vba-over.ini files, so maybe finding the directory where it is natively installed and running from there would be better. However, I could not for the life of me figure out where/how to run it.
VisualBoyAdvance version 1.8.0 [SDL]
Searching for file VisualBoyAdvance.cfg
Searching current directory: /var/lib/cloud9/ENGI301/project_01
Reading configuration file.
Searching for file vba-over.ini
Searching current directory: /var/lib/cloud9/ENGI301/project_01
Reading vba-over.ini
Failed to init SDL: Unable to open a console terminal
Frustrated with the lack of GameBoy Advance emulators, I tried a few outside emulators such as Desmume. I was hopeful because Desmume had a lot more support than the other two emulators, and followed their github and wiki to compile it from source using these instructions. I ended up having problems again even after further testing, but it does seem to have a solution if more time is spent in it. At least for desmume, I knew that it was a display issue even though the framebuffer had been setup. In the end, I decided to do a little more digging and found another guide with promise
debian@beaglebone:~$ desmume

(desmume:5257): Gtk-WARNING **: 04:34:37.626: cannot open display:Lastly, I tried Advance MAME using a guide from Mouser. What was unique about this guide was that they utilized a PocketBeagle and included its own device tree layout, hopefully solving the problem of the OS not recognizing the display's frame buffer. I had tried to setup the ILI 9488 frame buffer using the fbtft driver, but messed up while setting the device tree and ended up having to reinstall Debian on a new SD card. This page provided a detailed explanation of how to set this up on the BeagleBone Black.
Following their guide, I used their Device Tree Overlay Creation Guide in their github repository to setup the button and screen setups. I then installed Advanced MAME following their instructions with few problems ( I utilized -j1 while building the code as -j3 ran into issues for me). Even though button and displays were mapped in the device tree, I still ran into problems with the audio drivers. The guide had provided its own advmame.rc configuration file, but that did not fix the issue. Configuring the Advance MAME configuration file by removing the ALSA also did not eliminate the error code, and importantly, the video did also not initialize.
debian@beaglebone:~$ sudo advmame robby
[sudo] password for debian:
AdvanceMAME - Copyright (C) 1999-2018 by Andrea Mazzoleni
MAME - Copyright (C) 1997-2003 by Nicola Salmoria and the MAME Team
ALSA lib pcm_dmix.c:1108:(snd_pcm_dmix_open) unable to open slave
ALSA lib pcm_dmix.c:1108:(snd_pcm_dmix_open) unable to open slave
No video modes available for the current game.
Failed to initialize the video
To fix these problems, I went into the advmame.rc files and removed these two lines, which resolved the first two errors.
device_alsa_device default
device_alsa_mixer channel
After looking through the AdvanceMAME documentation, I was able to start the program using the following command, which allowed any user to run the program as root. The manual gave some useful information for the required drivers for the program to run, so be sure to check it out.
chown root:root /usr/local/bin/advmame
chmod u+s /usr/local/bin/advmame
With those changes, I was able to start the emulator by typing advmame robby, as seen below. The emulator only displays on part of the screen currently, and I am playing with the different configurations to see what I can do about that. I have tried adjusting device_video_overlaysize, display_resize, display_magnify, display_expand, and a few others with little success. The game runs however, I just need to make a few adjustments to be able to see the screen and use it properly. I recorded a video of what it looks like and will link it here.
If anyone is interested in making their own emulator console with the PocketBeagle, I highly recommend using a commonly used screen such as the Adafruit ILI9341 to save on the headache of setting up and using the frame buffer. Before buying other parts, I would recommend setting up the software aspect of the device first, with special emphasis on having the emulator recognize and initialize video onto the display, as this seems to be the largest issue with actually starting the emulator. Good luck to anyone attempting similar projects and hopefully my insights were helpful!


Comments
Please log in or sign up to comment.