


In the data collection of smart home, the measurement of light intensity is also very necessary. For example, the indoor lighting can be automatically adjusted according to the intensity of the light to provide users with the most comfortable learning and living environment. The tutorial here will use a photoresistor to cooperate with Arduino to complete the light data collection.
(1) Materials
Arduino UNO development board
Breadboard
Photoresistor
1K-10K resistance
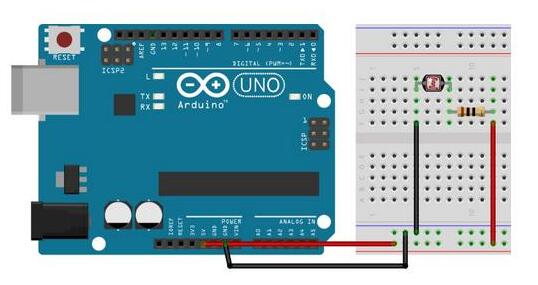
(2) Wiring Method
The resistance of photosensitive resistors is very high in the condition of no light. The stronger the light, the smaller the resistance. By measuring the voltage variation on both sides of the photosensitive resistance, the variation of the photosensitive resistance can be known and the light intensity can be obtained. In the connection diagram, we find that a partial voltage resistor is connected in series for the photosensitive resistor.
In the above figure, RL is a photoresistor, R1 is a series resistor, Vout=RLR1+RL∗Vin, in the dark, the resistance of RL will be very large, so Vout is also very large, close to 5V. Once the light is irradiated, the value of RL will decrease rapidly, so Vout will decrease accordingly. It can be seen from the above formula that R1 should not be too small, preferably around 1k~10k, otherwise the ratio will not change significantly.
(3) Code
The code part is very simple, just read the analog value of the interface connected to the photoresistor.
1 light = analogRead(0);
Open the serial monitor of Arduino, illuminate the photoresistor with the flashlight of the mobile phone, and observe the result:
2 Serial.println("lignt :");
3 Serial.println(light);
2 Use Experiment of Arduino Photoresistor(1) Materials
Arduino UNO x1
Photoresistor x1
Resistance 10K, 4.7K, 1K x several (or need one, but you can test the difference between different resistance values and data)
(2) Wiring method
(3) Program
#define AD5 A5 //Define analog port A5
#define LED 13 //Define digital port 13
int Intensity = 0;//Illuminance value
void setup() //Program initialization
{
pinMode(LED, OUTPUT);//Set LED to output mode
Serial.begin(9600);//Set baud rate 9600
}
void loop() // Program body loop
{
Intensity = analogRead(AD5); //Read the value of analog port AD5 and save it in the Intensity variable
Serial.print("Intensity = "); //Serial output "Intensity = "
Serial.println(Intensity); //The serial port outputs the value of the Intensity variable and wraps
delay(500); //Delay 500ms
}
(4) Power on, View serial data
Test Results:
The above data is the change of the value with the flashlight and no light.
(5) Summary
The positive and negative poles are reversed and the values are reversed. The larger the resistance value, the larger the change range. Using 5V, the range is larger than 3.3V.
Recommended Reading: Photoresistor- Definition, Working, Types, Applications and Arduino Tutorial

Comments
Please log in or sign up to comment.