I decided to take "Securing the World" literally and chose to use the Azure Sphere to create an IOT door lock.
This door lock uses an RFID scanner to authorise users, with onboarding and offboarding users being dealt with by an accompanying webapp. This door lock gives visual feedback through an OLED screen and audio feedback through a buzzer. This door lock works even without the internet as users information is stored locally within the Azure Spheres mutable storage.
DemosRequirementsMy main requirements for this lock were:
- It should have local storage for users (So that it works when the internet is down).
- It should be able to add and delete users remotely.
- It should be able to open remotely.
- It must work with RFID tags.
- It must give some user feedback on success/failure.
- It should be secure.
To meet these requirements
- I used the Azure Spheres Mutable Storage that allowed me to store a list of users and valid RFID unique identifiers (UIDs) on the device itself.
- I created a web application hosted on Azure app service that does direct method cloud to device calls. This allows the user list on the Azure Sphere to be modified.
- I implemented a direct method cloud to device in the web application that allows the lock to be opened remotely.
- I used the Azure Spheres UART to communicate with a RDM6300 RFID reader.
- I used an OLED Screen and a Buzzer to provide some user interaction.
- I used Azures Active Directory authentication on the Azure App Service hosted web application as I do not know web dev well enough to build a custom authentication system. Setting up Active Directory authentication took ~5 clicks and allows me to control access to the application via Azures Active Directory. Additionally, the Azure Sphere is set up to only allow external connections to my IOT Hub through the app_manifest.json configuration.
1. Azure Sphere MT3620 Starter Kit
2. RDM6300
3. 3v buzzer
4. 12v Plug
5. 125Khz RFID Tag
6. Electronic Lock
7. Relay
8.Reed Switch
9. OLED Screen
10. 10K ohm resistor
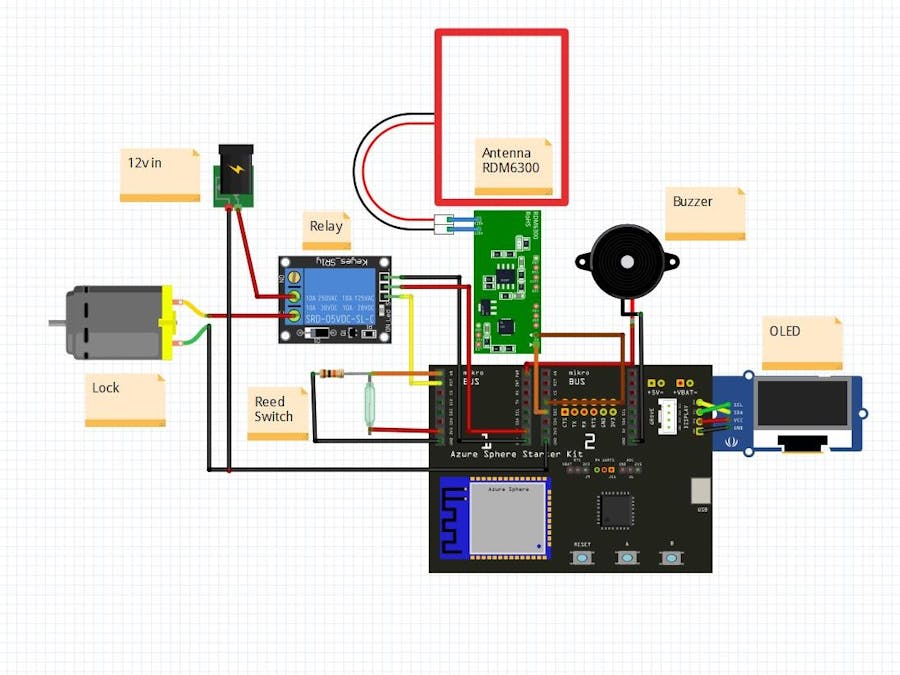
Connection DiagramI'm using a solenoid style lock that retracts when 12v is applied to it. Because the Azure Sphere cannot output this voltage I'm using a relay with the high side connected to 12v, and the low side driven by one of the Azure Spheres GPIO pins.
To detect whether the door is open or not, I'm using a reed switch (with a resistor to pull down to ground when the connection is open) connected to one of the GPIO pins set to input mode.
To read the RFID tags, I'm using a RDM6300 RFID reader which operates at 125khz (Note, the other common RFID tags operate at ~13MHz, the frequency is important). This communicates to the Azure Sphere using UART. I'm only taking readings of cards unique ids (UIDs), rather than writing any data to the card.
I'm using a buzzer driven by one of the GPIO outputs of the Azure Sphere to provide some audible indication of whether a card has been accepted or not, and an OLED to provide a visual indication.
How it works: Data FlowAt the basic device level, the Azure Sphere constantly updates its digital twin based on the current status of the door (open or closed):
Once a valid RFID card comes into contact with the RFID reader, the Azure Sphere compares the UID of the card to a list of UIDs currently within its mutable storage. If this card exists, then the Azure Sphere then sets the GPIO pin connected the solenoid relay HIGH, displays a welcome message on the OLED, buzzes and sends a message to the IOT Hub saying that a user has opened the door. If the UID is not recognized, then the OLED will display an invalid user warning and beep repeatedly at the user.
The next three flows involve the direct message web app, these are add user, remove user and remote open.
Due to some limitations regarding the App Service environment and current preview status of the Python IOT Hub SDK, I had to use a C# API hosted as an azure function to do the actual cloud to device and IOT Hub calls, the Direct Call Webapp simply calls this API and provides a friendly user interface.
One of the first calls that the webapp does is to request a list of devices associated with the IOT Hub, along with whether they're online or not. This data is then populated in the "device name" drop down, so users know exactly which devices they can modify.
If "Add User" is pressed, then this does a cloud to device direct method call to the Azure Sphere. This triggers the Azure Sphere to start trying to detect a RFID card and display a message saying "Ready to add user". If the RFID reader detects a card, it then sends a response back to the web ui with the cards UID. This UID is then added to the Users table along with the name and specific device that this UID should be allowed for. The contents of this table for the given device are then sent to the Azure Sphere in another cloud to device message until it is successfully delivered. Once successfully delivered, the webapp displays a "User successfully added" message.
Deleting a user is much simpler, it involves deleting the user from the Users table, then calling the cloud to device direct method with a payload of the Users table for that device until successful.
Install Azure Sphere SDK for your required version of VS Code (2017 or 2019)
Once this is done you will find that you have the Microsoft Azure Sphere Developer Command Prompt Preview.
In the Sphere Developer Command Prompt, enable the Azure IOT Hub extension
az extension add --name azure-cli-iot-extClaim your Azure Sphere
azsphere device claimIf your login fails with a message similar to “identity provider 'live.com' does not exist in tenant 'OsTechnology'", you'll need to create an active directory account in Azure.
Log in to your Azure Portal (https://portal.azure.com/) and select Active Directory.
Select "Users"
Create a new user under "Users". This user will not require any roles.
Note: Based on the comments on the 19.10 release, it looks like these steps won't be required for a non enterprise AD account. I haven't had a chance to test this release.
Run azsphere device claim and log in as this new user. You may need to create a new tenant with tenant create --name “Name of your tennant”.
Setup WiFi with azsphere device wifi add --ssid "New SSID" --key “Your key” Run azsphere device wifi show-status to validate that your wifi is connected properly.
SSID                : YOUR SSID NAME Configuration state : enabled
Connection state    : connected
Security state      : psk
Frequency           : 2457 Mode                : station
Key management      : WPA2-PSK WPA
State           :
COMPLETED IP Address          :
MAC Address         : 00:02:b5:xx:xx:xx
Command completed successfully in 00:00:01.4590142.
Prepare your Azure Sphere for development by running azsphere device prep-debug. If you upgrade the device and encounter this error
Copying application to the device
Device would not stage app for sideload:
Image not trusted by device; application development capability is required ('azsphere.exe device prep-debug') (DeviceClientException)
You will need to run this command again.
Note: Under 19.10 this command has been replaced with azsphere device azsphere device enable development.
To create a free tier IOT Hub, you'll need to create a resource group and setup the IOT Hub inside that resource group.
az group create \
 --name {your resource group name} \
 --location westus  az iot hub create \
 --name {your iot hub name} \
 --resource-group {your resource group name} \
 --sku F1
Create a new device on your IOT Hub with
az iot hub device-identity create \
 --device-id {device name} \
 --hub-name {hub name}
Grab the connection string, as you'll need it later to set up your Azure Sphere and to allow Azure resources to consume from your IOT Hub.
az iot hub device-identity show-connection-string \
 --device-id {device name} \
--hub-name {hub name}Clone the repo with git clone https://github.com/SrzStephen/azure-sphere-monitor-environment.git or download as a zip file.
Copy the connection string you got with the az iot hub device-identity show-connection-string command into the MY_CONNECTION_STRING definition in connection_strings.h.
In app_manifest.json copy in your iot hub hostname{ iothubname}.azure-devices.net to "AllowedConnections" to allow your Azure Sphere to communicate with it.
Hit "Remote GDB Debugger".
And you should see that your IOT Hub connection has been successful.
If this is not successful, then you should double check your IOT hub strings.
[Azure IoT Hub client] INFO: connection to the IoT Hub has been established (IOTHUB_CLIENT_CONNECTION_OK)You should also see that you start getting "Device to Cloud Messages" through your IOT Hub.
You can also view the exact content of the messages that arrive in your IOT Hub by downloading the Azure IOT Explorer.
Create SQL ServerCreate required resources
az sql server create \
 -l westus \
 -g {group name} \
 -n {server name} \
 -u {admin username} \
 -p {admin password}

az sql db create \
 -g {group name} \
 -s {server name} \
 -n {database name}  \
 --capacity 5 \
 --tier basic
Show your database connection string. Save this as you'll need it later.
az sql db show-connection-string \
 -s {server name} \
 -n {database name} \
 -c ado.net
Download DBeaver a multi platform database tool.
Create a new database connection selecting Azure SQL Server
Enter your connection details
Create your Users table. Make sure to replace {} with your database name!
CREATE TABLE {YOUR DATABASE NAME HERE}.dbo.Users (
card_UID varchar(20) COLLATE SQL_Latin1_General_CP1_CI_AS NOT NULL,
username varchar(100) COLLATE SQL_Latin1_General_CP1_CI_AS NOT NULL,
door_device varchar(100) COLLATE SQL_Latin1_General_CP1_CI_AS NOT NULL
) GOCreate your required resources
az group create \
 --name {group name} \
 --location westus

az storage account create \
 --name {storage name } \
 --location westus \
 --resource-group {group name} \
 --sku Standard_LRS

az functionapp create \
 --resource-group {group name} \
 --name {function app name} \
 --storage-account  {storage name} \
 --runtime dotnet \
 --consumption-plan-location westus
Deploy your function app from a git repo
az functionapp deployment source config \
 --branch master \
 --manual-integration \
 --name {function app name} \
 --repo-url https://github.com/SrzStephen/Azure-IOT-Hub-API.git \
 --resource-group {group name}
Set up required environment variables. Make sure to replace MyConn with your IOT hub connection string, and DBConn with your database connection string.
az functionapp config appsettings set \
 --name {function app name} \
 --resource-group {group name} \
--settings "MyConn={result from az iot hub device-identity show-connection-string command} DBConn={result from sql db show-connection-string}Create resources required to create
az group create \
 --location westus \
 --name {group name}

az appservice plan create \
 --name {web plan name} \
 --resource-group {group name} \
 --sku F1

az webapp create \
 --name {webapp name} \
 --resource-group {group name} \
 --plan {plan name}
Deploy Web app
az webapp deployment source config \
 --name {webapp name} \
 --resource-group {group name} \
 --repo-url https://github.com/SrzStephen/azure-direct.git
Add in required environment variables
az webapp config appsettings set
 --name {webapp name} \
 --resource-group {group name} \
 --settings-names "AZURE_API_ENDPOINT={azure endpoint url} AZURE_API_HOST_KEY={host key} DATABASE_USER={database username} DATABASE_PASSWORD={database password} DATABASE_SERVER={database server} DATABASE_DATABASE={database}"
You should be able to visit your web app and try to add a new user!
Securing the webappIn your App Service, click configuration.
Turn on Azure Active Directory with express installation.
If you want to give more users access to your active directory account, go to Azure Active Directory.
Click Users
And either create a new user, or invite guest users.
And you're done!


Comments
Please log in or sign up to comment.