

Software apps and online services | ||||||
 |
| |||||
 |
| |||||
| ||||||
 |
| |||||
| ||||||
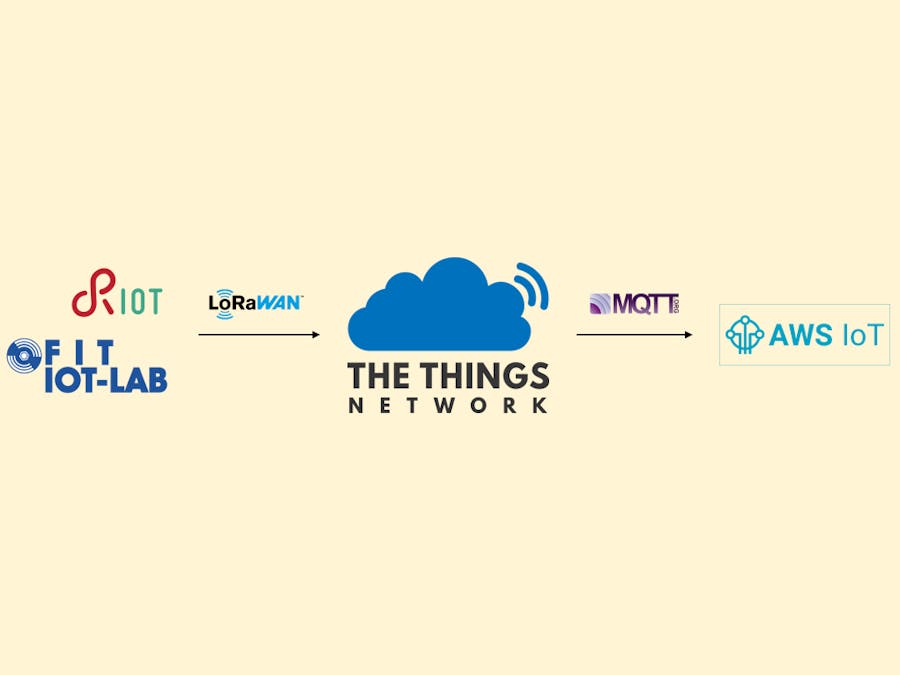
The project builds upon the cloud infrastructure that is developed in this project.
You must have followed these steps:
- AWS IoT configuration.
- Connection with DynamoDB.
- Developing the Node.js backend app.
- Developing the Angular frontend app.
Preliminary requirements
You need an account for The Things Network. If you don’t have it, you can create a TTN account here.
Once you have created your account, you can log in and navigate to the TTN Console.
Application set-up
1- Opening your console, you should see a screen as shown here:
2- Click on Applications, and you will see a screen like this:
3- Click on Get started by adding one! and then compile the form with the unique identifier of your application. You can give your application any ID, has long as it contains at least two characters and only lowercase alphanumeric characters, nonconsecutive - and _, and doesn’t start or end with a - or a _. (My application id is lora-ttn-1).
4- Next, click on the Add application button and you must see a screen like this:
5- Click on register device and then fill in the form by entering a device ID and generating a device EUI.
6- Click on Register.
7- Now, to properly manage the messages coming from the RIOT application, navigate to Paylod Formats and paste the following function inside the decoder input box.
function Decoder(bytes, port) {
// Decode an uplink message from a buffer (array) of bytes to an object of fields.
var message = "";
for (var i=0; i<bytes.length; i++){
message += String.fromCharCode(bytes[i]);
}
var decoded = {};
var mex = JSON.parse(message);
mex.timestamp = new Date().getTime().toString(); // Add message timestamp
decoded.message = mex;
return decoded;
}
8- At the bottom of the page, click on save payload functions.
RIOT ApplicationPreliminary requirements
You must have installed:
- Git. If Git is not installed, you can download it here.
- The build-essential packet (make, gcc etc.). This varies based on the operating system in use.
- The Native dependencies. If they are not installed, you can download they here.
- OpenOCD. If OpenOCD is not installed, you can download it here.
- GCC Arm Embedded Toolchain. If it is not installed, you can download it here.
- Netcat with IPv6 support. The installation command is the following:
> sudo apt-get install netcat-openbsdApplication set-up
1- To create your project, you need to clone the RIOT repository:
> git clone git://github.com/RIOT-OS/RIOT.git2- Now, you can choose one of the following steps according with your preferences:
- In order to publish, messages containing the virtual sensors’ values on a TTN device, you must update
RIOT/examples/lorawan/main.candRIOT/examples/lorawan/Makefilelike these. (Remember to update the code with your own application device keys). - In order to publish messages containing real sensors’ values on a TTN device, you must update
RIOT/examples/lorawan/main.candRIOT/examples/lorawan/Makefilelike these. (Remember to update the code with your own application device keys).
3- Open the Terminal from directory lorawan and run the following command:
> make allOnce executed the command, you have the.elf (Executable and Linkable Format) file of the program, and so you can now go on by starting a new experiment on the IoT-LAB testbed platform.
Note: To have multiple stations you can create other devices in the TTN application and redo the steps for setting up the RIOT applications related to the new devices.
IoT-LAB
Preliminary requirements
1- You must have an IoT-LAB account. If you don’t have it, you can create one here.
2- Set up your ssh access to the IoT-LAB servers. If you don’t have configured your ssh access, you must follow these steps:
- Run the following commands to generate the ssh key:
> ssh-keygen -t rsa
> ls ~/.ssh/
> cat ~/.ssh/id_rsa.pub- Log in and navigate to the IoT-LAB Testbed.
- Click on the Account icon and then select the SSH Keys tab.
- Next, paste the public key in the text input and save it by clicking on Update SSH Keys.
Experiment set-up
1- Navigate to the IoT-LAB Testbed.
2- Click on New Experiment.
3- Fill in the form with name and duration of your choice.
4- Click on Nodes and select an architecture, site and quantity as shown here:
5- Click on Add to experiment.
6- Click on the firmware icon.
7- Click on Browse and select the.elf file you have created before.
Note: you need to create one node per device. To create another node, click again on Add to experiment (with the architecture, site and quantity selected) and attach the related firmware.
8- Connect to the IOT-LAB server executing this command and replacing <login> by your IoT-LAB login:
> ssh <login>@grenoble.iot-lab.info9- Now, interact with the st-lrwan1 node using Netcat and replacing <nodeID> by your node ID:
> nc st-lrwan1-<nodeID> 20000You can find your node ID in this way:
- Navigate to the IoT-LAB Testbed.
- Click on My Experiments.
- Click on your experiment id link.
- Now you can see your node ID (in the following screen the node ID is
12):
Preliminary requirements
You must have an AWS EC2 key pair. If you don’t have it, follow step by step these:
- Log in to the AWS EC2 Console.
- From the side menu, navigate to Key pairs and then click on the Create key pair button.
- Fill in the form as demonstrated in the following image:
- Finally, click on Create key pair.
Stack set-up
1- Log in to the AWS CloudFormation Console.
2- From the side menu, navigate to Stacks and then click on the Create stack button.
3- Fill in the form as demonstrated in the following image:
4- Click on Next. Now you should see a screen as shown here:
5- Fill in the form with a stack name and with the ID and the access key of your TTN application.
6- Fill in the AWS Elastic Beanstalk Settings and AWS IoT settings sections as shown here:
7- Click on Next, again on Next, and finally on the Create stack button.
8- After about six minutes, you will see two new stacks:
Once you have connected TTN with AWS, you must create a DynamoDB rule that allows you to take information from the incoming messages and write them to the DynamoDB table. You can see here how to do it.
The query of the rule must be the following one:
SELECT payload_fields.message.id, payload_fields.message.timestamp, payload_fields.message.temperature, payload_fields.message.humidity, payload_fields.message.windDirection, payload_fields.message.windIntensity, payload_fields.message.rainHeight FROM '<appID>/devices/+/up'The subscription topic is the TTN uplink topic <appID>/devices/+/up. (Remember to replace <appID> by your TTN application ID).
Note: if you want to see your web page properly working on localhost:4200, your frontend and backend apps must be running. See herehow to do.
AboutThis project has been developed as part of my MSc degree at Sapienza University of Rome for the 2019/2020 Internet of Things course.
Related video on YouTube.


Comments