
Hardware components | ||||||
 |
| × | 1 | |||
 |
| × | 1 | |||
Software apps and online services | ||||||
 |
| |||||
 |
| |||||
| ||||||
| ||||||
| ||||||
Hand tools and fabrication machines | ||||||
| ||||||
| ||||||
You might have seen the quick start guide showing the steps to use the BME AI-Studio with the BME688 Development Kit board which has 8 BME688 sensors on the PCB.
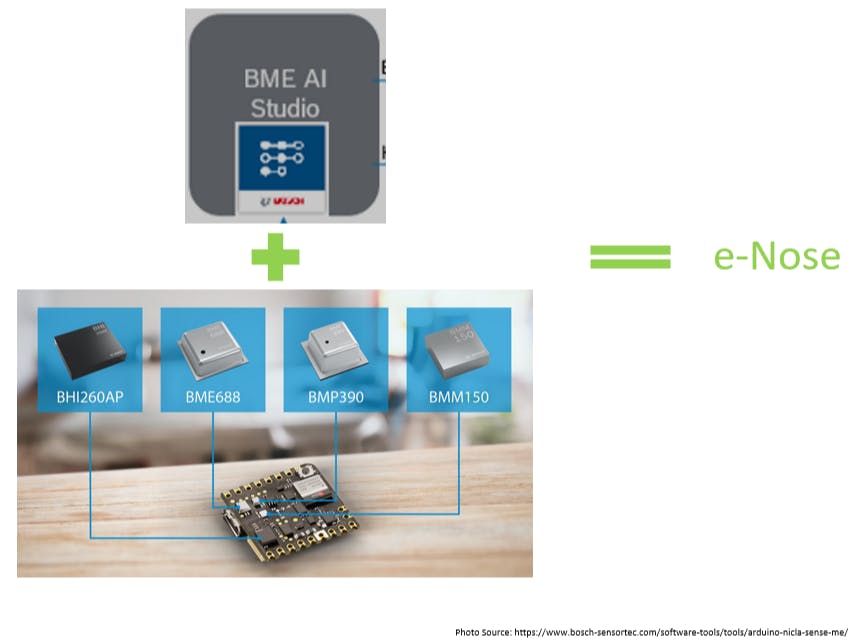
The Arduino Nicla Sense ME device also has a BME688 sensor on the board. This guide demonstrates how to use the BME AI-Studio Software with the BME688 sensor on the Nicla Sense ME board to go through the whole workflow of enabling detection of gases of interests as follows:
- Configure the BME688 sensor settings
- Collect raw sensor data using the Nicla Sense ME
- Data pre-processing (cleaning and formatting)
- Train an algorithm in BME AI-studio and generate the BSEC2 config string
- Deploy the config string from the algorithm
On the Nicla Sense ME device, the BME688 is connected to the BHI260AP smart sensor, and the BSEC2 library is running on the BHI260AP’s built-in processing unit.
In the data collection phase, the BME688 sensor hardware needs be configured with proper Heater Profile Settings.
This setting needs to be configured on the BME688 sensor HW through the MCU, which is the BHI260AP on the Nicla Sense ME board, and this could be easily done through the Arduino_BHY2’s library APIs and sketch examples which would be shown in more details later in this guide.
Once raw data is collected and pre-processed (formatted properly), it could be imported to BME AI-Studio to train an algorithm and a corresponding config string could be generated and loaded to the BSEC2 library which uses the config string to re-configure itself, enabling it to detect / classify the gas types of interest.
In this example, we will use the BME688 on the Nicla Sense ME board to classify 3 different gas types:
- Ambient air in the room
- Air in a lidded jar with alcohol wipes
- Air in a lidded jar with coffee
Hardware Used
- 1x PC with Windows OS
- 1x Nicla Sense ME board
- 1x micro-USB cable
- 1x lidded jar with alcohol wipes
- 1x lidded jar with coffee
Software to Download and Install
- Arduino IDE (2.0.3 or above)
- PuTTY (https://www.chiark.greenend.org.uk/~sgtatham/putty/)
- Python 3.x
- BME AI-Studio (BME688 Software | Bosch Sensortec (bosch-sensortec.com)
Arduino Board Support Package
Install the following Board Support Package in Arduino IDE:
“Arduino Mbed OS Nicla Boards” by Arduino Version 3.5.5 or above.
Arduino Library
- Arduino_BHY2
Download the library manually from the github repo,
Create a zip file from the Arduino_BHY2 folder and in the Arduino IDE, import the library by following the menus: “Sketch”->”Include Library”->” Add.ZIP Library…”.
When prompted, replace the existing Arduino_BHY2 with this new library version.
BHI260AP FW
Open the example sketch: “Arduino_BHY2”->”BHYFirmwareUpdate” and upload it to the Nicla Sense ME board to update the BHI260AP FW to the latest.
This firmware is required to for the data collection and prediction phase of the workflow.
Note: Before the upload, open the Serial Monitor (Ctrl+Shift+M), and when uploading the sketch, make sure “BHY FW Upload Done!” appears before moving on to other steps.
Configure the Data Collection Tool
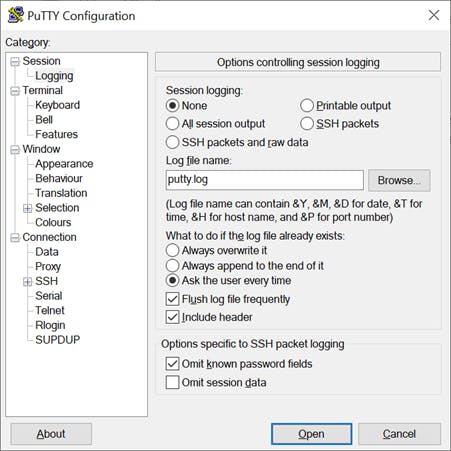
In the data collection phase of this example, the BME688’s raw senor data is printed to the USB serial port, and we will use PuTTY to collect the sensor data. To save the data properly, we need to enable data logging in PuTTY.
Open PuTTY, under the settings: Session->Logging, choose the log’s location and file name, and check the box: “Include header”, and this will put a timestamp in the first line of the log. The header is not mandatory but recommended, which will help us to better organize our data collected.
It’s also possible to use other serial monitor programs to log the data as long as data can be retained properly.
Note:
When using PuTTY or other serial monitor programs to log the serial data from Nicla Sense ME, please close the built-in serial monitor of Arduino IDE, otherwise only partial data gets into the log.
Open the BME AI-Studio software, and click “Create Project…” to create a new project.
In the dialog, choose the location and name for the new project. In this example, the following name and location is used. Click on the “Create Project…” to proceed.
The following folder structure is created upon successful project creation:
In the “Specimen Collection” tab, click the “Configure BME Board” button.
In the dialog brought up (shown in the figure below), choose “Heater Profile Exploration” in the “Board Mode” portion.
In the “Heater Profiles” area, keep the “HP-354” heater profile, and remove others.
In the “Duty Cycles” area, choose “RDC-1-0 Continuous”.
Then click the button “Save to file”, and same the file as: “NiclaSenseME_BoardConfiguration.bmeconfig” under C:\Arduino\BSEC2_Examples_For_NiclaSenseME.
And the folder structure is like the figure below after the BME board config file is created.
Deploy the sensors settings to the BME688 hardware
In Arduino IDE, open the example sketch “BSEC2GasScannerCollectData”.
Upload the sketch to the Nicla Sense ME Board and the default sensor settings would be configured for the BME688 sensor.
Using different Heater Profile from the default HP-354
If the default heater profile - HP-354 is desired, this step could be skipped.
Note that there are two arrays defined in the example sketch “BSEC2GasScannerCollectData”:
The values of the arrays match the Heater Profile selected in the last phase: “Configure the BME688 sensor settings”. One thing to note is that: the BSEC2HP_DUR array contains the duration for each Temperature Step, and the duration is calculated by subtracting the current time from the previous Temperature Step (an example is shown below). If a different Heater Profile is chosen, the contents in the arrays BSEC2HP_TEMP and BSEC2HP_DUR need to be adjusted per the Heater Profile database.
For example, to use the HP-321 Heater Profile, go to the Heater Profile selection page by clicking “Select Heater Profiles …” as shown in the Figure 5: Configure BME Board Page and select the HP-321 Heater profile.
The HP-321 Heater Profile’s settings could be summarized in the table below.
The arrays of BSEC2HP_TEMP and BSEC2HP_DUR can be populated from the columns “Temperature” and “Duration (step of 140ms)” accordingly.
Collect the Sensor Data
Collect the data for ambient room air
Put the Nicla Sense ME board in the room and start PuTTY to log the data. For a quick evaluation, it’s recommended to collect data for at least 30 mins, for practical applications more data is always better.
After the data collection is done, close PuTTY and move the PuTTY log (location specified in Figure 2: Enable Logging in PuTTY) to the new location as: “C:\Arduino\BSEC2_Examples_For_NiclaSenseME\datalog\session1_in_office\ ambient_air.log”.
Collect the data for alcohol in a lidded Jar
Put the Nicla Sense ME board in a lidded jar with alcohol wipes, close the lid, and restart PuTTY to log the data. It’s recommended to collect data for at least 30 mins.
After the data collection is done, close PuTTY and move the PuTTY log to the new location as: “C:\Arduino\BSEC2_Examples_For_NiclaSenseME\datalog\session1_in_office\alcohol.log”.
Remove the Nicla Sense ME from the jar (it’s recommended to close the lid so the room air is not contaminated by the alcohol which might affect the future classification) and let the board settle for a few minutes before moving on.
Collect the data for coffee in the lidded Jar
Put the Nicla Sense ME board in a lidded jar with coffee, close the lid, and restart PuTTY to log the data. It’s recommended to collect data for at least 30 mins.
After the data collection done, close PuTTY and move the PuTTY log to the new location as:
“C:\Arduino\BSEC2_Examples_For_NiclaSenseME\datalog\session1_in_office\coffee.log”.
Remove the Nicla Sense ME from the jar (it’s recommended to close the lid so the room air is not contaminated by the coffee) and let the board settle for a few minutes.
Below is the folder structure after collecting the raw sensor data.
(Optional) Collect the data for ambient room air again
To achieve better algorithm performance, it’s recommended to collect more data as more data typically yields better accuracy.
About Sessions
For ease of data import to BME AI-Studio, it’s recommended to put collected data logs into new folders when the following conditions are met:
- The Nicla Sense ME board is power cycled for the new data collected
- There is already one log file for a particular gas type
When importing the data to BME AI-Studio, it would be easier if data from different folders are assigned different sessions so that no confusion is introduced (sometimes, for example confusion caused by timestamp rewinding due to power cycle of the board etc).
In this example, the data are collected without resetting the Nicla Sense ME board in between, and there is only one log file for each gas type, so the logs are put in the same folder and will later be assigned with the same session name.
Data pre-processing (cleaning and formatting)The BME AI-Studio only accepts data of a specific format with the extension: “.bmerawdata”.
The raw data log collected must be converted to the format recognizable by the BME AI-Studio.
Get the Tool
First, determine the location of the Arduino library: “Arduino_BHY2”, this could be found through the menus: “File”->”Preferences…” of Arduino IDE. As shown in the figure blow.
The location of the Arduino’s sketchbook is high-lightened in the red box. And the Arduino’s library is under the “libraries” folder of the above location. As shown in the figure below.
Go to the subfolder: Arduino_BHY2\examples\BSEC2GasScannerCollectData\tools and find the script:
“BSEC2DataLogConverter.py”.
Copy this script to the folder: “C:\Arduino\BSEC2_Examples_For_NiclaSenseME”, and the folder structure of the project is shown as the figure below:
Convert the Data Log to Formatted Raw Data
Start a Windows Power Shell from the folder: “C:\Arduino\BSEC2_Examples_For_NiclaSenseME”, and run the following commands in sequence.
python .\BSEC2DataLogConverter.py   .\datalog\session1_in_office\ambient_air.log 0   .\NiclaSenseME_BoardConfiguration.bmeconfig

python .\BSEC2DataLogConverter.py   .\datalog\session1_in_office\alcohol_wipe.log 1   .\NiclaSenseME_BoardConfiguration.bmeconfig

python .\BSEC2DataLogConverter.py .\datalog\session1_in_office\coffee.log 2 .\NiclaSenseME_BoardConfiguration.bmeconfigAfter the execution of the commands, as can be seen in the figure above, 3 new files with the extension “.bmerawdata” have been created in the same folder of the data logs.
It could be seen that we will label the “ambient air” as type 0, “alcohol” as type 1, and “coffee” as type 2 which would be used accordingly in the upcoming algorithm training phase.
Note:
Sometimes, the tool spits some warning about incomplete records in the log, e.g.:
This is normal because the log file (typically in the beginning) may contain stale data from the serial program PuTTY, as long as the “.bmerawdata” file is generated successfully, this kind of warning can be safely ignored.
Train an algorithm in BME AI-studio and generate the BSEC2 config stringImport raw sensor data
In BME AI-Studio, on the “Specimen Collection” tab, click the “Import Data” button, and select the file: “_gas_0_ambient_air” from the folder: “C:\Arduino\BSEC2_Examples_For_NiclaSenseME\datalog\session1_in_office”.
Assign “session1” as the session name, and “ambient” as the Specimen name.
Do the same for the other data (alcohol and coffee). After all data is imported, the summary of the data imported is presented as shown in the figure below:
Create and train an algorithm
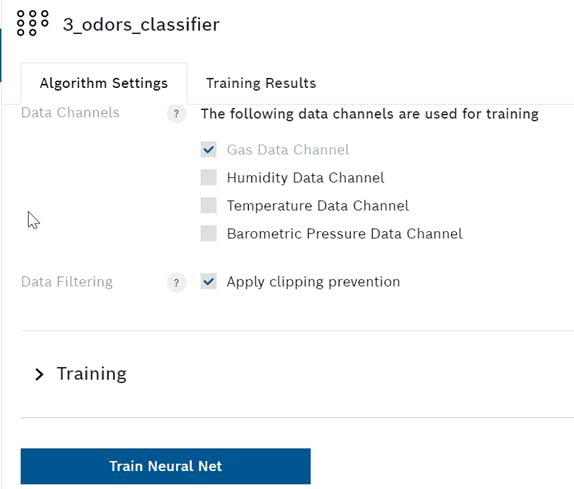
In BME AI-Studio, create a new algorithm by clicking on “New Algorithm” under the “My Algorithms” tab and name the new algorithm as anything of your choice, such as: “3_odors_classifier”, like shown in the figure below.
Then, click the button “+ Add class”, and assign the first class to “ambient air” first because we assigned label 0 to ambient air data in the step Convert the Data Log to Formatted Raw Data.
Like shown in the figure below:
Then add the class for “alcohol” and “coffee” in sequence.
In this algorithm used for quick evaluation, we will use data from only the gas data channel (because temperature and humidity might vary between data collection phase and inference phase which require much more data to be collected to cover the variations), so make sure the check-boxes are checked and shown in the figure below.
Also, we will check the option: “Apply clipping prevention”.
Algorithm Settings
Click the button “Train Neural Net” to train the algorithm.
Export the training results as BSEC2 config string
Once the training is finished, go to the “Training Results” sub-panel, select BSEC Version as: 2.2.0.0 and click “Export as BSEC Config File”, as shown in the figure below.
In the dialog, create a subfolder “algo” under: “C:\Arduino\BSEC2_Examples_For_NiclaSenseME”, and export the result to the new folder “algo”.
The following files are generated by BME AI-Studio’s export action as shown in the folder structure below.
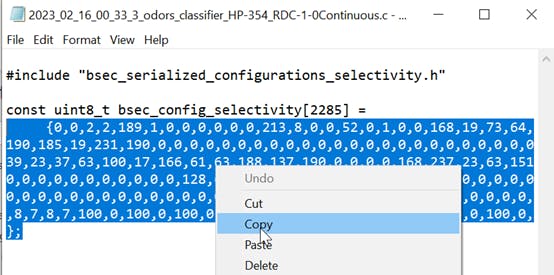
Open the generated file with the “.c” extension, in this specific example: “2023_02_16_00_33_3_odors_classifier_HP-354_RDC-1-0Continuous.c”and copy the contents of the array “bsec_config_selectivity” which contains the binary array of the config string:
In Arduino IDE, open the example sketch: “Arduino_BHY2”-> “BSEC2GasScannerClassify”.
Replace the content of the array “BSEC2_CONFIG” with the content copied from the step: Figure 25: Copy the Content of the Config String, as shown below:
Once done with the replacement, upload the sketch to the Nicla Sense ME board and the BSEC2 config string will be loaded to the BSEC2 library running inside the BHI260AP chip.
Open a serial monitor program such as PuTTY or the built-in serial monitor from Arduino IDE to test the gas classification result using the newly trained algorithm.
For example, when putting the Nicla Sense ME board in the jar with the alcohol wipes, the following output is observed on the serial monitor.
The gas[1] has a 99% likelihood, and we know from the previous steps that gas[1] is alcohol and thus the sensor has made a correct classification.
What to do nextAs was noted in the step “Figure 21: New Algorithm – Algorithm Settings”, the algorithm uses only gas resistance, in some applications, the temperature and humidity data can also be used as useful input/features.
There may be some causes for the algorithm to not perform as expected, in which situations, it’s encouraged to reiterate the workflow and collect more data so that the algorithm is able to generalize better under different environments.
Lastly, the help documents provided within the BME AI Studio is also a good documentation for reference. It’s recommended to go through the document to have a more though understanding of how the sensors and the tool works in order to create an optimal workflow and training results.


Comments