


Hardware components | ||||||
 |
| × | 1 | |||
 |
| × | 1 | |||
 |
| × | 1 | |||
 |
| × | 1 | |||
 |
| × | 1 | |||
Software apps and online services | ||||||
 |
| |||||
| ||||||
I created this project because in my country the climate (weather) has changed very drastically. when it rains the weather will be so cold that it makes me flu, but on a sunny day the weather will be so hot that it makes me sweat.
This is a simple project which if developed further might become a smart room or smart home project that can prevent us from getting sick due to drastic climate change.
I'm using a DHT11 to monitor temperature & humidity in my workspace, and I added LED control to this project with an ESP32 as an intermediary connection to Blynk
List of component that I'm used in this project:· ESP32
· Sensor DHT11
· LED (Light Emitting Diode)
· Bread Board- Male/Female jumper wires
and for apps I'm used in this project:· Arduino IDE
· Blynk
already set in the Hardware components and Software apps part
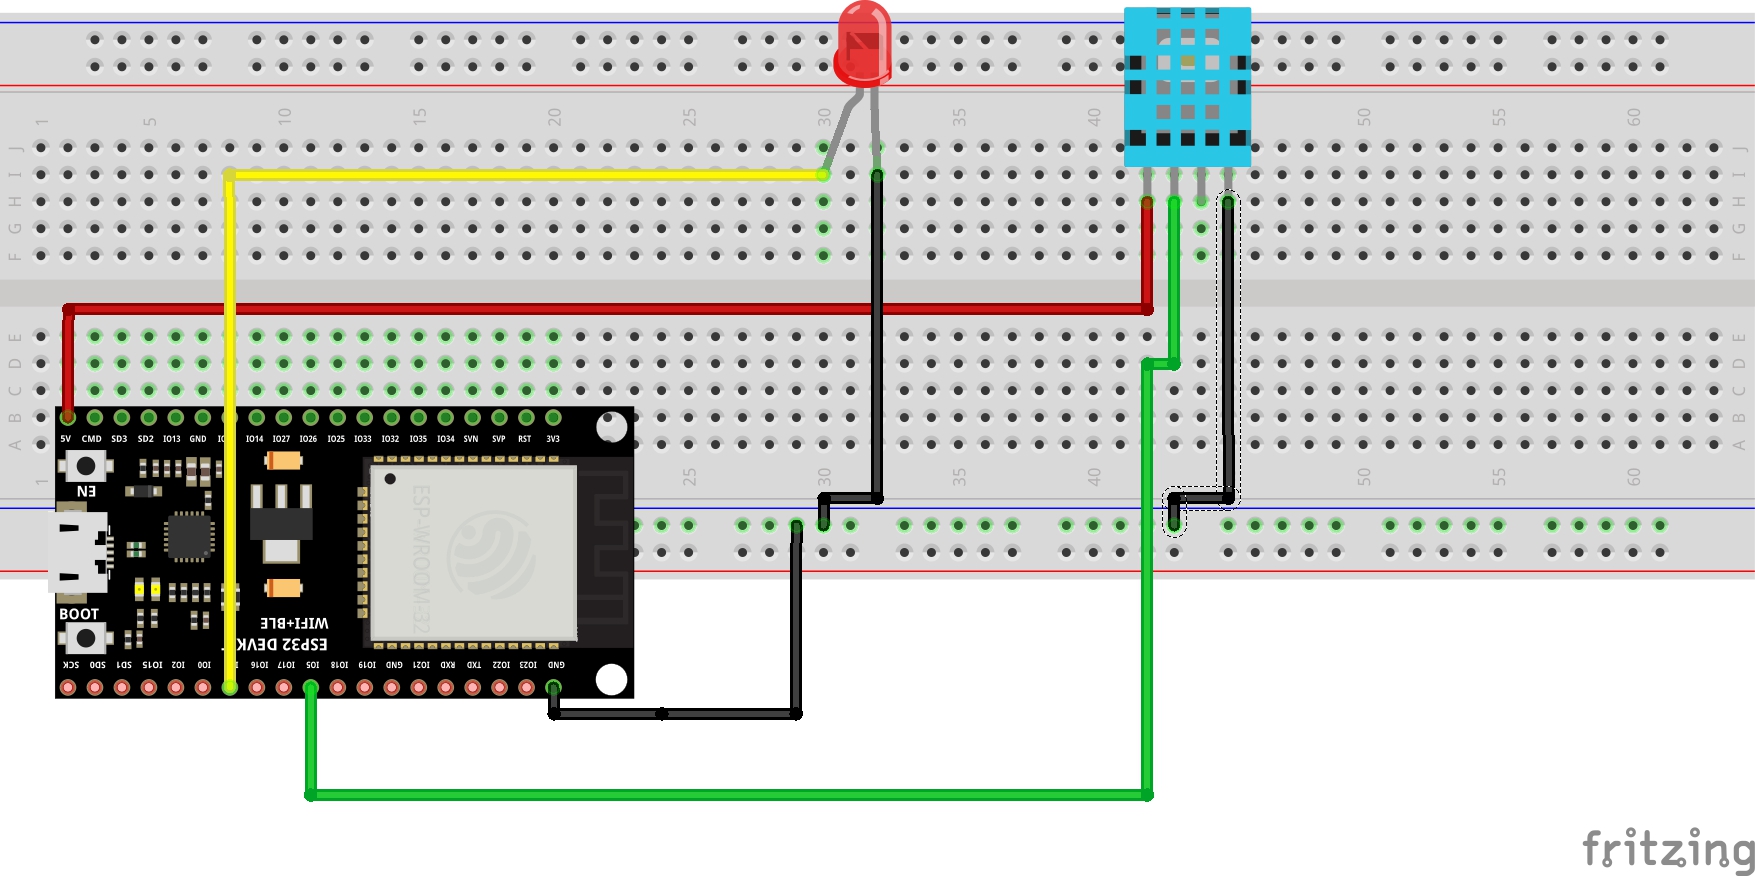
Diagram and WiringThis is the image of diagram block control LED and Monitor Temperature & Humidity.
and next image is Wiring of control LED and Monitor Temperature & Humidity
LED
· Pin Anode to Pin 4 in ESP32 (Yellow Cable)
· Pin Cathode to Pin GND in ESP32 (Black Cable)
DHT 11
· Pin Signal to Pin 5 in ESP32 (Green Cable)
· Pin VCC to Pin 5V in ESP32 (Red Cable)
· Pin GND to Pin GND in ESP32 (Black Cable)
How to make this Project:1. Making account in Blynk and setting for the controller, open web Blynk in your browser (https://blynk.cloud) and make account in Blynk, after make account in Blynk next is Create new template.
Create Name of your project and choose ESP32 in column Hardware, you can empty for the Description and click "Done". And Then go to Datastreams and click New Datastream choose Virtual PIN.
And the Screen will be like this, click “Done” if you finish set the Virtual Pin. We need create 3 Virtual Pins:
· V0 for Temperature (Suhu)
· V1 for Humidity (Kelembaban)
· V2 for LED (Lampu)
After you already finish in Datastreams, go to Web Dashboard for make button switch to control LED and 2 gauges for monitor Temperature and Humidity.
You can get Switch button and gauge in widget box, Don’t forget to set the gauge and Switch button, there’s icon gear in the box gauge and Switch button for setting the Virtual Pin.
After this step you can go to Devices for get the AUTH TOKEN
Then you click “+New Device” and Choose Template after that choose your template for Control LED and Monitoring Temperature & Humidity and click “Create”.
And you will get notification of auth token in the Top right corner of your Screen for connected to Blynk.
2. Create a circuit of LED and monitor the temperature and humidity on the Breadboard,
If you are confused by this photo, I have provided a schematic diagram along with an explanation and the cables used in the schematic part.
3. Programming in Arduino IDE and Upload the program to ESP32
Open your Arduino IDE application then program the code for controlling LED and monitoring the temperature and humidity, To use the DHT11 sensor, add the ‘DHT Sensor Library’ and ‘Adafruit Unified Sensor’ libraries via Sketch → Include Library → Manage Library.
Create a program as follows, fill in the "ssid" with your WiFi name, then "pass" with your WiFi password, and auth with the token obtained from Blynk.
Then upload the program to ESP32 and waiting untill “Done Uploading”.
If it has been uploaded, open the Serial Monitor in Arduino IDE and there’s already information about Temperature & Humidity.
In the same time, on Blynk your Device will change from offline to online.
After this step, you can controlling LED and Monitoring Temperature & Humidity by using Blynk website.
4. Controlling LED and Monitoring Temperature & Humidity on your Mobile
Download Blynk application in your Mobile, if you already have it, open the Blynk application then login with the account you previously created, after that press developer mode which is shaped like a pliers and open the template you created earlier then add the gauge component to display temperature & humidity and switch button to turn on/off the LED.
Then setting the virtual pins in gauge and switch button
Gauge 1 is for Temperature (Set to V0 for monitor Temperature)Gauge 2 is for Humidity (Set to V1 for monitor Humidity)Switch button for LED (Set to V2 for control LED)
after this return to the main menu, and the gauge will display temperature & humidity information and Switch button will controlling LED.
And you can controlling LED and Monitoring Temperature & Humidity on your Mobile.
Result PhotoThis is the Demonstration Video for the project Control LED and Monitoring Temperature & Humidity (Language Indonesia)
Schematic Control LED and Monitor Temperature &Humidity (Screenshot)
LED
Pin Anode to Pin 4 in ESP32 (Yellow Cable)
Pin Cathode to Pin GND in ESP32 (Black Cable)
DHT 11
Pin Signal to Pin 5 in ESP32 (Green Cable)
Pin VCC to Pin 5V in ESP32 (Red Cable)
Pin GND to Pin GND in ESP32 (Black Cable)


Comments