Many Under Developed Countries in the world still don't have any reliable source which is predicating the accurate weather condition. still people rely on google weather, for that reasons some time predictions work but 90% predictions results are wrong in Certain Scenarios.
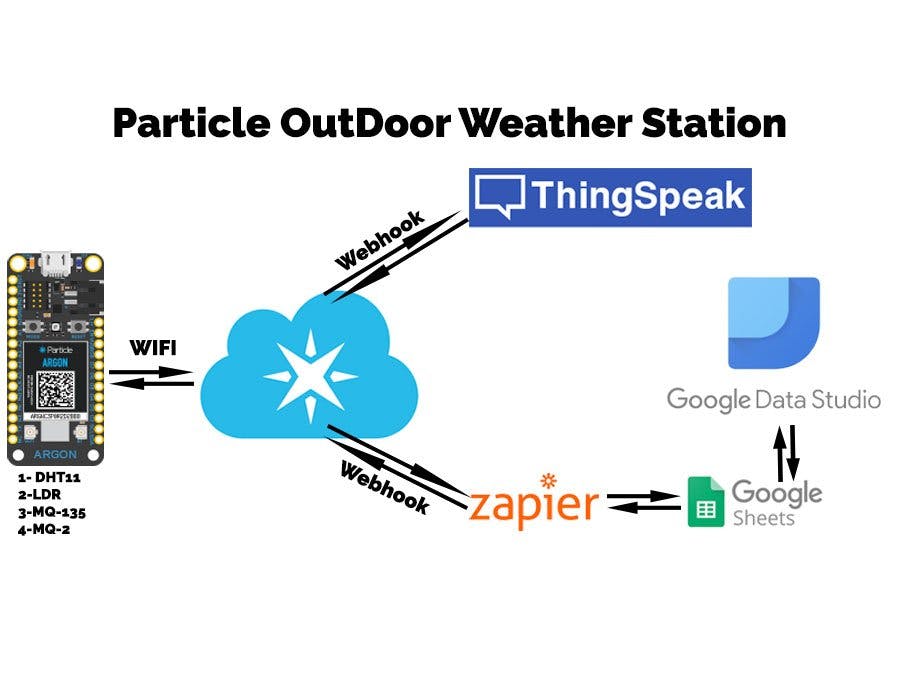
So I am going to develop Outdoor Weather Station using Particle Argon Which will send the data to Particle Cloud and Particle Cloud Sends the Data to ThingSpeak For Real Time Stats and we also send the data to Google Sheets using Zapier later on we will use Google Sheet in Google Data Studio for Further Data Manipulation.
Already There are Many Projects Regarding Smart Weather Stations but they all are just showing the current weather stats not showing us other stats like Max, Min, Avg and future predictions that's why this time I have chosen the Google Data Studio to Analyze the Sensors Data.
Note: MyArgon board has been dead due to my DIY Lithium Battery experiment( I joined the both batteries in Series instead of Parallel which produced over 7 Volts) so I am unable to capture Part 3 to 4. if any body need assistance in Zapier or Google Data Studio then you can contact to me. But Still it's Working till ThingSpeak.
I am Dividing the Project into Below Phases:
1-Hardware Assembly & Sending Data to Particle Cloud
2-Setup ThingSpeak Channel and Particle Webhook
3-Setup Zapier, Google Sheets integration and Webhook in Particle Cloud
4-Google Data Studio Reports
1-Hardware Assembly & Sending Data to Particle CloudNote: If you are new to Particle Boards then Read this article https://docs.particle.io/quickstart/argon/
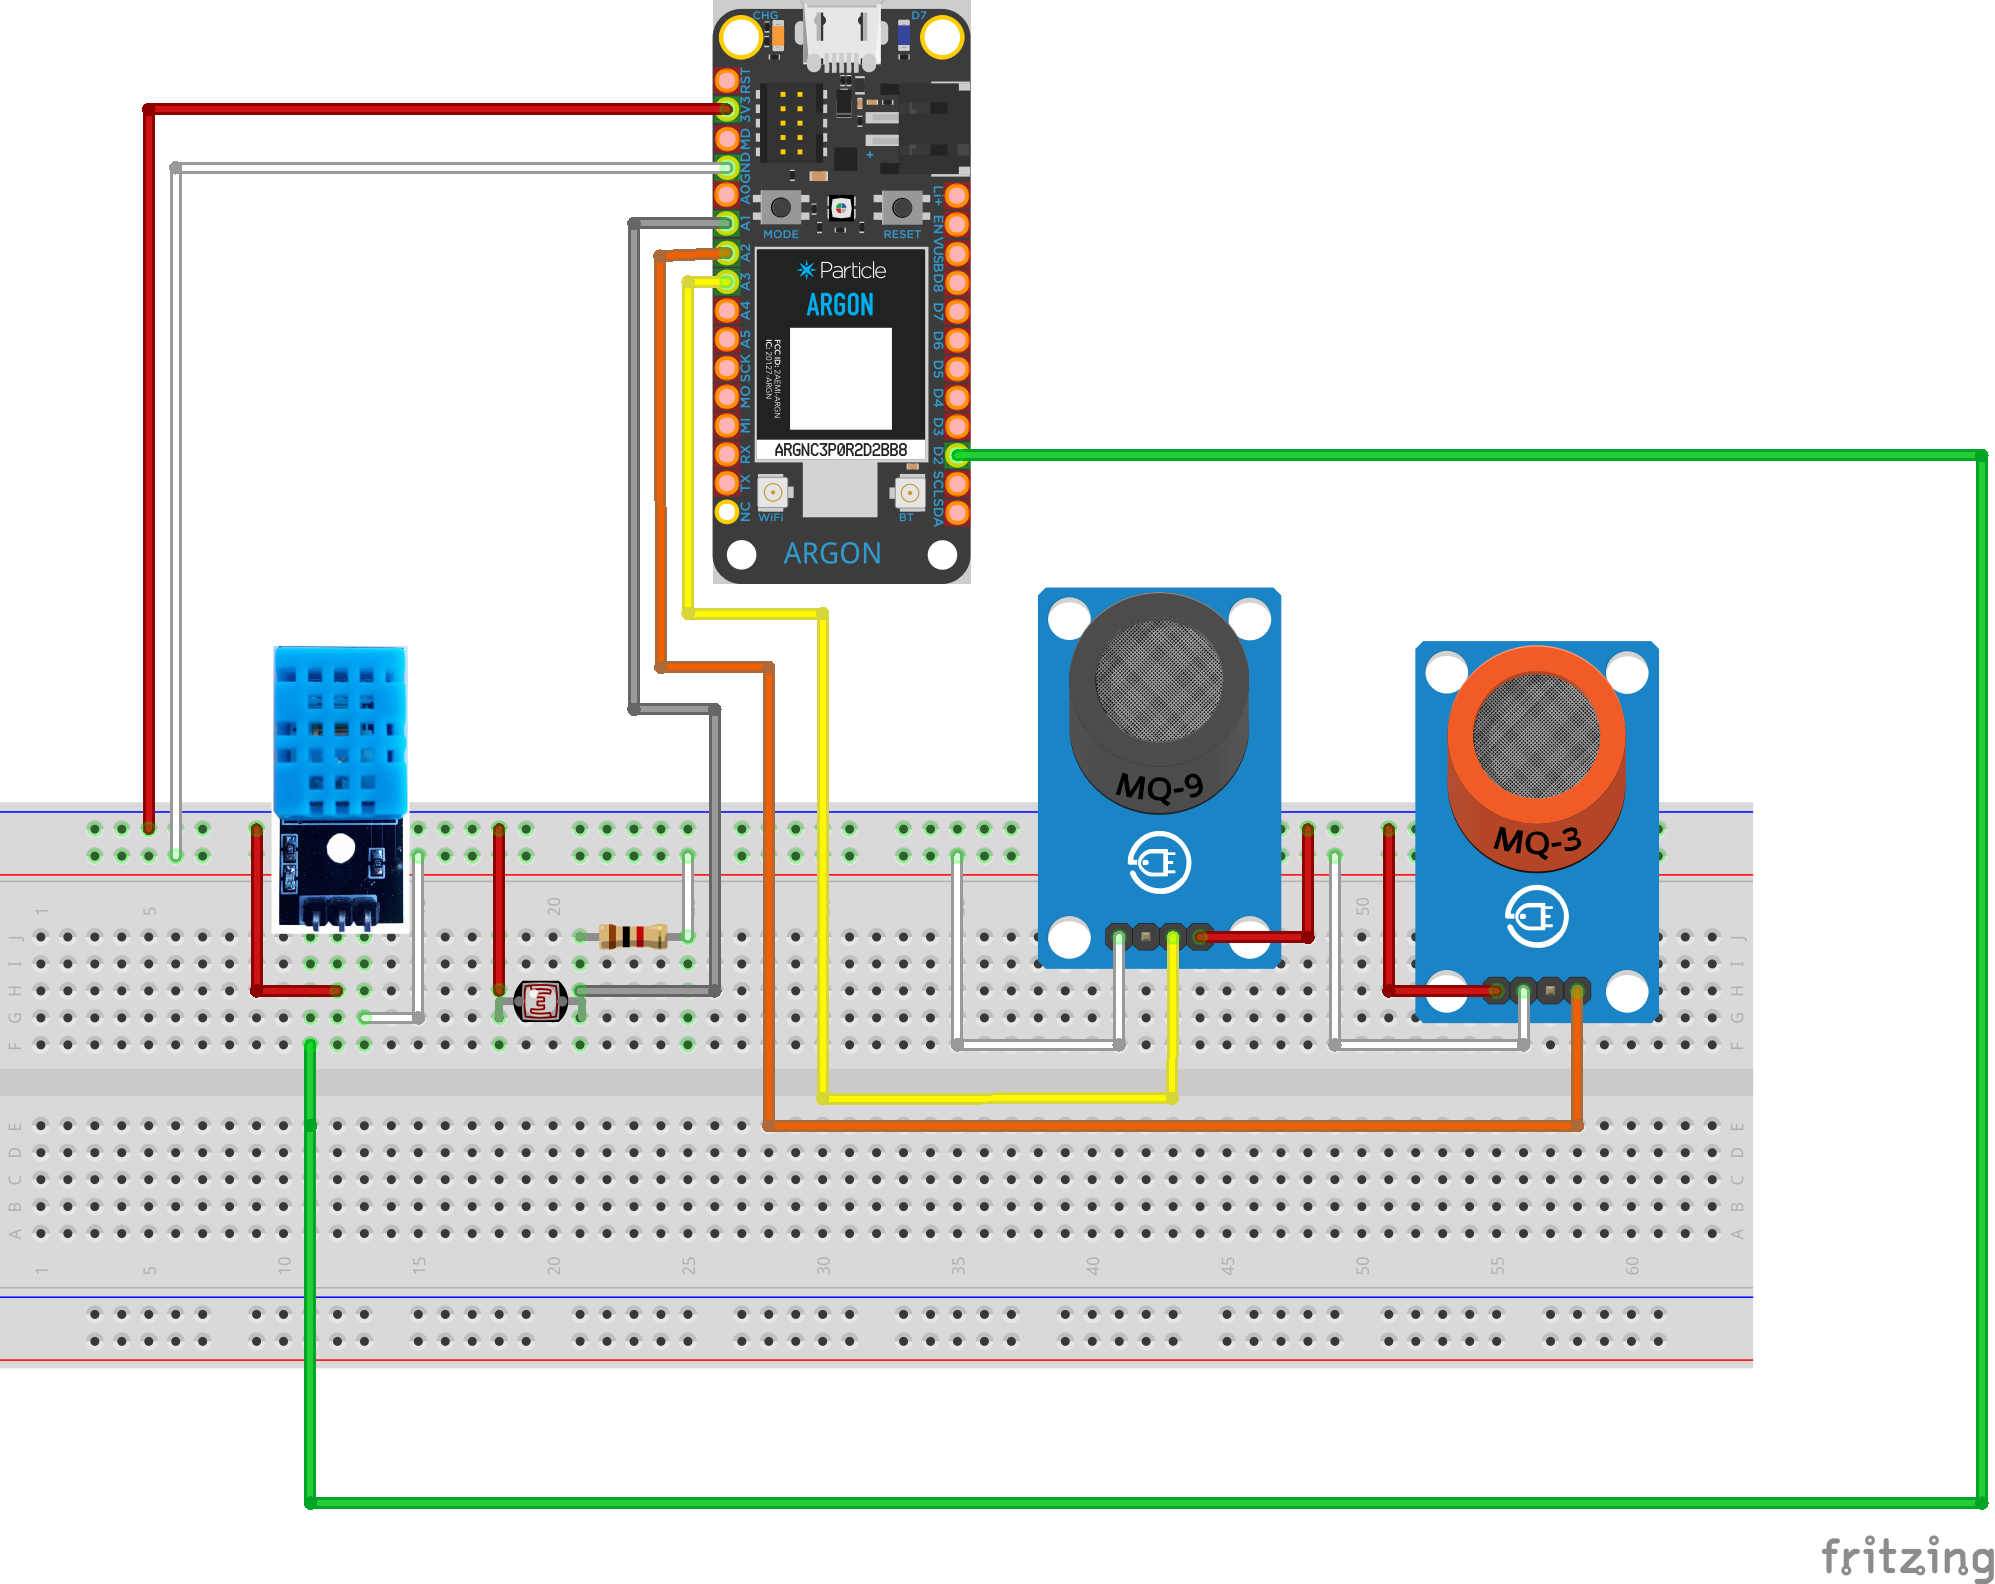
Below is the Diagram you can use to assemble your sensors and modules on breadboard and after that on vero board for final deployment.
Pin Layout:
Ldr -> A1
MQ-2 -> A2
MQ135 -> A3
DHT11 Module -> D2
After Assembling the Things your breadboard will look like below picture :)
Now it's time to load the Code into Board. open up particle web IDE https://build.particle.io/build/ or you can directly clone the code from this link https://go.particle.io/shared_apps/5d503a777a79310015244c0c and copy the APP. if you used the same pins as mentioned above then just click on Flash icon and wait for response. after successfully load of code navigate to https://console.particle.io/events and see if there is any event coming with the name of "WeatherData". if yes then you are successful person :)
2-Setup ThingSpeak Channel and Particle Webhook:Right now we are Ready for integration with other Platforms. so click on Integration. no no just wait firstly we need to setup ThingSeapk. so visit https://thingspeak.com/ signup for account if you don't have account and login to portal. after login just click on Channels-> My Channel
Click on New Channel
Enter the Channel Name and other Fields Name according to below image.
Click on API Keys tab and copy the Write API Key that we will use in webhook settings.
yahoooo our thingspeak channel setup has been completed, if you click on Private View tab you will see empty charts now it's time to send some data to Thingspeak.
Get back to Particle Console and click on Integration Icon.
After Click on Integration Select Webhook
Here we are going to setup webhook for thingspeak.
Enter the URL https://api.thingspeak.com/update
and click on Advance Settings and select Custom and Enter the
api_key= ThingSpeak Write key that you already copied.
Add Row for other fields as per shown image and click on Save button
Webhook setup has been completed, lets take a tour to thingspeak to see some data.
Create new account on Zapier.com and login to portal. After that click on "MyZaps" and then click on "Make a New Zap"
Click on "WebHooks"
Select "Catch Hook"
Copy the URL From Field and Paste into Particle Web Hook URL as we already done this before in ThingSpeak webhook section.
Click on "Add a Step" to send data to Google Sheet.
Select "Google Sheets"
Select "Create Spreadsheet Row" option
Select Google Account in the below step.
Before Connecting an account just create a spreadhseet at docs.google.com and enter the columns name according to WeatherStation Data.
Just Test the Zap and turn it on.
Rest of steps are incomplete as I already described that my board has been dead due to over voltage mistake. but with the use of Google Data Studio you can manipulate the data for future predication and also get other stats.
Future Goals:
1- Add Air Pressure in it.
2- Integrating cheap lipo battery including Solar Power
3- Rain Module to Detect Rain
4- Soil Moisture Sensor to Detect the Effect of Rain & Dry Season of Land.
I am Founder of http://OpenWeather.cc Project. Main purpose of Project is to create DIY Network of Weather Stations in all over the world (especially in under developed countries where Govt's are not taking too much interest in Weather & Environment Monitoring) which is maintained by volunteers and any body can fetch the weather data freely. write now it's in progress and soon it will be live. if any body is interested to become a part of this project then please contact with me.


_zhWsCcSEcl.jpg?auto=compress%2Cformat&w=48&h=48&fit=fill&bg=ffffff)


Comments
Please log in or sign up to comment.