


🏠 Smart Home System 🔎
A home environment monitoring system can help you track various aspects of your home environment, such as temperature, humidity, air quality, and more. So we can use following -
- 🌡️ Temperature and Humidity Sensors: Monitor the indoor climate.
- ❄️ Air Quality Sensors: Detect levels of pollutants, such as carbon dioxide (CO2), volatile organic compounds (VOCs), and particulate matter (PM2.5 and PM10).
- 🏃 Motion Sensors: Track movement within your home for security or automation purposes.
- 💡 Light Sensors: Measure ambient light levels.
- 🔊 Sound Sensors: Monitor noise levels.
- 💧 Water Leak Sensors: Detect leaks to prevent water damage.
With the integration of IoT based Smart Home systems, We can use -
- 📱 Mobile App: For real-time monitoring and alerts.
- 🌐 Web Dashboard: For more detailed analysis and historical data.
- 📣 Integration with Smart Home Systems: Compatibility with platforms like Amazon Alexa, Google Home, or Apple HomeKit.
There are several commercial modules available in market for such needs like following -
- Netatmo Smart Home Weather Station: Offers temperature, humidity, and air quality monitoring.
- Awair Element: Focuses on air quality, including CO2, VOCs, PM2.5, temperature, and humidity.
- Google Nest Hub: Integrates with various sensors and offers a comprehensive smart home control platform.
- Samsung SmartThings: A versatile platform that supports a wide range of sensors and smart devices.
In this project we are going to build similar kind of DIY Home Environment monitoring system which will be -
- Monitor temperature, humidity, pressure, Air Quality, Volatile Organic Compounds (VOC), Ultraviolet Intensity, Ambient Light level
- Detect Smoke, Fire, LPG/CH4 Gas leak
I'm very grateful to DFRobot for providing me their awesome hardware and supporting my Project's Idea with FireBeetle 2 ESP32 C6 IoT Development Board, and Sensors ❤️🙏Hardware 🛠️
For this project we are going to use FireBeetle 2 ESP32 C6 Dev Board Which has following features -
- Equipped with the ESP32-C6 chip, it supports communication protocols including Wi-Fi, BLE, Zigbee, and Thread.
- Supports Wi-Fi 6 protocol for lower latency and lower power consumption.
- Solar charging enables deployment without the need for power lines.
- Battery level detection allows monitoring of device battery information.
- Ultra-low power consumption with deep sleep at 16uA.
- Onboard GDI interface for easy connection to screens.
And there are several other components like display and sensors as following -
- 2.0" 320x240 IPS TFT LCD Display with MicroSD Card
- Fermion: Multifunctional Environmental Sensor
- Gravity: SGP40 Air Quality Sensor
- MEMS Methane CH4 Gas Detection Sensor
- MEMS Smoke Gas Detection Sensor
2.0”LCD display adopts T7789V driver chip and has 320*240 color pixels (RGB565). There are two connection ways for this module: pin headers and GDI. Only one FPC cable is needed when working with main-controllers with GDI, which greatly reduces the complexity of wiring.
Step 1️⃣ - Assembly and Connecting the Hardware 🧰
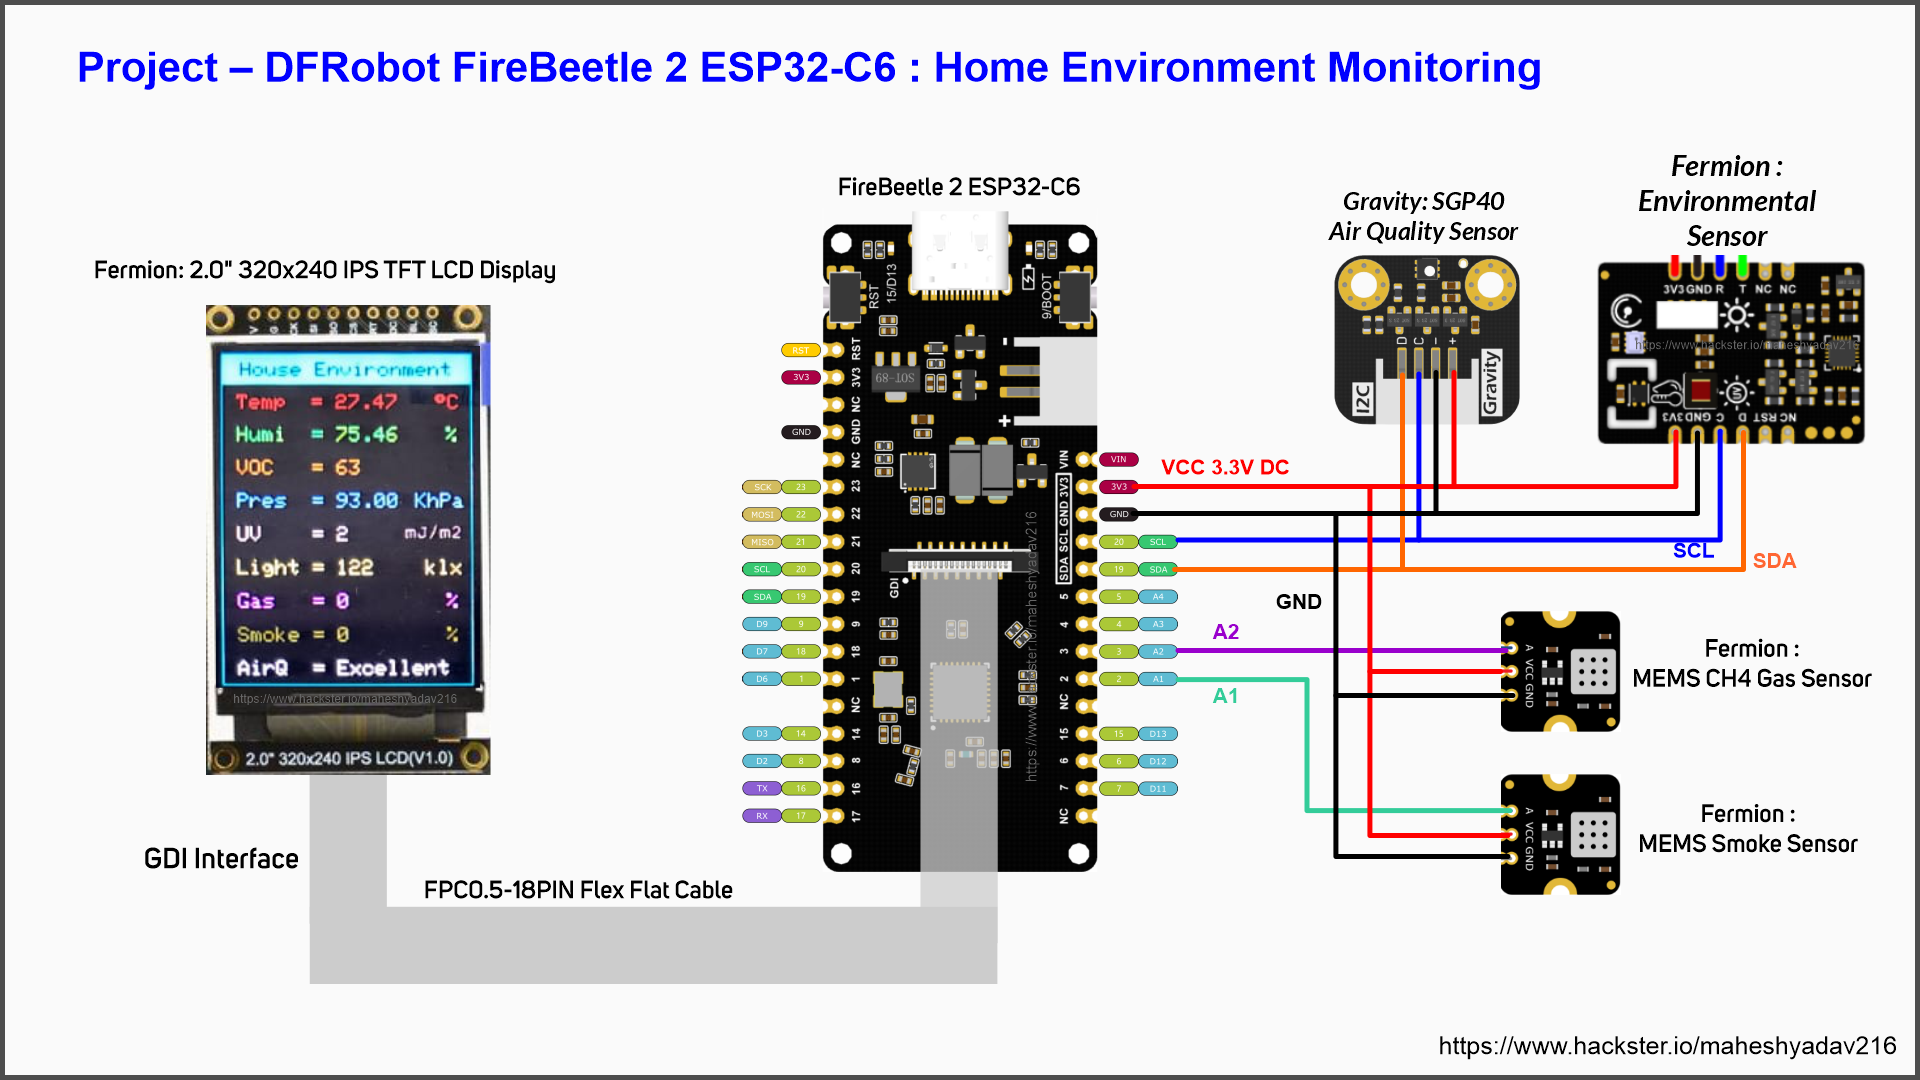
Circuit Diagram
Circuit schematics of the project is as shown below. Display is connected to ESP32C6 Board via FPC0.5-18PIN Flex Flat Cable as shown in fig below. SGP40 and Multifunction Sensors are connected via I2C interface. MEMS Smoke and Gas sensors are analog sensors hence connected to A1 and A2 Analog pins of ESP32C6.
We have used Arduino IDE for programming the projects code into FireBeetle 2 ESP32 C6 dev board. So to we have -
- Configured Arduino IDE to install the MCU (FireBeetle 2 ESP32 C6) core. You will get detailed information about how to do this on WiKi page of this MCU board. Please follow it before going into further programming
- Libraries 📚 So we have used 2 I2C sensors, 2 Analog Sensors and one TFT display with GDI interface.
- For Gravity: SGP40 Air Quality Sensor we require - DFRobot_SGP40 library
- For Fermion: Multifunctional Environmental Sensor we require this DFRobot_EnvironmentalSensor library
- For Analog Sensors there is no library required.
Step 2️⃣ Install MCU Board code and required libraries and upload the following code to get Home environmental readings locally on LCD display
//=============================================================================//
// Project/Tutorial       - DIY Project - Smart Home Environment Monitoring System
// Author                 - https://www.hackster.io/maheshyadav216
// Hardware               - DFRobot FireBeetle 2 ESP32 C6 Dev board, 2In LCD Display
// Sensors                - Fermion Multifunction Env Sensor, SGP40 Air Quality
// Software               - Arduino IDE
// GitHub Repo of Project - https://github.com/maheshyadav216/Project-Smart-Home-Environment-Monitoring-System
// Code last Modified on  - 06/07/2024
//============================================================================//
// Code to Display Smart Home Environmental Readings Locally

#include "DFRobot_GDL.h"
#include <DFRobot_SGP40.h>
#include "DFRobot_EnvironmentalSensor.h"
//Display Pins
#define TFT_DC  D2
#define TFT_CS  D6
#define TFT_RST D3
/**
* @brief Constructor Constructor of hardware SPI communication
* @param dc Command/data line pin for SPI communication
* @param cs Chip select pin for SPI communication
* @param rst reset pin of the screen
*/
DFRobot_ST7789_240x320_HW_SPI screen(/*dc=*/TFT_DC,/*cs=*/TFT_CS,/*rst=*/TFT_RST);
DFRobot_SGP40    mySgp40;
DFRobot_EnvironmentalSensor environment(/*addr = */SEN050X_DEFAULT_DEVICE_ADDRESS, /*pWire = */&Wire);
float temperatureC, temperatureF, altitude, humidity, pressure;
uint16_t VOC, ultravoilet;
uint8_t smoke, CH4, Light;
uint8_t SmokePin = A1;
uint8_t GasPin = A2;
String AirQuality="";
void init_EnvSensor(){
Serial.println("Initializing ENV Sensor...");
while(environment.begin() != 0){
Serial.println(" Sensor initialize failed!!");
delay(1000);
}
Serial.println("\nEnv Sensor initialize success!!");
}
void init_SGP40(){
Serial.println("Initializing SGP40 Sensor...");
/*
* The preheating time of the sensor is 10s.
* duration:Initialize the wait time. Unit: millisecond. Suggestion: duration > = 10000 ms
*/
while(mySgp40.begin(/*duration = */10000) !=true){
Serial.println("failed to init chip, please check if the chip connection is fine");
delay(1000);
}
Serial.println("----------------------------------------------");
Serial.println("sgp40 initialized successfully!");
Serial.println("----------------------------------------------");
/**
* @brief  Set the temperature and humidity
* @param relativeHumidityRH  Current environmental relative humidity value, range 0-100, unit: %RH
* @param temperatureC  Current ambient temperature, range -10~50, unit: °C
*/
//mySgp40.setRhT(/*relativeHumidity = */ 50, /*temperature = */ 20);
}
void getGasStatus(){
uint16_t tmp = 0;
uint16_t sensorValue = analogRead(GasPin);
Serial.print("CH4 Gas Raw Reading = ");
Serial.println(sensorValue);
tmp = map(sensorValue, 430, 4096, 0, 100);
if(tmp >= 25){
CH4 = tmp;
} else{
CH4 = 0;
}
Serial.print("CH4 Gas Level = ");
Serial.print(CH4);
Serial.println(" %");
Serial.println("\n");
}
void getSmokeStatus(){
uint16_t tmp = 0;
uint16_t sensorValue = analogRead(SmokePin);
Serial.print("Smoke value Raw Reading = ");
Serial.println(sensorValue);
tmp = map(sensorValue, 0, 4096, 0, 100);
if(tmp >= 25){
smoke = tmp;
} else{
smoke = 0;
}
Serial.print("Smoke Level = ");
Serial.print(smoke);
Serial.println(" %");
Serial.println("\n)");
}
void getENV_Readings(){
Serial.println("ENV Sensor Readings :");
//Print the data obtained from sensor
Serial.println("-------------------------------");
Serial.print("TempC: ");
temperatureC = environment.getTemperature(TEMP_C);
Serial.print(temperatureC);
Serial.println(" ℃");
Serial.print("TempF: ");
temperatureF = environment.getTemperature(TEMP_F);
Serial.print(temperatureF);
Serial.println(" ℉");
Serial.print("Humidity: ");
humidity = environment.getHumidity();
Serial.print(humidity);
Serial.println(" %");
Serial.print("Ultraviolet intensity: ");
ultravoilet = environment.getUltravioletIntensity();
Serial.print(ultravoilet);
Serial.println(" mw/cm2");
Serial.print("LuminousIntensity: ");
Light = environment.getLuminousIntensity();
Serial.print(Light);
Serial.println(" lx");
Serial.print("Atmospheric pressure: ");
pressure = environment.getAtmospherePressure(KPA);
Serial.print(pressure);
Serial.println(" Khpa");
Serial.print("Altitude: ");
altitude = environment.getElevation();
Serial.print(altitude);
Serial.println(" m");
Serial.println("-------------------------------");
delay(500);
}
void getSGP40_Readings(){
/**
* @brief  Measure VOC index after humidity compensation
* @note   VOC index can indicate the quality of the air directly. The larger the value, the worse the air quality.
* @note       0-100,no need to ventilate, purify
* @note       100-200,no need to ventilate, purify
* @note       200-400,ventilate, purify
* @note       400-500,ventilate, purify intensely
* @return The VOC index measured, ranged from 0 to 500
*/
uint16_t index = mySgp40.getVoclndex();
VOC = index;
if(index <= 100){
AirQuality = "Excellent";
} else if( (index > 100) && (index <= 200)){
AirQuality = "Good";
} else if( (index > 200) && (index <= 300)){
AirQuality = "OK";
} else if( (index > 300) && (index <= 400)){
AirQuality = "Bad";
} else if( (index > 400) && (index <= 500)){
AirQuality = "Very Bad";
}
Serial.println("\nSGP40 Sensor Readings");
Serial.println("-------------------------------");
Serial.print("VOC index = ");
Serial.println(VOC);
Serial.print("Air Quality = ");
Serial.println(AirQuality);
Serial.println("-------------------------------");
Serial.println("\n");
}
void draw_initScreen(){
screen.fillScreen(COLOR_RGB565_BLACK);
screen.drawRect(0, 0, 240, 320, COLOR_RGB565_CYAN);
screen.fillRect(0, 0, 240, 30, COLOR_RGB565_CYAN);
screen.setTextColor(COLOR_RGB565_BLACK);
screen.setTextSize(2);
screen.setCursor(18, 8);
screen.println("House Environment");
screen.setTextColor(COLOR_RGB565_RED);
screen.setTextSize(2);
screen.setCursor(15, 40);
screen.println("Temp  = ");
screen.setCursor(205, 40);
screen.println("\367C ");
screen.setTextColor(COLOR_RGB565_GREEN);
screen.setCursor(15, 72);
screen.println("Humi  = ");
screen.setCursor(215, 72);
screen.println("%");
screen.setTextColor(COLOR_RGB565_ORANGE);
screen.setCursor(15, 104);
screen.println("VOC   = ");
screen.setTextColor(COLOR_RGB565_SKYBLUE);
screen.setCursor(15, 136);
screen.println("Pres  = ");
screen.setCursor(185, 136);
screen.println("KhPa");
screen.setTextColor(COLOR_RGB565_PINK);
screen.setCursor(15, 168);
screen.println("UV    = ");
screen.setFont(&FreeMono9pt7b);
screen.setTextSize(1);
screen.setCursor(175, 178);
screen.println("mJ/m2");
screen.setFont();
screen.setTextSize(2);
screen.setTextColor(COLOR_RGB565_YELLOW);
screen.setCursor(15, 200);
screen.println("Light = ");
screen.setCursor(195, 200);
screen.println("klx");
screen.setTextColor(COLOR_RGB565_MAGENTA);
screen.setCursor(15, 232);
screen.println("Gas   = ");
screen.setCursor(215, 232);
screen.println("%");
screen.setTextColor(COLOR_RGB565_OLIVE);
screen.setCursor(15, 264);
screen.println("Smoke = ");
screen.setCursor(215, 264);
screen.println("%");
screen.setTextColor(COLOR_RGB565_WHITE);
screen.setCursor(15, 296);
screen.println("AirQ  = ");
}
void display_readings(){
screen.setTextWrap(false);
screen.fillRect(105, 37, 67, 278, COLOR_RGB565_BLACK);
screen.setTextColor(COLOR_RGB565_RED);
screen.setCursor(110, 40);
screen.println(temperatureC);
screen.setTextColor(COLOR_RGB565_GREEN);
screen.setCursor(110, 72);
screen.println(humidity);
screen.setTextColor(COLOR_RGB565_ORANGE);
screen.setCursor(110, 104);
screen.println(VOC);
screen.setTextColor(COLOR_RGB565_SKYBLUE);
screen.setCursor(110, 136);
screen.println(pressure);
screen.setTextColor(COLOR_RGB565_PINK);
screen.setCursor(110, 168);
screen.println(ultravoilet);
screen.setTextColor(COLOR_RGB565_YELLOW);
screen.setCursor(110, 200);
screen.println(Light);
screen.setTextColor(COLOR_RGB565_MAGENTA);
screen.setCursor(110, 232);
screen.println(CH4);
screen.setTextColor(COLOR_RGB565_OLIVE);
screen.setCursor(110, 264);
screen.println(smoke);
screen.setTextColor(COLOR_RGB565_WHITE);
screen.setCursor(110, 296);
screen.println(AirQuality);
}
void setup() {
// put your setup code here, to run once:
Serial.begin(115200);
Serial.println("Starting the House Environment Monitoring System...");
init_EnvSensor();
init_SGP40();
screen.begin();
draw_initScreen();
}
void loop() {
// put your main code here, to run repeatedly:
getSGP40_Readings();
getENV_Readings();
getGasStatus();
getSmokeStatus();
display_readings();
delay(8000);
}

//============================================================================//
Step 3️⃣ All these libraries given above required for locally setup the system and get different Home Environmental parameters displayed on LCD display. (Locally).
But what if we need to monitor all these parameters from remote/other location?
How we can get alerts about Gas Leak or Smoke detection when we are not in Home?
Step 4️⃣ Alert and Notifications System 🚨
For this solution we decided to take leverage of IoT technology and implement Smart Home Environmental parameters Monitoring and Alert system using Wireless Technology. So, there are several ways you can send all these readings to any IoT cloud Dashboards - Like Blynk IoT Cloud, Arduino IoT Cloud, Particle, ThingsSpeak etc.
But due to limitations of "Free Account" on these platforms, we can not cover/include all House Environment Parameters in the Dashboards of these IoT Cloud Services. There are limitations (only upto 5) Widgets/Sensor Reading Parameters we were able to add using/On these platforms in our Free tier accounts. So in order to include all 9 parameters(of Home Env project) we have to purchase their paid/premium plans. Hence for the demo purpose we decided to go with Telegram.
- We can use different long distance wired/wireless technologies to send sensor readings. Like for example we can use - Cellular GSM 3G/4G/5G, LoRa, SIgFox, NBIoT etc;
- In this project, for the sake of demo we have supposed that WiFi will be available at Home and we can use Telegram Bot to Send Alert Notifications and Enquire about current status of House Environment.
Future Scheme 🔮 - In future, we have planned to design this system to connected Home Assistant Server running on Raspberry Pi. So that we can get graphical view Dashboard of different parameters.
Setting Up Telegram Bot 🤖
Telegram Messenger is a cloud-based instant messaging and voice over IP service. You can easily install it in your smartphone (Android and iPhone) or computer (PC, Mac and Linux). It is free and without any ads. Telegram allows you to create bots that you can interact with.
"Bots are third-party applications that run inside Telegram. Users can interact with bots by sending them messages, commands and inline requests. You control your bots using HTTPS requests to Telegram Bot API"
There are three very important steps -
- Create Telegram Bot
- Get your Telegram chat ID
- Libraries required for Telegram bot ESP32 integration
🦾 Create a Telegram Bot
- We need to create a Telegram Bot that can alert us when our Edge AI Vision module detects the people. For that open Telegram App on your PC or Phone and search for BotFather.
- You have Chat with Bot named 'BotFather' to create your own new bot and its HTTP API credentials. i.e Bot Token
🤵 Get your Telegram chat ID
- In the telegram messenger every user, chat, and group is having a unique ID. So To prevent any unauthorized access to our bots from other users we need to find our unique user ID and use it inside our Arduino code for ESP32.
- To know your Telegram chat ID you have to chat with Bot named 'IDBot, For that open Telegram App on your PC or Phone and search for “@myidbot”.
📚 Libraries required for Telegram bot ESP32 integration
To establish communication with the Telegram bot, we’ll be using the Universal Telegram Bot Librarycreated by Brian Lough that provides an easy interface for Telegram Bot API.
We also have to install the ArduinoJsonlibrary
You can either install above libraries in Arduino IDE by adding their zip file or You can also use Library Manager.
You can Check out following excellent tutorials
for more details about How to create Telegram Bot? and how you can integrateit with your ESP32 Board?.
Step 5️⃣ Final Code
Once you done with all above 4 steps, Check out and upload the code given below in attachment section or on GitHub repo.
Please replace your credentials in main code. Like, your WiFi SSID and Password. As well as your Bot Token and Chat ID
🚀 Demo and Results -
- Project works flawlessly with showing real time readings of different House Environment Parameters like temperature, humidity, pressure, Air Quality, Volatile Organic Compounds (VOC), Ultraviolet Intensity, Ambient Light level. on LCD display locally.
- The Gas Leak detection system and Smoke Detection System also works correctly, by giving instant messages/Alert notifications and pop-ups on Telegram App
- On Telegram App we can send commands to HouseEnv_Bot to get real time sensor readings on Telegram.
- We have also programmed Telegram Bot in such away that, we can enable/Engage or Disable the Smoke and Gas detection system using issuing commands from Telegram.
- Please Check out following video for complete project Assembly and Demonstration of practical working of project.
We have plans to make following upgradation in our project in future.
- Connectivity - More robust and ubiquitous wireless connectivity options like LoRa, SigFox, Cellular - 4G/5G, NBIoT etc.
- Connecting it to IoT cloud Services like - Blynk, Arduino IoT Cloud etc.
- Making system completely standalone by powering it through Solar power.
- Adding proper 3D Printed enclosure.
I will share all the documents, codes, schematics, etc. on GitHub.
Suggestions about this Tutorial/Project design, Circuits, code modifications, Optimization, Errors/Bugs findings and queries are most welcomed. Feel free to raise you queries, suggest your opinions and point out any errors or bugs.Credits
Thank you Hackster, DFRobot, and all other peoples, websites and entities who helped me (directly/indirectly) for creating this article.


Comments
Please log in or sign up to comment.