


We can’t deny that starting programming with the GPIO using Raspberry PI is very hassle and hard thing to do. Especially when you try to locate and identify some specific pins in the GPIO.
Although there are already existing products that you can buy and use to solve this problem (Ex: T-cobblers) But still, look at this mess when you really just want to connect these 4 LEDs and blink them as a start. Although, these products are pretty useful when you are making more big and complex projects.
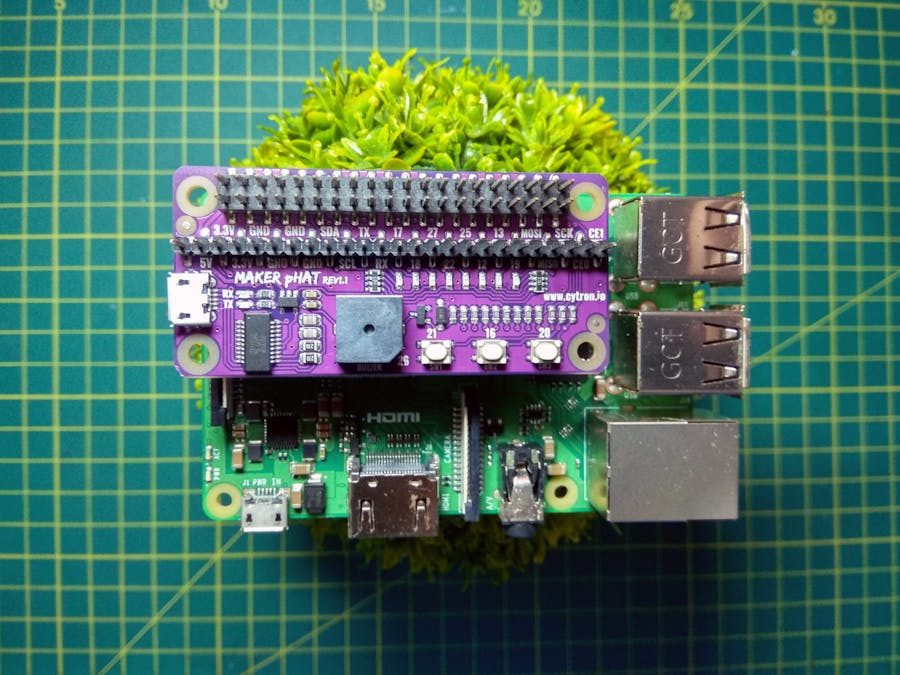
That’s what Cytron Technologies is trying to simplify and solve this problem, through Maker Phat. These are the features that I like about this Hat
- This hat has built in LEDS connected to (GPIO 17, 18, 27, 22, 25, 12, 13, 19).
- 3x on board programmable push buttons (GPIO 21, 19 and 20)
- On board active buzzer (GPIO 26).
- Proper label for all GPIOs, including SPI, UART, I2C, 5V, 3.3V, and GND.
- And most of all for me one of the best additional feature of this hat is USB to UART communication. (HEADLESS CONFIGURATION using the USB!!!)
I often just throw away the box every time I receive the electronic component. But Cytron Technologies did really put some time and effort in making their product presentation.
RevisionsI was lucky to be one of the first to test this device and unfortunately I encountered some problems with the LED. It has something to do with the effect of Electrostatic Discharge (ESD) to the MOSFET in the hat and immediately sent an email report to their support team.
It was fast, their support team is one of the best. They said it will take a month for the revision and they really did fulfill their promise. (Look at the specificdates in the email.
I Think they don’t ship those revision 1 Maker pHats anymore. But for the benefit of everyone here are maker phats side by side. You can really tell the difference just by looking at it.
- For me the labels on the GPIO from the old version are a lot better and a lot clearer.
- Revision 1.1 now uses FT231X as the USB to UART compared to the old CH340. More details can be found in their website so check them out.
You can use the program provided by Cytron here: https://gist.github.com/IdrisCytron/9b3e2994eb2142d4ac10cb4d151016e3
from gpiozero import LED, Button, Buzzer
from time import sleep
import os

LED1 = LED(17)
LED2 = LED(18)
LED3 = LED(27)
LED4 = LED(22)
LED5 = LED(25)
LED6 = LED(12)
LED7 = LED(13)
LED8 = LED(19)

SW1 = Button(21)
SW2 = Button(16)
SW3 = Button(20)

BUZZER = Buzzer(26)

NONE = 0
DECREASE = 1
INCREASE = 2
ALL_OFF = 9
ALL_ON = 10

def beep(times, sec):
 for x in range(times):
   BUZZER.on()
   sleep(sec)
   BUZZER.off()
   sleep(sec)

def led(ledNumber):
 if ledNumber == 1:
   LED1.on()
 else:
   LED1.off()
 if ledNumber == 2:
   LED2.on()
 else:
   LED2.off()
 if ledNumber == 3:
   LED3.on()
 else:
   LED3.off()
 if ledNumber == 4:
   LED4.on()
 else:
   LED4.off()
 if ledNumber == 5:
   LED5.on()
 else:
   LED5.off()
 if ledNumber == 6:
   LED6.on()
 else:
   LED6.off()
 if ledNumber == 7:
   LED7.on()
 else:
   LED7.off()
 if ledNumber == 8:
   LED8.on()
 else:
   LED8.off()
 if ledNumber == ALL_OFF:
   LED1.off()
   LED2.off()
   LED3.off()
   LED4.off()
   LED5.off()
   LED6.off()
   LED7.off()
   LED8.off()
 elif ledNumber == ALL_ON:
   LED1.on()
   LED2.on()
   LED3.on()
   LED4.on()
   LED5.on()
   LED6.on()
   LED7.on()
   LED8.on()

mode = NONE
ledPosition = 0
led(ALL_ON)
beep(1, 0.1)
led(ALL_OFF)

try:
 while True:
   if SW1.is_pressed and mode != DECREASE:
     beep(2, 0.07)
     mode = DECREASE
   elif SW2.is_pressed and SW3.is_pressed:
     sleep(0.5)
     for loop in range(3):
       led(ALL_ON)
       BUZZER.on()
       sleep(0.2)
       led(ALL_OFF)
       BUZZER.off()
       sleep(0.2)
     sleep(1)
     os.system("sudo shutdown -h now")
   elif SW2.is_pressed and mode != INCREASE:
     beep(2, 0.07)
     mode = INCREASE
   elif SW3.is_pressed and mode != NONE:
     beep(1, 0.07)
     mode = NONE
   if mode == INCREASE:
     if ledPosition < 8:
       ledPosition = ledPosition + 1
     else:
       ledPosition = 0
   elif mode == DECREASE:
     if ledPosition > 0:
       ledPosition = ledPosition - 1
     else:
       ledPosition = 8
   led(ledPosition)
   sleep(0.05)
except KeyboardInterrupt:
 led(ALL_OFF)
Overall, this product is very useful to a lot of beginners who are just starting to learn programming with the GPIO in their Raspberry pi. I think this is the only GPIO hat in the market right now that has a lot of functionality. If you found other GPIO hat in the market please do comment below. Thanks.


Comments
Please log in or sign up to comment.