Temperature is only one of the variables that contribute to the comfort of your home. High humidity can cause your home to feel muggy, hot, or sticky, and can cause damage to your house. Low humidity can lead to dryness, static, and can make you feel colder as moisture evaporates from your body into the dry air.
In this project, we will set up an Arduino with a digital temperature and humidity sensor to record indoor humidity data. We will compare the data collected by the Arduino to the outside temperature to determine the comfort level of the room, and we will send notifications when the room is deemed "uncomfortable" (i.e. too dry or too humid).
These notifications will be sent through IFTTT using the Webhooks service, meaning that the action triggered by the Webhook (here, a push notification), can easily be swapped out for any IFTTT service, such as a toggle for a smart power plug connected to your dehumidifier.
The humidity data and alerts will be processed through the MATLAB Analysis service included in every free ThingSpeak account, so there is zero cost involved in getting started with this example.
The first ThingSpeak channel will hold our device's temperature and humidity readings. Create a new ThingSpeak channel and activate two fields: the first will hold the indoor humidity and the second will hold the indoor temperature.
The ideal indoor humidity is dependent on the outdoor temperature. Higher outdoor temperatures correspond to higher indoor humidity, and lower temperatures to lower humidity. To make our ideal humidity calculation easier, we will include a table of outdoor temperatures and their corresponding ideal indoor humidities in the Metadata section of our channel.
40, 45
30, 40
20, 35
10, 30
0, 25
-10, 20
-20, 15
The table is read left to right, for example, 40, 45 reads "an outdoor temperature of 40°F corresponds to an indoor humidity of 45%". Paste this data as-is into your Metadata field, we will use MATLAB to parse and use this data.
Hit Save Channel once you've finished activating the fields, filling in the Metadata, and naming your channel. Head over to the API Keys tab and write down your Write API Key and Channel ID for the next step.
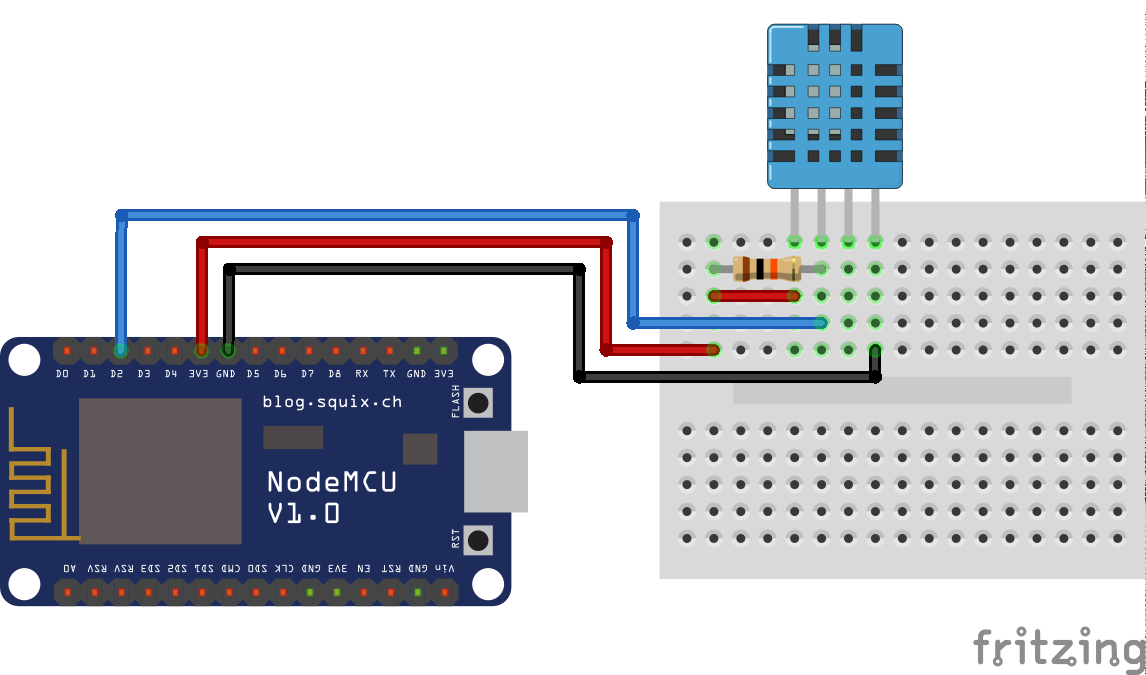
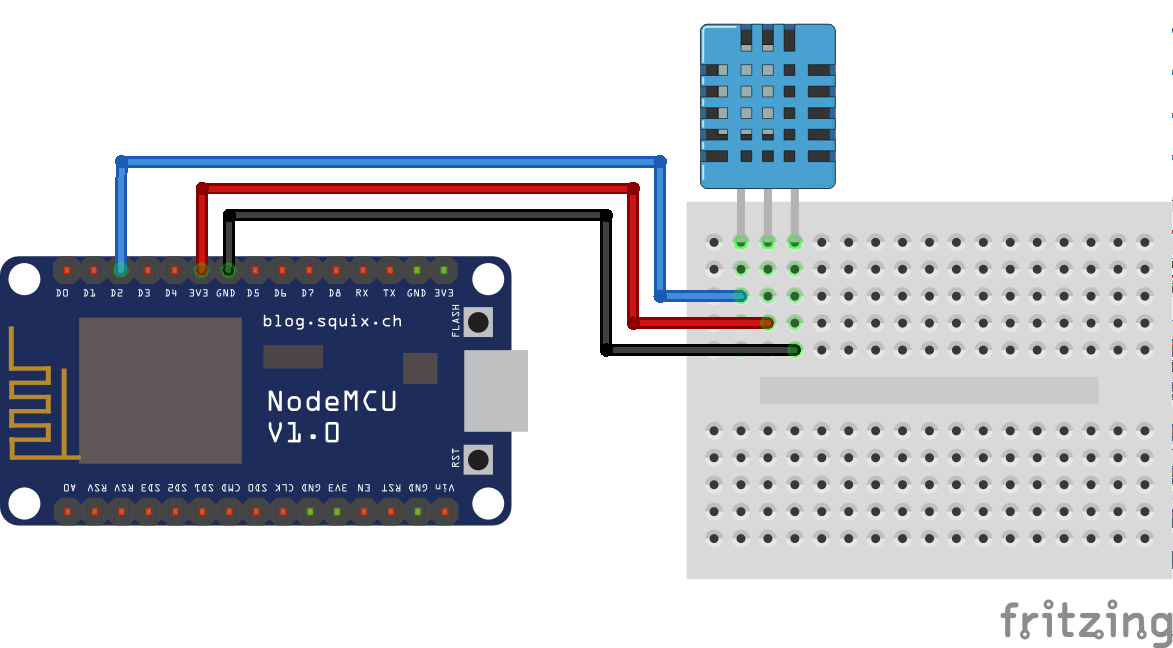
Part 2: The DeviceWe will be using a NodeMCU v1.0 and a DHT11 sensor to take our readings and post them to ThingSpeak. The Arduino code for the NodeMCU is provided as an attachment titled Monitor, and the schematic, titled NodeMCU and DHT11, is provided at the bottom of the page.
There are a few changes to be made to the code before it is ready to upload. First, you must provide a WiFi SSID (name) and password for the device to connect to. You will also need to supply the Channel ID and Write API Key to your device. Enter these details in the lines below on your copy of the file.
char ssid[] = "";
char pass[] = "";
long channelID = 0;
char writeAPIKey[] = "";
Upload your code to your device using the Arduino IDE. If everything is configured correctly, you should see temperature and humidity readings being posted to your ThingSpeak channel every 20 seconds.
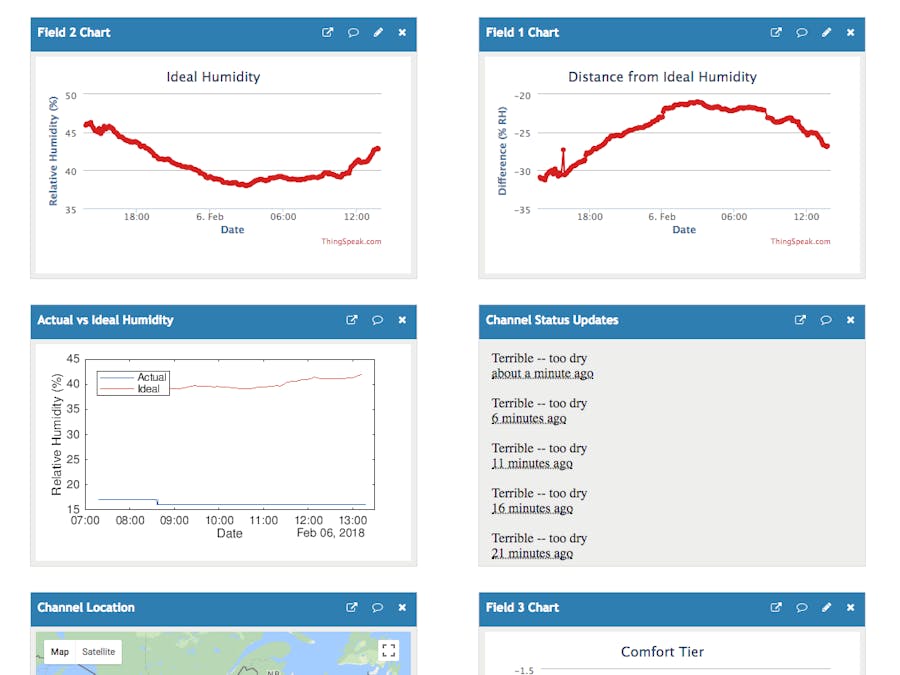
We will use a scheduled MATLAB Analysis to populate our second ThingSpeak channel with data about the ideal humidity. Create a second ThingSpeak channel with three active fields; the first will hold the difference between the ideal humidity and the actual humidity, the second will hold the ideal humidity, and the third will hold the "comfort tier"—an integer representation of the humidity difference.
The comfort tier ties in to the Metadata of our channel. We will include another table, this time correlating humidity difference to a message. Paste this data as-is in the Metadata section of your channel.
10 "Good"
15 "Okay"
25 "Poor"
100 "Terrible"
Each line corresponds to a humidity threshold and message: for example, the line 10 "Good" is read "a difference of 10% or less between the actual and ideal humidity is Good". Each threshold corresponds to a comfort tier—differences under 10 are in tier 0, differences under 15 are tier 1, etc. If the difference is negative (i.e. the room is too dry), the comfort tier is negative, otherwise, it's positive.
We will post the message generated by the analysis to the Status field, so check the Show Status toggle before you save your channel.
Create a new MATLAB Analysis (found in Apps). The source code is provided as an attachment titled Analysis—go ahead and paste this into the MATLAB Code section of the MATLAB Analysis editor.
There are a handful of changes that must be made before your analysis can be run. You must provide the Channel ID and Read Key for your indoor (first) channel, as well as the Channel ID, Read Key, and Write Key for your humidity difference (second) channel. Enter these details in the lines below on your copy of the file, replacing the [] square brackets with your channel ID and typing your keys inside the '' quotes.
You don't need to change the outdoor channel info—it's preconfigured to the MathWorks weather station located on campus in Natick, MA—but if you have access to a nearby temperature feed, feel free to use it for more accurate data.
%% Channel Info %%
% Channel to read indoor humidity
indoorChannelID = [];
indoorChannelReadKey = '';
% MathWorks weather station to read outdoor temperature
outdoorChannelID = 12397;
outdoorChannelReadKey = ''; % Not needed for public channel
% Channel to read & post humidity difference
diffChannelID = [];
diffChannelReadKey = '';
diffChannelWriteKey = '';
Once you've configured the channel info, hit Save and Run. Your analysis should run successfully and post data to your new channel.
To continuously record data, we need to schedule our MATLAB Analysis. Click on TimeControl within the Schedule Actions section of the MATLAB Analysis editor, and configure a new recurring TimeControl with an interval of 5 minutes.
Save your TimeControl at the bottom of the page, and ensure that the new TimeControl appears in the Schedule Actions section of your MATLAB Analysis. Your second channel should begin receiving updates every 5 minutes.
Part 4: The AlertWe can use IFTTT to handle our events and trigger a corresponding action: in this example, we will use a push notification. Create an account on ifttt.com if you don't have one already, and create a New Applet from the My Applets page. Click the blue this button to select your trigger service.
We will use the Webhooks service to receive our message from ThingSpeak. Select Receive a web request as your trigger, name your event, and record the event name for later.
Select Notifications as your action service, and select Send a notification from the IFTTT app. Paste the message below into the Message field of the notification.
It has been too {{Value1}} for the last {{Value2}} hours.We use two of the three value fields provided by the Webhooks service. Value1 holds a string—"dry" or "humid"—that describes the state of the room. Value2 holds the number of hours and minutes that the room has been in this state for—for example, It has been too dry for the last 6:00 hours. would be sent after 6 hours in a negative comfort tier.
Head over to the ifttt.com/maker_webhooks page and click the Settings button at the top of the page. Go to the URL in the Account Info section by copy-pasting it into the navigation bar of your browser.
Write down your Key for the Webhooks service from the top of the page, or from the end of the URL.
We will need another MATLAB Analysis to trigger our IFTTT Applet. Create a new MATLAB Analysis and paste in the code from the attachment titled Alert.
Once again, a few changes need to be made to the code before it can be run. Enter the Channel ID and Read Key for your difference (second) channel, as well as the event name, and the Webhooks Key you recorded from the settings page.
%% Configuration %%
alertIntervals = [hours(0.25) hours(1) hours(3) hours(6) hours(12) hours(24)];
%% Channel Info %%
% Channel to read humidity difference
channelID = [];
channelReadKey = '';
% Event name and key for the IFTTT WebHooks service
makerEvent = 'humidity_alert';
makerKey = '';
You should be able to run the analysis once you've filled in the configuration info, but you likely won't receive any notifications unless you're checking close to one of the alertIntervals defined at the top of the file.
To schedule our new MATLAB Analysis to run regularly, we will use another app. Click on React within the Schedule Actions section of the MATLAB Analysis editor. Change Condition Type to Numeric, change Test Frequency to On Data Insertion, and set up your alert to trigger when Field 3 (the comfort tier) of your difference (second) channel is not equal to 0. Make sure your second MATLAB Analysis is selected to be executed, and check the Run action each time condition is met toggle before saving the React.
Once the React has been set up, the MATLAB Analysis will be triggered automatically each time new data is posted to the channel with a non-zero comfort tier. You should receive notifications within 5 minutes of each alert interval.
Part 5: How it WorksLet's take a look at the source code to see what's going on.
Part 5a: The MonitorOur Monitor code is written in Arduino C++ and consists of two functions outside of the standard setup and loop functions. We include the necessary libraries for WiFi, ThingSpeak, and the DHT sensor at the top of the file, and we define a couple of macros for the DHT sensor.
In our setup function, we simply connect to WiFi and initialize the ThingSpeak library. Our loop function is responsible for requesting new data from the DHT and uploading the data to ThingSpeak—but only every 20 seconds. We keep track of the last time data was uploaded and compare that to the current time to determine whether another reading is due.
void setup()
{
  Serial.begin(115200);
  Serial.println("Start");
  connectWifi();
  Serial.println("Connected to wifi");
  ThingSpeak.begin(client);
}
void loop()
{
  if (millis() - lastConnectionTime > postingInterval)
  {
    updateDHT();
    ThingSpeak.setField(1, dhtHumidity);
    ThingSpeak.setField(2, dhtTemp);
    ThingSpeak.writeFields(channelID, writeAPIKey);
    lastConnectionTime = millis();
  }
}
The other two functions concern the libraries used for WiFi and the DHT:
- The first,
connectWifi, attempts a connection to the network and will printConnecting to WiFievery 2.5 seconds until connected. - The second,
updateDHT, calls thereadTemperatureandreadHumidityfunctions on the DHT object defined at the top of the file and assigns the results to ourdhtTempanddhtHumidityvariables to be posted to ThingSpeak.
The first MATLAB Analysis we use, attached and titled Analysis, can be broken down into five sections: configuration, data acquisition, data preparation, data analysis, and publication. The most interesting parts of the file are in the data preparation and data analysis steps.
After fetching the indoor and difference (first and second) channel data with webread in the acquisition step, we enter the struct to get the metadata field of the channel, and we perform a textscan to convert the text we entered to a format usable in MATLAB. %f and %q are format specifiers used to extract the data we want from the text.
humidityLookup = cell2mat(textscan(indoorChannelData.channel.metadata, ...
                                    '%f, %f'));
stateLookup = textscan(diffChannelData.channel.metadata, '%f %q');
For a more in-depth explanation of ThingSpeak metadata in MATLAB, check out my MetaData in ThingSpeak example.
We're left with a matrix in humidityLookup that contains the outdoor temperature vs indoor humidity table and a cell array in stateLookup containing the humidity thresholds in one column and the messages in the other.
The next interesting section of code is in the data analysis section of the script. In order to turn the discrete temperature/humidity data we entered in the Metadata of our first channel to a continuous function, we make use of the MATLAB polyfit function. We use this fit with the polyval function to evaluate the polynomial at the current outdoor temperature to determine our optimal humidity value.
% Determine the target humidity using a polynomial fit over the lookup data
lookupFit = polyfit(humidityLookup(:, 1), humidityLookup(:, 2), ...
                    length(humidityLookup) - 1);
optimalHumidity = polyval(lookupFit, curTempOut);
The third key snippet is responsible for determining the comfort tier from the average difference in humidity. We look through the humidity thresholds stored in our stateLookup array until we find a value greater than the average difference, and we use the index of this threshold as our comfort tier.
%% Determine Comfort Level %%
comfortTier = 0;
% loop through the lookup table and find which threshold the humidity
% falls under
for i = 1:length(stateLookup{1})
    comfortTier = i;
    if abs(avgDiff) < stateLookup{1}(i)
        break
    end
end
We use this index again to get the corresponding message from our array and append more detail to the description if we are not within the lowest threshold.
Lastly, the comfort tier is given the same sign as the humidity difference and the sign of the difference is subtracted to make 0 the lowest threshold (rather than -1 and 1 sharing the title of lowest threshold). This makes it easier to schedule a React that triggers only when the room is or isn't "comfortable".
% Create a message describing the current comfort level
comfortMsg = stateLookup{2}(comfortTier);
% Append a further description if not within the lowest threshold
if comfortTier > 1
    if avgDiff > 0
        comfortMsg = strcat(comfortMsg, ' -- too humid');
    else
        comfortMsg = strcat(comfortMsg, ' -- too dry');
    end
end
% Give the comfortTier a sign to denote if it is too dry/humid
% sign of avgDiff is subtracted to make 0 the base (okay/comfortable) value
comfortTier = comfortTier * sign(avgDiff) - sign(avgDiff)Our second MATLAB Analysis, attached and titled Alert, is a bit simpler than the first. It can be broken down into four sections: configuration, data acquisition, data analysis, and the alert.
The Alert analysis is tasked with determining when to send a notification. We want to notify the user if the humidity has been outside of the comfortable range for a given amount of time. We determine the amount of time since the room became uncomfortable by looking for the point where the comfortTier crosses the x axis—meaning the room either went from comfortable to uncomfortable, from too humid to too dry or vice versa.
To do this, we iterate through the comfortData looking for the most recent point where the comfortTier changed sign or was equal to 0. We use the index of this point in the table to determine the time that the event occurred, and we use that time to determine the timeSinceChange.
% Determine when the last change in state occurred
for i = height(comfortData):-1:1
  comfortTier = comfortData.ComfortTier(i);
  lastStateChange = i;
   if (sign(comfortTier) ~= sign(currState) || comfortTier == 0)
      break
  end
end
lastChangeTime = comfortData.Timestamps(lastStateChange);
timeSinceChange = datetime('now') - lastChangeTime;
Once we've found the time since change, we subtract that time from each item in the alertIntervals matrix, and we check to see if any of the results are between 0 and -5 minutes—which would mean we are within 5 minutes of that interval, and an alert should be sent.
% Determine if we are close enough to any of the alert intervals to receive an update
alertCountdowns = alertIntervals - timeSinceChange;
% Send notification if we are within 5 minutes following an alert interval
if sum(alertCountdowns <= 0 & alertCountdowns > -1 * minutes(5)) > 0
    webwrite(strcat('https://maker.ifttt.com/trigger/', makerEvent, ...
                '/with/key/', makerKey), ...
                'value1', stateMsg, ...
                'value2', char(timeSinceChange, 'hh:mm'));
end
The webwrite function is responsible for sending the HTTP GET request to the Webhooks URL that triggers the IFTTT recipe. Further logic can be added here to customize your alert behavior—for example, you could send a different event for a room that's too humid versus one that's too dry.
If you've made it this far, you have a working humidity sensor and you're receiving updates about the room to your phone or other device. But what changes can you make to customize your project?
Either channel's Metadata can be a good place to start. Prefer a drier environment? Edit your first ThingSpeak channel's Metadata table to define your own ideal humidity curve. You can also easily customize the comfort level thresholds and messages in the Metadata for your second ThingSpeak channel.
To customize when the applet is triggered, open your Alert MATLAB Analysis and edit the alertInterval at the top of the file. Add durations to the matrix in order to define additional moments where the IFTTT applet will be triggered, or remove them to trigger the applet less frequently.
Do you have an IFTTT connected humidifier/dehumidifier? Instead of triggering a notification, you can change the then branch of your Applet to turn on your device. You can also use multiple event names to handle humidity and dryness, and you can set up a React that triggers only when the humidity is ideal (i.e. the comfort tier is 0) to disable your humidifier/dehumidifier.


Comments
Please log in or sign up to comment.