


Hardware components | ||||||
| × | 1 | ||||
 |
| × | 5 | |||
 |
| × | 1 | |||
 |
| × | 6 | |||
 |
| × | 10 | |||
 |
| × | 1 | |||
 |
| × | 1 | |||
 |
| × | 1 | |||
Software apps and online services | ||||||
 |
| |||||
We all have started working on a project for an hour, only to end up working on it for three hours unknowingly. Today, we're going to fix this problem, and we'll do all of that in less than an hour!
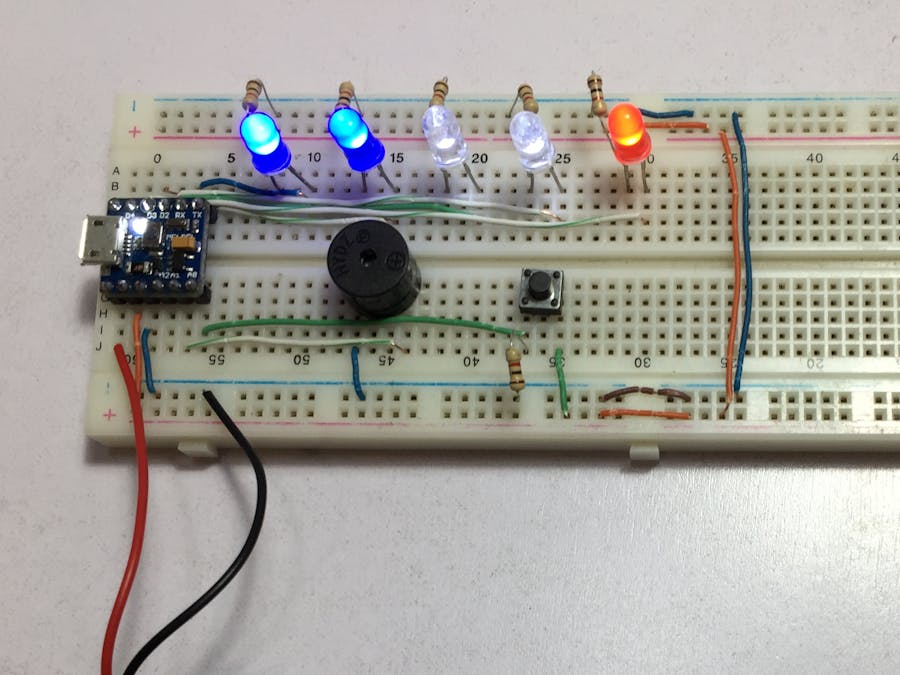
We will create an alarm that uses LEDs and a buzzer to notify you when the time interval finishes. It will also have multiple checkpoints that keep you aware of how much time has passed. We'll be using PICO, LEDs, and a buzzer to get this done.
Connecting the LEDsWe want to have the LEDs either turned on or off, which means that they only need digital signal. Meaning that we can use the D0-D4 pins to control our 5 LEDs. And we connect them accordingly:
- First of all, connect the anode - which is the positive longer leg - of each LED to the digital pins D0-D4 of PICO.
- Now, connect the cathode - which is the negative shorter leg - to the GND.
- connect a 330 ohm resistor in series between your PICO and each LED anode. We do this to protect our LEDs from exploding.
Now that we have the LEDs properly connected to our PICO, we have to program them to light up depending on the time passed, and that is what we are going to do in the next step.
Programming the LEDs and TimerWe want to create a program that turns on an LED after a certain amount of time has passed. Which means that we need variables that describe the following:
- The time interval that we want to wait between changing the status of each LED
We will call it interval and it will be of the type long.
- The last time an LED was changed
We will call it lastChange and it will be of the type unsigned long.
- A variable for our LEDs
We will call it led and it will be of the type int.
- A variable that describes the total time that the program has been running for
We will call it currentTime and it will be of the type unsigned long
The first thing we want to do is to relate our PICO's digital outputs to each of our led variables, and turn them all off. We used a for loop to do that and to avoid writing 10 lines of code, and only wrote 3 instead. In our void loop() function we assigned milis() to our currentTime variable then compared it to the last time an LED was changed, and to the interval that we wanted.
Connecting the Buzzer and Programming ItNow that we have our LEDs and their code ready. We are also going to add a buzzer that creates a noise to notify us when the time interval passes. Connecting the buzzer is very simple, as it can only be turned on or off, and we connect it to A1 to do so.
- First of all, connect the anode - which is the positive longer leg - to PICO's A1
- Then, connect the cathode - which is the negative shorter leg - to the GND
Now that our buzzer is connected to our PICO, lets code it so it starts buzzing when the time interval passes. We simply create a condition to check whether our last LED is turned on or not, and if it is, the buzzer makes a sound since the entire time interval has passed.
Adding the Reset Button and Connecting the BatteryOur hourglass now alarms us when the time period finishes. But, we have to disconnect it and and reconnect it to the power source whenever we want to reset it, and that is impractical. So, lets add a push button that easily does that for us, and let's connect it to an external power source instead of having to use USB for power.
Push buttons are very simple, they only have two legs, and the orientation of the connection doesn't matter because push buttons don't have polarities. When the push button is unpressed "open", there is not connection between its two legs, meaning that there is no current flow. Pressing the button closes the connection between its legs, connecting them and allowing current to flow between them.
We will use this to connect it to PICO, and when current flows into PICO from the push button it is going to reset the LEDs and the timer.
Do the following to connect our PICO to the 9v battery:
- Connect the battery's positive pole to PICO's Vin
- Connect PICO's Vout to the breadboard's positive power strip
- Connect the battery's negative pole, to the breadboard's negative power strip
And you can turn on your PICO without having to connect it to a PC.
After we connected everything, lets rewire our project and make it look better and cleaner.
You Are Done!In this guide we have learned how to use PICO's built-in timer, and how to use push buttons. And, at the end, we created an awesome hourglass alarm that we can use to keep time, and that is great!
We will be more than happy to answer any questions, feel free to ask anything. :-)

_3u05Tpwasz.png?auto=compress%2Cformat&w=40&h=40&fit=fillmax&bg=fff&dpr=2)
Comments
Please log in or sign up to comment.