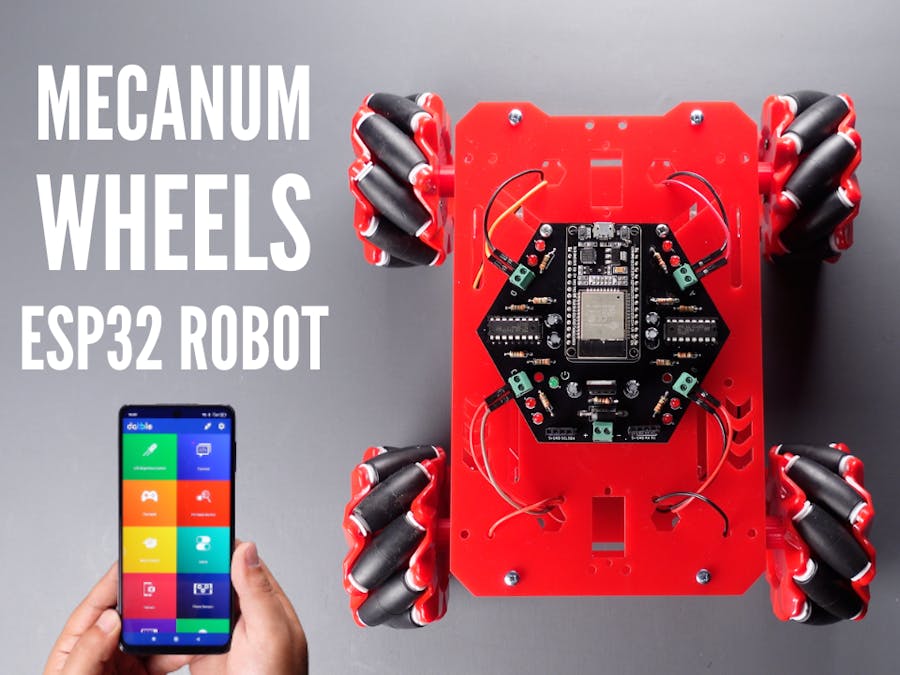
In this project we will see how to make an ESP32 Mecanum Wheels Robot which is capable of moving in any direction. This unique mobility of the robot is achieved by using special type of wheels, called Mecanum Wheels. The robot can be controlled via bluetooth with an application that you can use on both iOS and Android smartphones. Also, this project shows a simple breadboard circuit for beginner readers, and a printed circuit board for those who want a more useful prototype. Check out the video to see how it works...
Step 1: How It Works?As seen in the video, I can easily connect to the robot via bluetooth with my smartphone, and I can move the robot in any direction with the gamepad feature. An ESP32 development board was used to control the robot wirelessly over both bluetooth and WiFi. L293D driver was used to provide motor movements. Of course, special Mecanum wheels were preferred to enable the robot to move in all directions. All the hardware is fitted into a simple robot car chassis kit containing four DC motors.
Step 2: Assembly of the Robot Car ChassisThe main equipment of the project is mecanum wheels. So how do mecanum wheels work? A Mecanum wheel is a wheel with rollers attached to its circumference. These rollers are positioned at 45-degree angle to the axis of rotation of the wheel. This makes the wheel exert force in diagonal direction when moving forward of backward. So, by rotating the wheels in certain pattern, we utilize these diagonal forces and thus the robot can move in any direction.
We need two types of Mecanum wheels, often referred to as, left-handed and right-handed Mecanum wheels. In the source code step, I will explain how the robot will move depending on the direction of rotation of the wheels.
In this project, 4pcs of 80 mm / 3.15 inch (2pcs of right and 2pcs of left) mecanum wheels were used. In addition, 4pcs motor connectors (couplings) are required for motor connections. Since I only have wheels, I designed the motor connectors in 3D and printed them with a 3D printer, but here is an all-in-one set for mecanum wheels, you can check it out if you want: Mecanum Wheel Set 80mm - https://amzn.to/3tET9AD
A 4WD robot chassis kit was used for the robot platform. The kit has 4pcs 3-6V gear motors. Here is a similar kit that I use: 4WD Robot Car Chassis Kit - https://amzn.to/3mSGIxC
If you want to have all the robot equipment (mecanum wheels, platform, DC motors) with a single kit, there is an interesting kit at this link: Mecanum Wheel Chassis Car Kit - https://amzn.to/3aXyZLP
If you have all the necessary equipment, you need to assemble the mecanum wheels in the correct position. The axis of rotation of the top roller of each wheel should point to the center of the robot. That is, each direction wheel should be located diagonally from each other. The left mecanum wheel is placed to the front left side and the right mecanum wheel is placed to the right front side of the chassis. The other right mecanum wheel is placed on the left back side and the left mecanum wheel is placed on the right back side of the chassis.
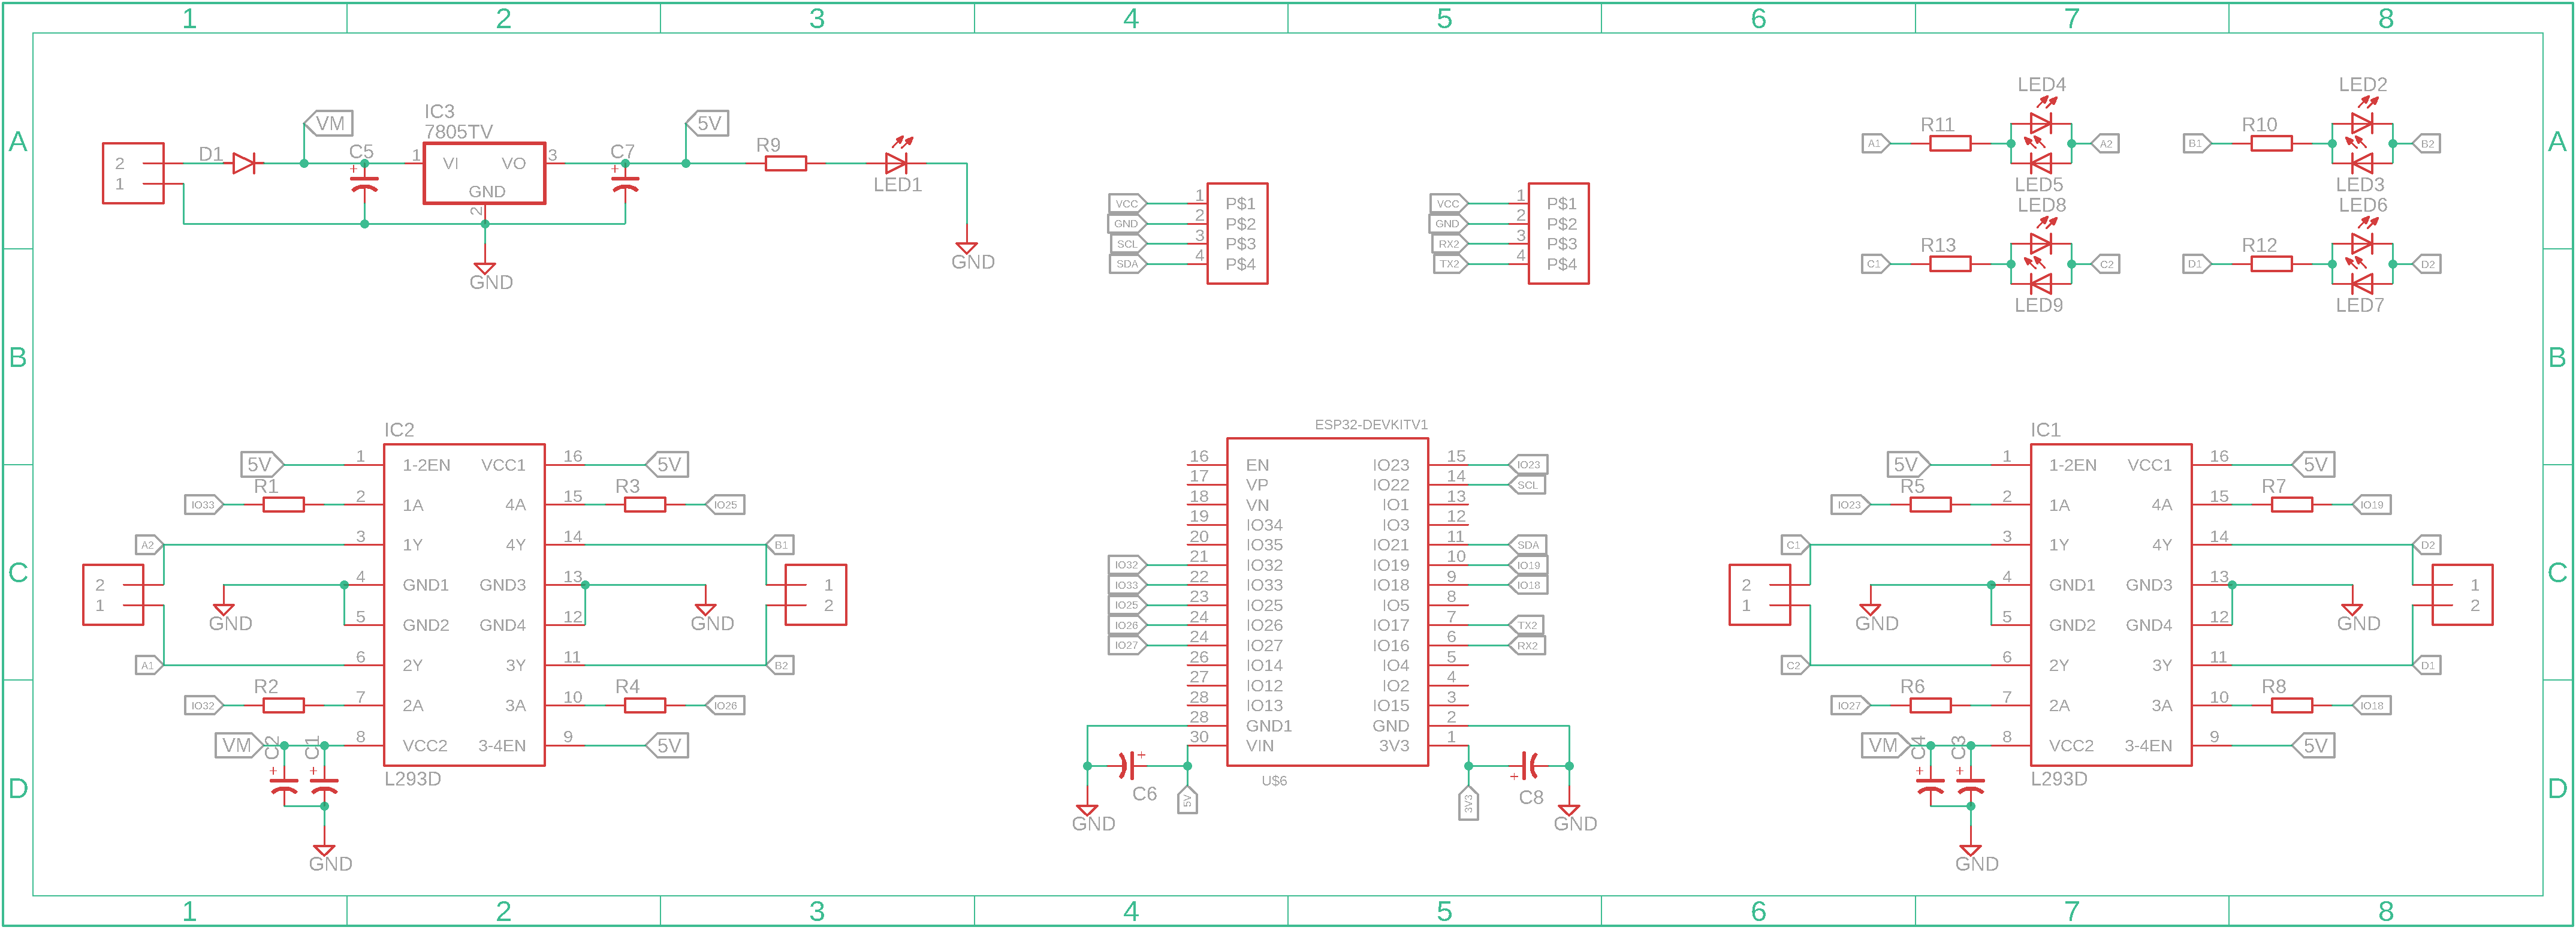
Step 3: Breadboard CircuitI've built a breadboard circuit for beginner readers. So you can easily build the circuit with jumpers following the shared circuit diagram. The pins used in the microcontroller are specified in the circuit diagram.
Minimum requirements for the breadboard circuit:
- A breadboard was used to build the circuit - https://amzn.to/3Qq16mZ
- L7805 voltage regulator was used as 5V is required for the microcontroller - https://amzn.to/3twf50S
- A few 100uF capacitors are needed for the voltage regulator - https://amzn.to/3ObRACk
- L293D IC driver was used to movement the DC motors - https://amzn.to/3N1GXRf or if you want to install the circuit more easily you can use L293D expansion board module - https://amzn.to/3zGekGh
- ESP-32S WiFi BLE Development Board - https://amzn.to/3NWFixW
- Several jumper wires were used to provide the pin connections: https://amzn.to/3tveigJ
- 18650 Li-ion 3.7V Rechargeable Battery
A few extra components are needed for the printed circuit board prototype, mentioned these components in the PCB step.
Step 4: Printed Circuit BoardI designed a printed circuit board for those who want a professional prototype. Thank you PCBWay for support and sponsorship in ordering the printed circuit board. For high-quality PCBs, you can choose PCBWay. If you want to get this printed circuit board easily, you can download the PCB Gerber file from the link below or order it directly.
https://www.pcbway.com/project/shareproject/Mecanum_Wheels_Robot_ESP32_Motor_Driver_L293D_Board.html
If you look at the bill of material (BOM), easily solderable components were preferred, so you can easily assembly your printed circuit board by following the circuit diagram designator.
You need few more components for the printed circuit board:
- SR560 (SB560) Diode - https://amzn.to/3xtmOy4
- 3mm LED - https://amzn.to/3b662gQ
- 330ohm Resistor - https://amzn.to/3tBAXIo
- 2pin 3.50mm Screw Terminal - https://amzn.to/3MR4CUJ
- 1x4 2.54mm Female Header - https://amzn.to/3zHfvFv
I used the ESP32 development board, which provides two different connection methods (WiFi & Bluetooth) to control the robot wirelessly. Among the wireless connection methods, I preferred bluetooth. I needed a handheld controller to control the robot wirelessly via bluetooth, I wanted to do it via my smartphone and I discovered a great app.
Dabble is an application developed by STEMpedia that you can use for free on Android and iOS devices.
So what is Dabble?
- Dabble App transforms your Smartphone into a virtual I/O device to easily make various DIY projects and IoT applications.
- Dabble provides you with a lots of modules to control hardware via Bluetooth, communicate with it, access sensors like accelerometer, GPS, proximity and other features of your Smartphone.
- Software Compatibility: Easily programmable with both Scratch and Arduino IDE thus making it suitable for everyone.
- Supports various prototyping boards such as evive, Arduino - Uno, Mega, Nano - and ESP32.
- Connects with several Bluetooth modules such as HC-05, HC-06, and HM-10.
In this project, I used the Gamepad controller in the Dabble application. The Gamepad Controller Module is one of the input modules, using which user can give commands to the board using buttons and analog joystick present in different layouts:
- Digital Mode
- Joystick Mode
- Accelerometer Mode
In this project I chose the digital mode, in this way I have a hand controller with lots of buttons for the robot to move in many directions. The digital mode is the default mode when the module opens. It has 10 digital buttons whose data is sent to the device when they are pressed or released. For more detailed information about gamepad controller and mods, check this link: https://thestempedia.com/docs/dabble/game-pad-module/
In this section, all you have to do is get the Dabble application. You will not need to make any settings for this project in the Dabble application, you just need to turn on the bluetooth connection of your smartphone and connect to the board through the application.
Step 6: Source Code (ESP32 Programming)ESP32 is a microcontroller has builtin Wifi and dual mode Bluetooth support. It can be programmed through various programming platforms like Arduino IDE. For programming ESP32 board with Arduino IDE first step is to add ESP32 board support on Arduino IDE. For this follow the steps below:
- Open Arduino IDE go to “File” in menu bar and open “Preferences”.
- As “Preferences” dialog box opens, copy the URL in “Additional Board Manager URLs” box highlighted in image below.After this select “OK”. URL https://dl.espressif.com/dl/package_esp32_index.json
- Now go to “Tools>Board>Board Manager”.
- Search the “esp32”, you can see the esp32 package by Espressif Systems in Board Manager select it and then select “Install”.
Using Gamepad module of Dabble with ESP32
- First download library Dabble-ESP32 for working with different Dabble modules. https://thestempedia.com/download/24469/
- Add the downloaded zip file of the library to Arduino IDE. Navigate to “Sketch>>Include Library >>Add.ZIP Library” in Menu Bar.
- After successfully installing library open the shared source code.
All requirements for the Dabble Gamepad module are specified in the source code.
As in the example below:
#define CUSTOM_SETTINGS
#define INCLUDE_GAMEPAD_MODULE
#include <DabbleESP32.h>
The motor direction names to which the mecanum wheels are connected are defined, the only change to be made here is the pin numbers. Please update this section if you have used different pins other than the pins specified in the schematic.
As in the example below:
#define RightFrontFWD 32
#define RightFrontBWD 33
#define RightBackFWD 25
#define RightBackBWD 26

#define LeftFrontFWD 18
#define LeftFrontBWD 19
#define LeftBackFWD 23
#define LeftBackBWD 27
Digital mode has 10 digital buttons whose data is sent to the device when they are pressed or released. These buttons are defined in the code as follows: Up, Down, Right, Left, Triangle, Circle, Cross, Square, Select, and Start
As in the example below:
if (GamePad.isUpPressed()){
Serial.print("Up");
}
Functions are created for mecanum wheel directions, just like "void moveForward()".
As in the example below:
void moveForward() {
  digitalWrite(RightFrontFWD, HIGH);
  digitalWrite(RightFrontBWD, LOW);
  digitalWrite(RightBackFWD, HIGH);
  digitalWrite(RightBackBWD, LOW);

  digitalWrite(LeftFrontFWD, HIGH);
  digitalWrite(LeftFrontBWD, LOW);
  digitalWrite(LeftBackFWD, HIGH);
  digitalWrite(LeftBackBWD, LOW);
}
When any gamepad button is pressed, the function you want is executed. When you release the button, the "stop" function "stopMoving();" is called.
As in the example below:
if (GamePad.isUpPressed()) {
    moveForward();
}
else {
    stopMoving();
}
The source code is already shared ready to use. If the pins are different, update them, if the wheels move in different directions, swap the pin numbers or swap the motor wires.
If everything is ready, upload the source code, then open the application and connect to the ESP32 board... Now it's time to act!
Step 7: ESP32 Bat Hand ControllerFirst of all, thank you for reading article. I wanted to share the content of the next project with you already. I designed an ESP32 hand controller to wirelessly control the ESP32 Mecanum Wheels robot without using an app. This hand controller is bat-themed and features two thumb joysticks and four push-buttons. You can have this PCB from the link below.
https://www.pcbway.com/project/shareproject/Bat_Hand_Controller_ESP32_and_Joystick.html
If you have any ideas, please let them know in the comment section. Follow to be informed about the next projects.


Comments
Please log in or sign up to comment.