


Hardware components | ||||||
 |
| × | 1 | |||
| × | 1 | ||||
| × | 1 | ||||
 |
| × | 1 | |||
 |
| × | 1 | |||
Hand tools and fabrication machines | ||||||
 |
| |||||
YOLU is the autonomous robot I have made before the year 2025 hits. I am satisfied with everything except one feature I wish it had. A capability of monitoring it wirelessly. Oh did I mention it is ploughing the snow outside too. So it is very necessary to monitor it remotely.
The capability of reading sensor status information from other Bluetooth or wifi enabled devices.The Other vital information like battery status, sending video via Bluetooth or wifi from the camera the robot has in the future is also so cool. Imagine wearing the powerful mini computer in your wrist and it shows you all the cool stuff about your hardware/s you specifically custom program it with.The hardware choice to realize this idea was so obvious:The Unihiker board is the one!.No doubt!. Because I have a couple of them lying around from past contests freely given to me by dfrobot.
A built in wifi/Bluetooth connection, running Debian/Linux, and topped with the powerful python. I found the Unihiker board to be the perfect choice for a wearable cyber-deck computer I have in mind. In fact this cyber-deck I am designing is open and it can be customized to any project in mind.
InspirationFor my curiosity and inspiration I hit some AI search. As I want this to be as unique as possible with some style. I found some results that ignited my imagination howeve; they appear to be non practical. Or are they? Let us find out.
Here are some inspirations I got from google Gemini :
generate an image of UNIHIKER board with 2.8 inch touch screen that fits like a big 3D printed plastic bracelet case in the inner part of a wrist
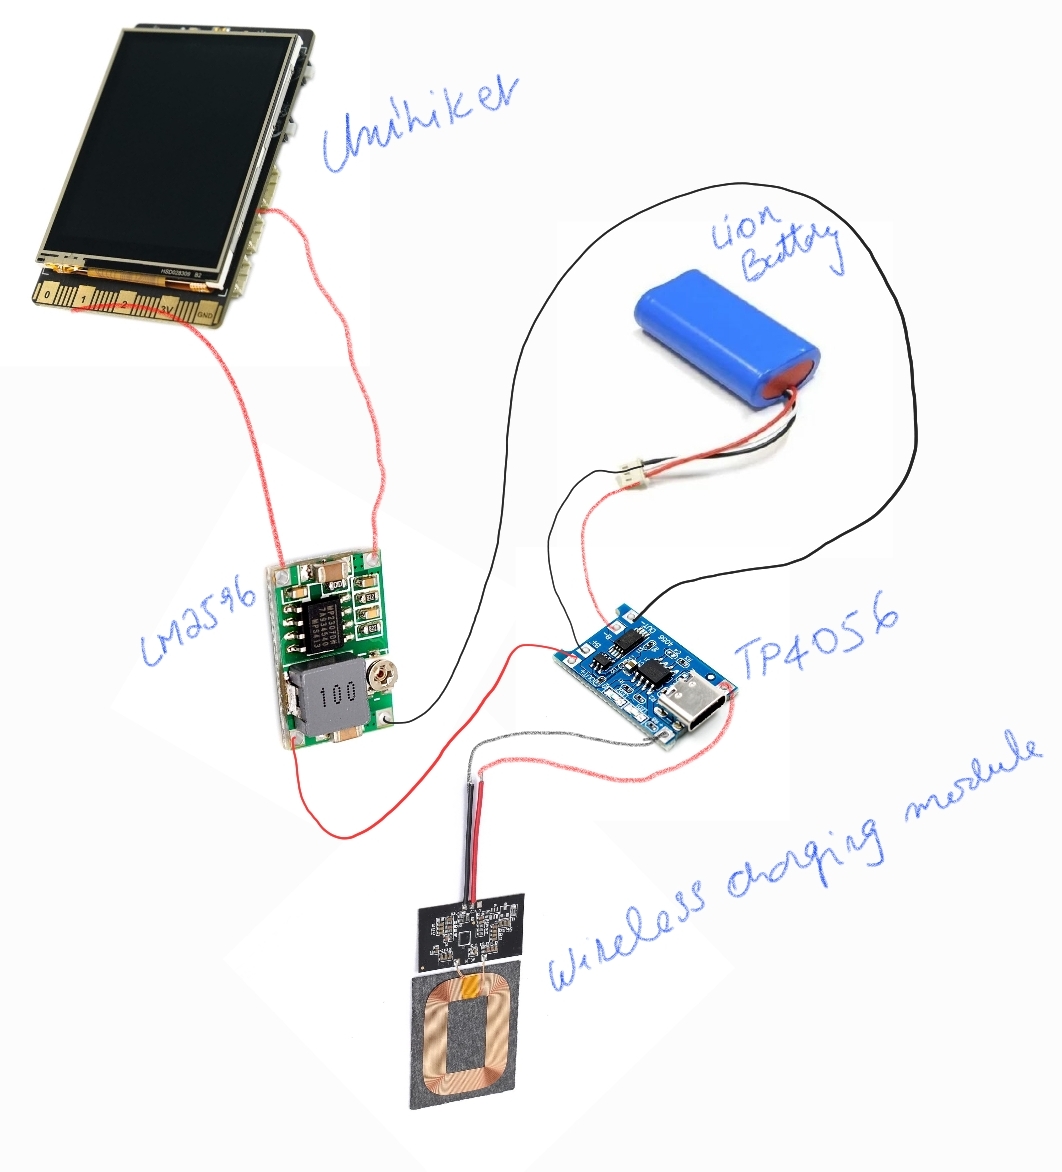
That was Very cool right? I know!!. In reality I had to put all the hardware: The Unihiker board, the lithium-ion battery, the charging module, some wires and finally the inner closing plate in the case and all have to fit in the left arm of my wrist. Very interesting challenge but doable.
How do we wear a 2.8 inch screen ,battery pack and charging module on your wrist without looking ridiculous? 🤔
Make the design as slim as possible and use small circuitry and components. It is possible to use keyboard to type in both hands while the Unihiker is on the wrist (inside or out side wrist) making you cool and all free hands. I know what you thinking...the Unihiker is also a touch screen. Yeah we can use that too. The design I am approaching is the shape of human wrist as slim as possible, and as fashionable as possible (Wearable is the technical term). It is also possible to attach a Velcro belt and it fits to any wrist size. Here is the unique design approach:
I tried to leave a space for the 7.8 V lithium-ion 100mm X 40mm, stepdown module 20mm X 20mm and for wireless charging module (Reciever). Leaving basic hardware parts in the design consideration is vital.
So finally, these are the main components to consider dimension the cyber-deck. Here is the final video showing the look of the unique wearable cyber-deck that can pack a power inside. You can download the CAD and use it for your purpose, here I linked the file below.
The CAD
See you after I get this printed in My new printer (Bambu) 😆. Yes they are an awesome printers and I am not against of anything and In favour of anything either. I just like melting some plastic.
To be continued . . .


Comments
Please log in or sign up to comment.