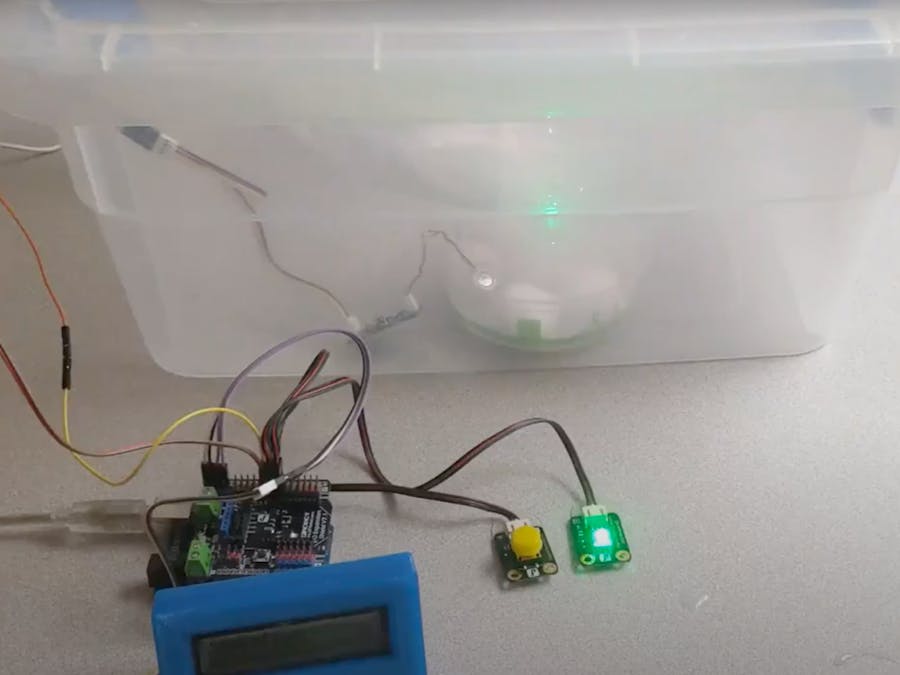
We are all experiencing the the impact of COVID19, after hearing stories of our front line health workers are reusing their masks and gowns in brown bags it really hit home. Calling my doctor friend I realized his hospital told him to do the same thing. We are team MixPose, a live streaming yoga class company, and we want to build something that can help with COVID19.
After COVID19 hitting the EU, US and China, the developed nations will no longer have more resources to spare when the virus starts to spread in developing nations. If we, the United States can not even guarantee the safety of our healthcare workers by providing the PPE, when the virus reaches the developing nations it will have much larger impact.
We want to build an affordable sterilizer that's easy to scale and rebuilt so that people can sterilize their PPEs and use them safely. And easy enough so that any developing nations can build this.
Hydrogen Peroxide SterilizationAccording to Steris Healthcare, "Hydrogen peroxide sterilization, also known as hydrogen peroxide gas sterilization, is a low temperature sterilization process commonly used to sterilize heat-sensitive devices. A hydrogen peroxide sterilization cycle typically requires less time than alternative forms of sterilization, such as ethylene oxide sterilization. A hydrogen peroxide sterilization process involves H2O2 vapor filling the sterilizer chamber, contacting and sterilizing exposed device surfaces."
Steris further explains the process
1) Liquid H2O2 gets converted into vapor
2) The vapor fills the chamber, contacting all surfaces and penetrating lumens
3) After sterilization, the vapor is vacuumed from the chamber and converted into water and oxygen
And by that concept, we can build a much cheaper solution using maker components.
Currently, the H2O2 steralize machines usually operates at industrial level, and is a standard for hospitals and other health facilities for sterilization and decontamination of PPEs. With the COVID19, all of these sterilization machines are all back ordered.
Industrial H2O2 machine for sterilization
While these machines are hard to come by, we want to use basic equipment and build them. To do so we simply need the following
- $1 Hydrogen Peroxide Liquid
- $10 Arduino Zero (equipped with Arm Cortex M0) or anything cheaper
- $10 Seeed Atomizer
- $5 DFRobot LED and Buttons
- $0 Recycled containers
- $0.5 Cottons
With above bill of material, we will be able to build a H2O2 sterilization device under $35
H2O2 is the standard for sterilization used among hospitals and facilities, the UV light is often good for hard surfaces, to penetrate the normal layered surfaces it would require prolonged use.
Also, only UVC is effective for sterilization and decontamination, according to UV Resources, unsafe exposure to UVC would potentially cause skin damage, eye damage and skin cancer. So making any UV sterilization machine would require carefully designed product.
H2O2 is being used for treating wounds, which is much safer for usage. It is also easily accessible anywhere around the world, with local hospitals and clinics already equipped with it.
Not to mention, a certified UVC bulb cost about $80+, and is currently in short supply.
Step 1: Building out Arduino SchematicSo first we will gather our bill of material, which is shown below
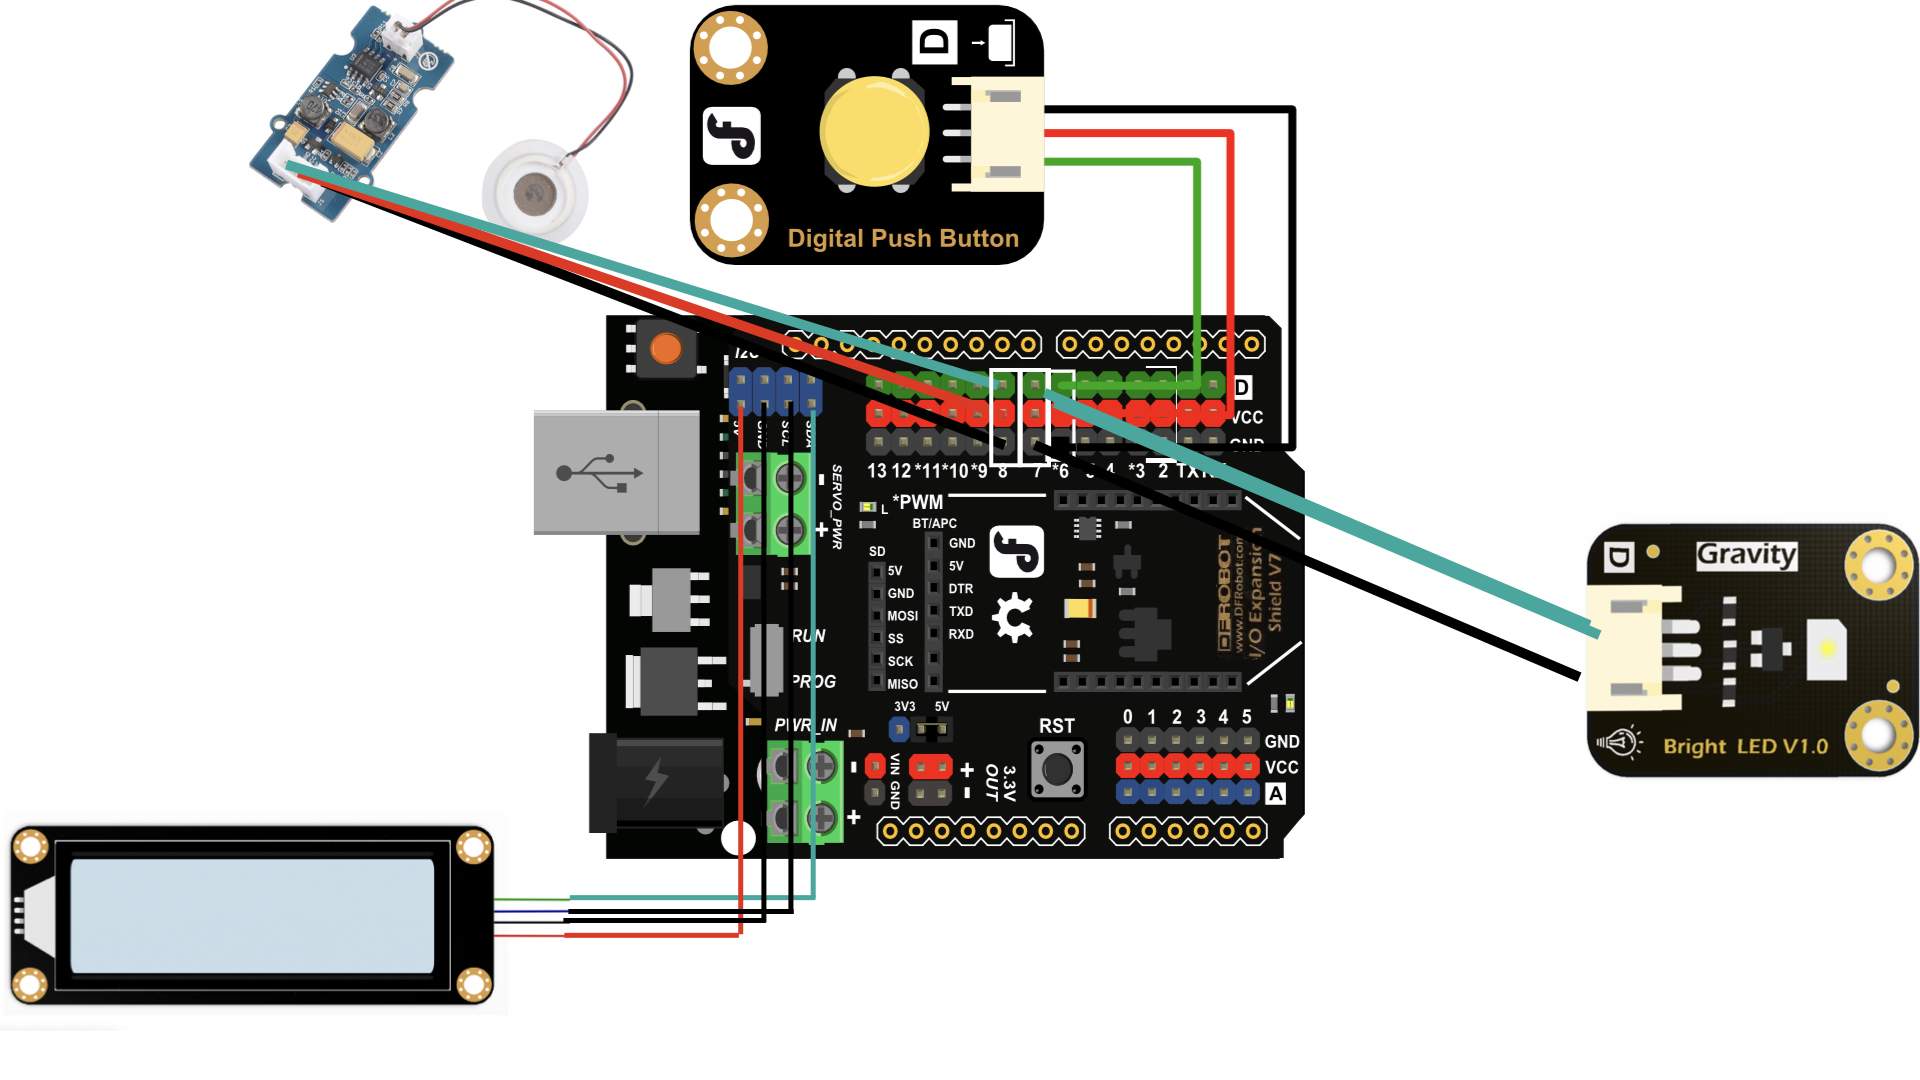
We are connected the button to input as D6, LED as D7, Atomizer as D8. And LCD via I2C bridge through DFRobot Arduino Shield on top of the Arduino Zero. This should give us enough materials to display the following demo. The LCD Display is optional.
When all is connected, we should have the following
Let's explain the logic a little bit, we are planning to use this for 15 minutes, which is 900 seconds. The LCD is optional piece which can be removed for Developing Nations to cut cost. We are setting up LED as pin 7, Button as pin 6 and vaporizer as pin 8.
Upon pressing the button we are activating both LED and Vaporizer for 15 minutes. When this is done we go back to ready state.
#include <Wire.h>
#include "rgb_lcd.h"


rgb_lcd lcd;


int ledPin = 7;                // LED is 7
int inputPin = 6;               // Button is 6
int vaporizer = 8;                // Vaporizer is 8

bool pressed = false;
int count = 0;

void setup() {
  pinMode(ledPin, OUTPUT);      // declare LED as output
  pinMode(inputPin, INPUT);     // declare pushbutton as input
  pinMode(vaporizer, OUTPUT);      // declare LED as output
      // set up the LCD's number of columns and rows:
    lcd.begin(16, 2);
          lcd.setRGB(0, 0, 0);

    // Print a message to the LCD.
    lcd.print("Ready      ");
        lcd.setCursor(0, 1);

    lcd.print("              ");


}

void loop(){

  int val = digitalRead(inputPin);  // read input value
  if (val == HIGH) {
    pressed = true; // check if the input is HIGH
  }

  if(pressed == true){

    digitalWrite(ledPin, HIGH); // turn LED ON
    digitalWrite(vaporizer, HIGH); // turn LED ON
    count += 1;
    lcd.setCursor(0, 0);
    lcd.print("Steralizing");
  }
  else
  {
        lcd.setCursor(0, 0);

    lcd.print("Ready      ");

      digitalWrite(ledPin, LOW);  // turn LED OFF
      digitalWrite(vaporizer, LOW); // turn LED ON
  }

  if(count > 900)
  {
    count = 0;
    pressed = false;
  }
  delay(1000);
}When all is done, we can see a 2 minute short demo at
We've also created a longer demo includes a step by step instruction on building Hygieia and it's over 5 minutes long, feel free to watch it.


Comments
Please log in or sign up to comment.