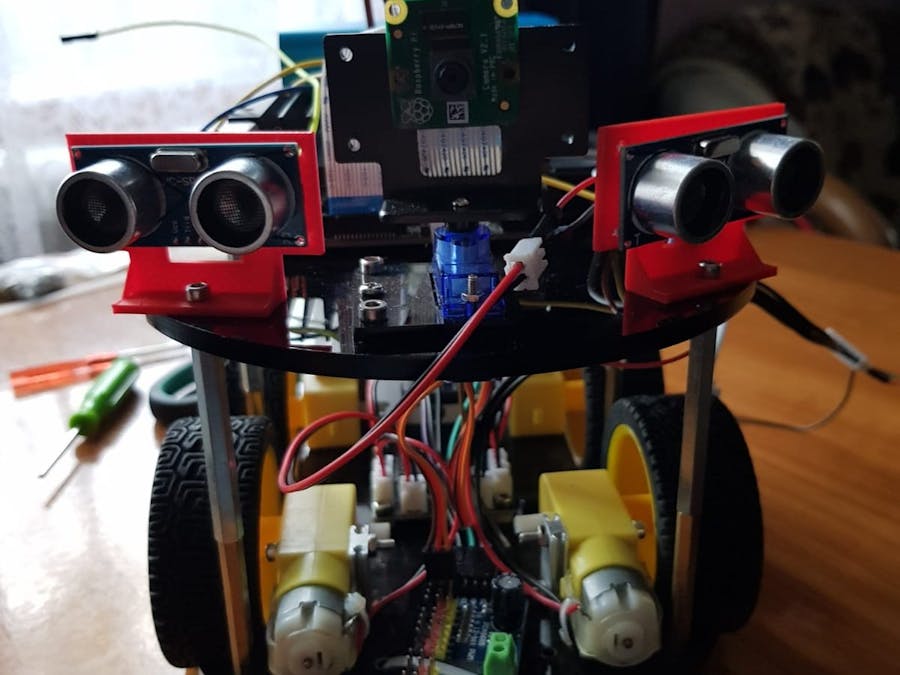
Jetson Finder is a robotic car powered by Nvidia Jetson Nano board, able to detect known objects, controlled through remote voice control using an Android Application which supports words in two languages: English and Romanian. It is a challenging project, because it is an interdisciplinary one, so it combines: programming on a development board to control actuators (DC & Servo motors), to get data from sensors (Ultrasonic distance sensor, Camera sensor) or to communicate (via Internet) with programming on Android and usage of a trained neural network.
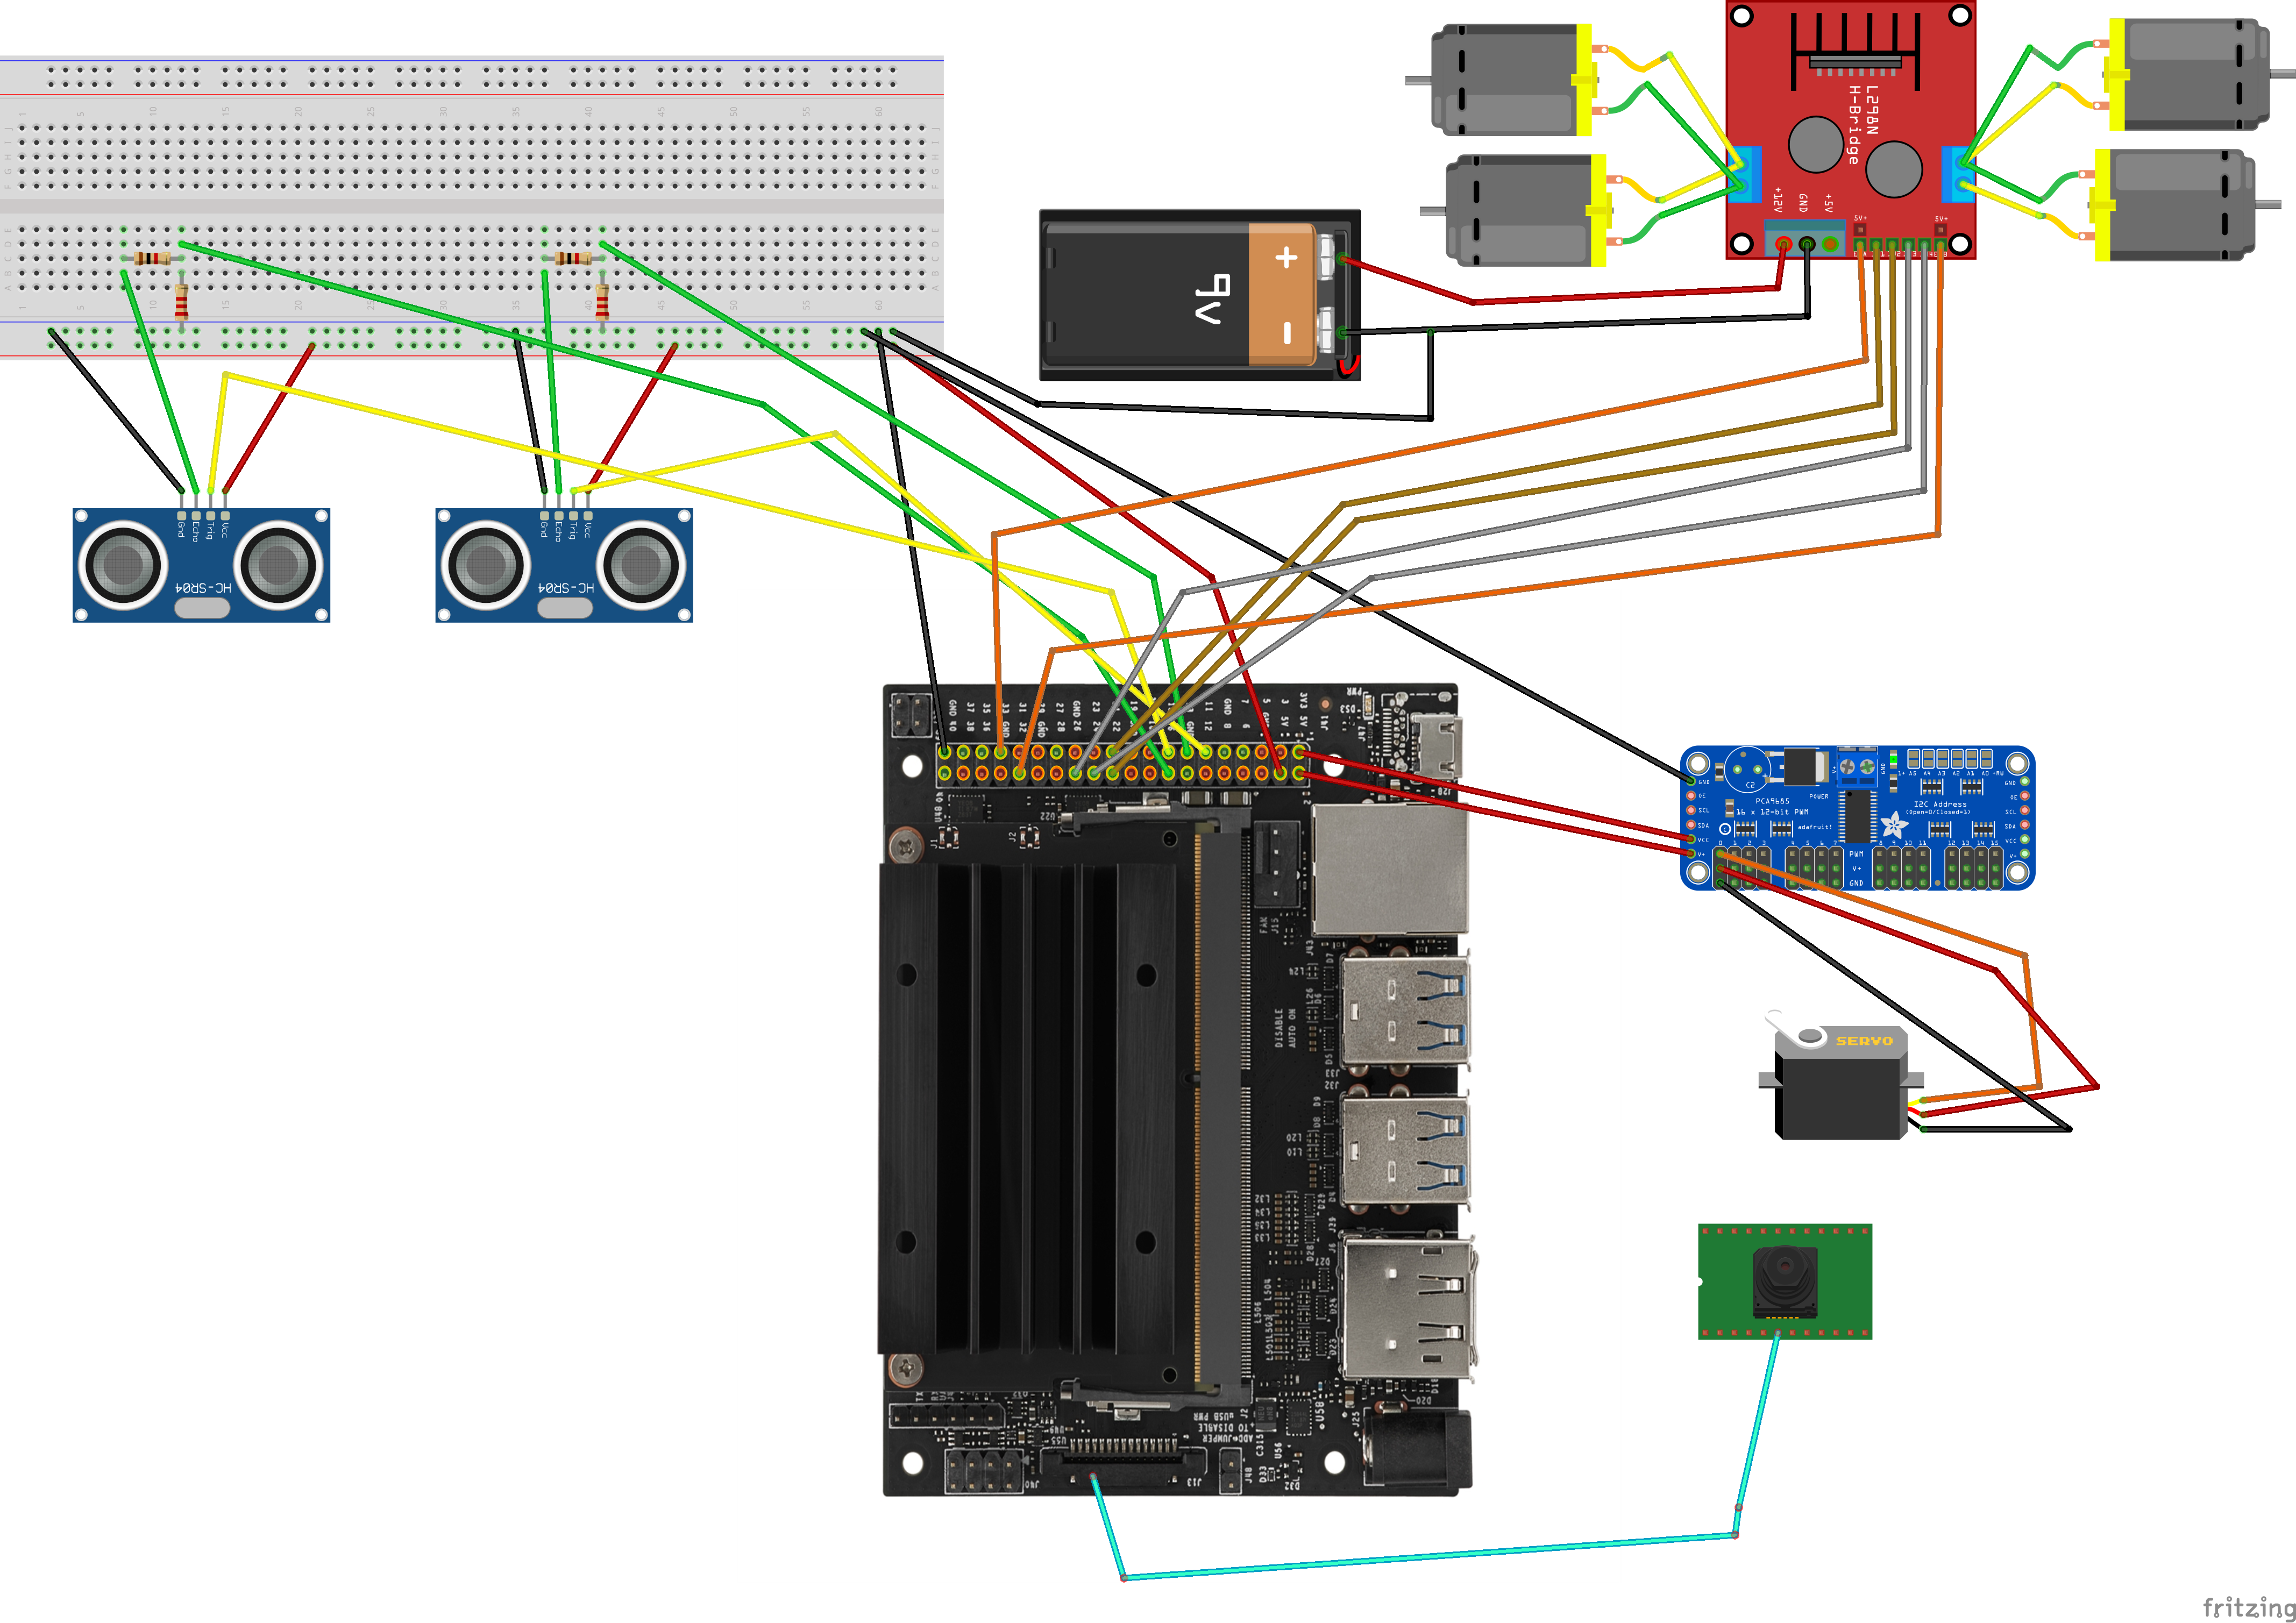
Assembly the carOur vehicle frame is represented by a robotic car chassis with 2 levels. Let's begin with the bottom level, which is responsible with the movement and provides the project dynamics. Here are positioned four DC motors, Dual H-Bridge L298 motor driver, Adafruit servo shield and a half size breadboard used to solve some wiring needs.
When a DC (Direct Current) motor is connected to a power supply ( a 9V battery in our case), it spins either backward or forward, depending on how you connect the plus and the minus. Our car has four such motors, so to get a complete car movement we need to change the spin direction of the wheels or to rotate the motors on the same side in one direction and the motors from the other side in the opposite direction. That is the reason for the H-Bridge L298 module presence. It is a motor driver that allows to easily control the speed (through a PWM signal) and the direction of the motors. We used a dual H-Bridge to control two pairs of motors, so the motors from the same side are controlled together (have always the same speed and direction).
Adafruit PWM/Servo shield is a servo motor driver with I2C interface. A servo motor can usually (as in our case) only turn 90° in either direction for a total of 180° movement. We use a SG90 Micro-servo motor to move the camera in the left or right direction. The position of the servo-motor (so, the position of the camera) is controlled through a PWM signal. But, our car is powered by a Jetson Nano board (so it is the brain that controls all things) and it supports only two PWM channels, which are already used for speed control of DC motors. Our solution is to use the mentioned servo driver which provides up to 16 PWM channels and a pretty easy python module to adjust the servo position.
On the top level of the car chassis are positioned the camera and the servo motor (about which we discussed), two HC-SR04 ultrasonic sensors, the Jetson Nano board, the battery used to power the motors and the power bank used for the Jetson board.
HC-SR04 ultrasonic sensors are positioned on each side of the car and are used to get the distance to the closest obstacle. This is not a high precision sensor, and from our experience, it works decently in areas of 5 - 80 cm. The Jetson Nano GPIO pins only tolerate maximal 3.3V, and the sensor output signal (ECHO) is rated at 5V, so to solve this issue we have been used a voltage divider circuit, consisting of two resistors (one of 1 kOhm and one of 2 kOhm), to lower the sensor output voltage to 3.3V. A voltage divider circuit has been used for each distance sensor and these are positioned on the breadboard from the bottom level.
Nvidia Jetson Nano board is the brain of the entire project. It controls all things through a Python script, but about this we will discuss in the next section. The board is powered with 5V - 2A by the Asus Power Bank which provides an autonomy of some couple of hours of intensive use.
First of all, we needed to set up the Jetson Nano board. All the steps are detailed here. For the first boot is necessary to use a display monitor, a keyboard and optionally a mouse. After this, you can feel free to remove these and get a remote terminal on your computer, if you use a SSH connection. By default, the Jetson Nano should be running an SSH server. We preferred this way. But to use SSH you need an Internet connection, and Jetson Nano has not a built-in Wi-Fi module. We have been using a USB Wireless Adapter to connect the board to the Internet and then we configured a port forwarding rule on the network device to which Jetson Nano was connected. So, we improved the remote team working by making the Jetson accessible from everywhere via SSH (we chose PuTTY as SSH client), using a global IP address.
Before we started programming, we prepared the environment. We have been installed Python 3.8 and some necessary python modules:
sudo apt install python3.8-dev
sudo pip install adafruit-circuitpython-servokit
sudo pip install opencv-python
After that we build from the source the jetson-inference project on our machine to be able to use the python modules for object detection:
sudo apt-get update
sudo apt-get install git cmake libpython3-dev python3-numpy
git clone --recursive https://github.com/dusty-nv/jetson-inference
cd jetson-inference
mkdir build
cd build
cmake ../
make -j$(nproc)
sudo make install
sudo ldconfig
Detailed explanation can be found here. The project comes with pre-trained networks that you can download and install through the Model Downloader tool, which can be run with the following command:
cd jetson-inference/tools
./download-models.sh
We have been using the SSD-Mobilenet-V2 pre-trained network. It can detect 90 classes of objects and the list of them can be found here.
The logic of the project is contained in JetsonBrain.py. Also, we write an auxiliary python module, Things.py, to abstract the control and use of DC motors and HC-SR04 ultrasonic sensors. These files can be found in JetsonFinder/PythonApp/ from GitHub repository. Our main script starts a web server, using socket python module, on the local address 192.168.0.101 and the port 1998. After that, the server is waiting for clients (up to 5 clients) to connect and to send commands (in case of simultaneous connection of multiple clients, the requests are processed in parallel on different threads). The requests/commands are transmitted by the Android application and received by the server as raw data, without using any protocol, like HTTP protocol. When a command is received the logic of the server checks if it is a known command, in which case the car will act according to it. The list of accepted commands (in English and Romanian language) are presented below:
['photo', 'forward', 'back', 'left', 'right', 'stop', 'camera left', 'camera right', 'distance left', 'distance right', 'fast', 'slow', 'poză', 'mergi', 'înapoi', 'stânga', 'dreapta', 'camera stânga', 'camera dreapta', 'accelerează', 'încetinește', 'distanță stânga', 'distanță dreapta']A special case is photo/poza command. When this command is received, Jetson Finder takes a photo using the attached camera, applies the object detection neural network on it, draws boxes around recognized objects and then sends the image as raw data (without any protocol) to the client. In case of unknown command, nothing happens.
Android applicationAlso, the source code of the Android application can be found on GitHub repository. The app integrates the Google Voice Assistant through which we use speech recognition, so to the web server that runs on the Jetson Nano will be sent a string of recognized words. Only if the photo / poza command is sent, the app will wait to receive the response from the web server. The response consists in the taken photo with boxes that overlay detected objects and it will be saved on the path /storage/emulated/0/Signs/from_jetson.jpg, after that will be displayed inside the app. Also this app allows us to configure web server settings: the host address and the port.
A lot of improvements can be made on this project. We think that it could be continued in various directions and areas and could be the foundation of some great and very complex projects. Here is a list of some improvements we thought about:
- use ultrasonic sensors to avoid obstacles
- develop an algorithm so the car to be able to move around itself and to search a specified object
- use a communication protocol to transfer data between Jetson Nano and Android application, so to detect data loss
- add more and complex commands
- develop a browser version of the Android application, so that it could be accessed from any platform
- and so on, only imagine it...


_3u05Tpwasz.png?auto=compress%2Cformat&w=40&h=40&fit=fillmax&bg=fff&dpr=2)


Comments
Please log in or sign up to comment.