A few days back, I found out a beautiful RC car from my childhood days but its remote was broken so I thought that why not convert this car into a High Speed Arduino RC car.
So here it is now, I have converted it into a High Speed Arduino RC car and today I am going to share with you that how I did that. The app I have used for this project can be downloaded from here.
For Custom Projects, hire me at https://www.freelancer.com/u/Muhammadaqibdutt
Functions of High Speed Arduino RC carThe functions this High Speed Arduino RC car are as following
- Front lights
- Back lights
- RGB light in center will make it look good
- Horn
- Rotation in all directions
- Speed control
The components required for High Speed Arduino RC car are as follows
- Old Car with Motors
- Arduino Uno
- HC-05 or HC-06 Bluetooth Module
- L298N Motor driver
- Buzzer
- RGB LED
- 2 X Red LED’s
- 2 X White LED’s
- 2 X Rechargeable cells of 3.7V
- 9V battery
- 7 X 220 ohm resistors
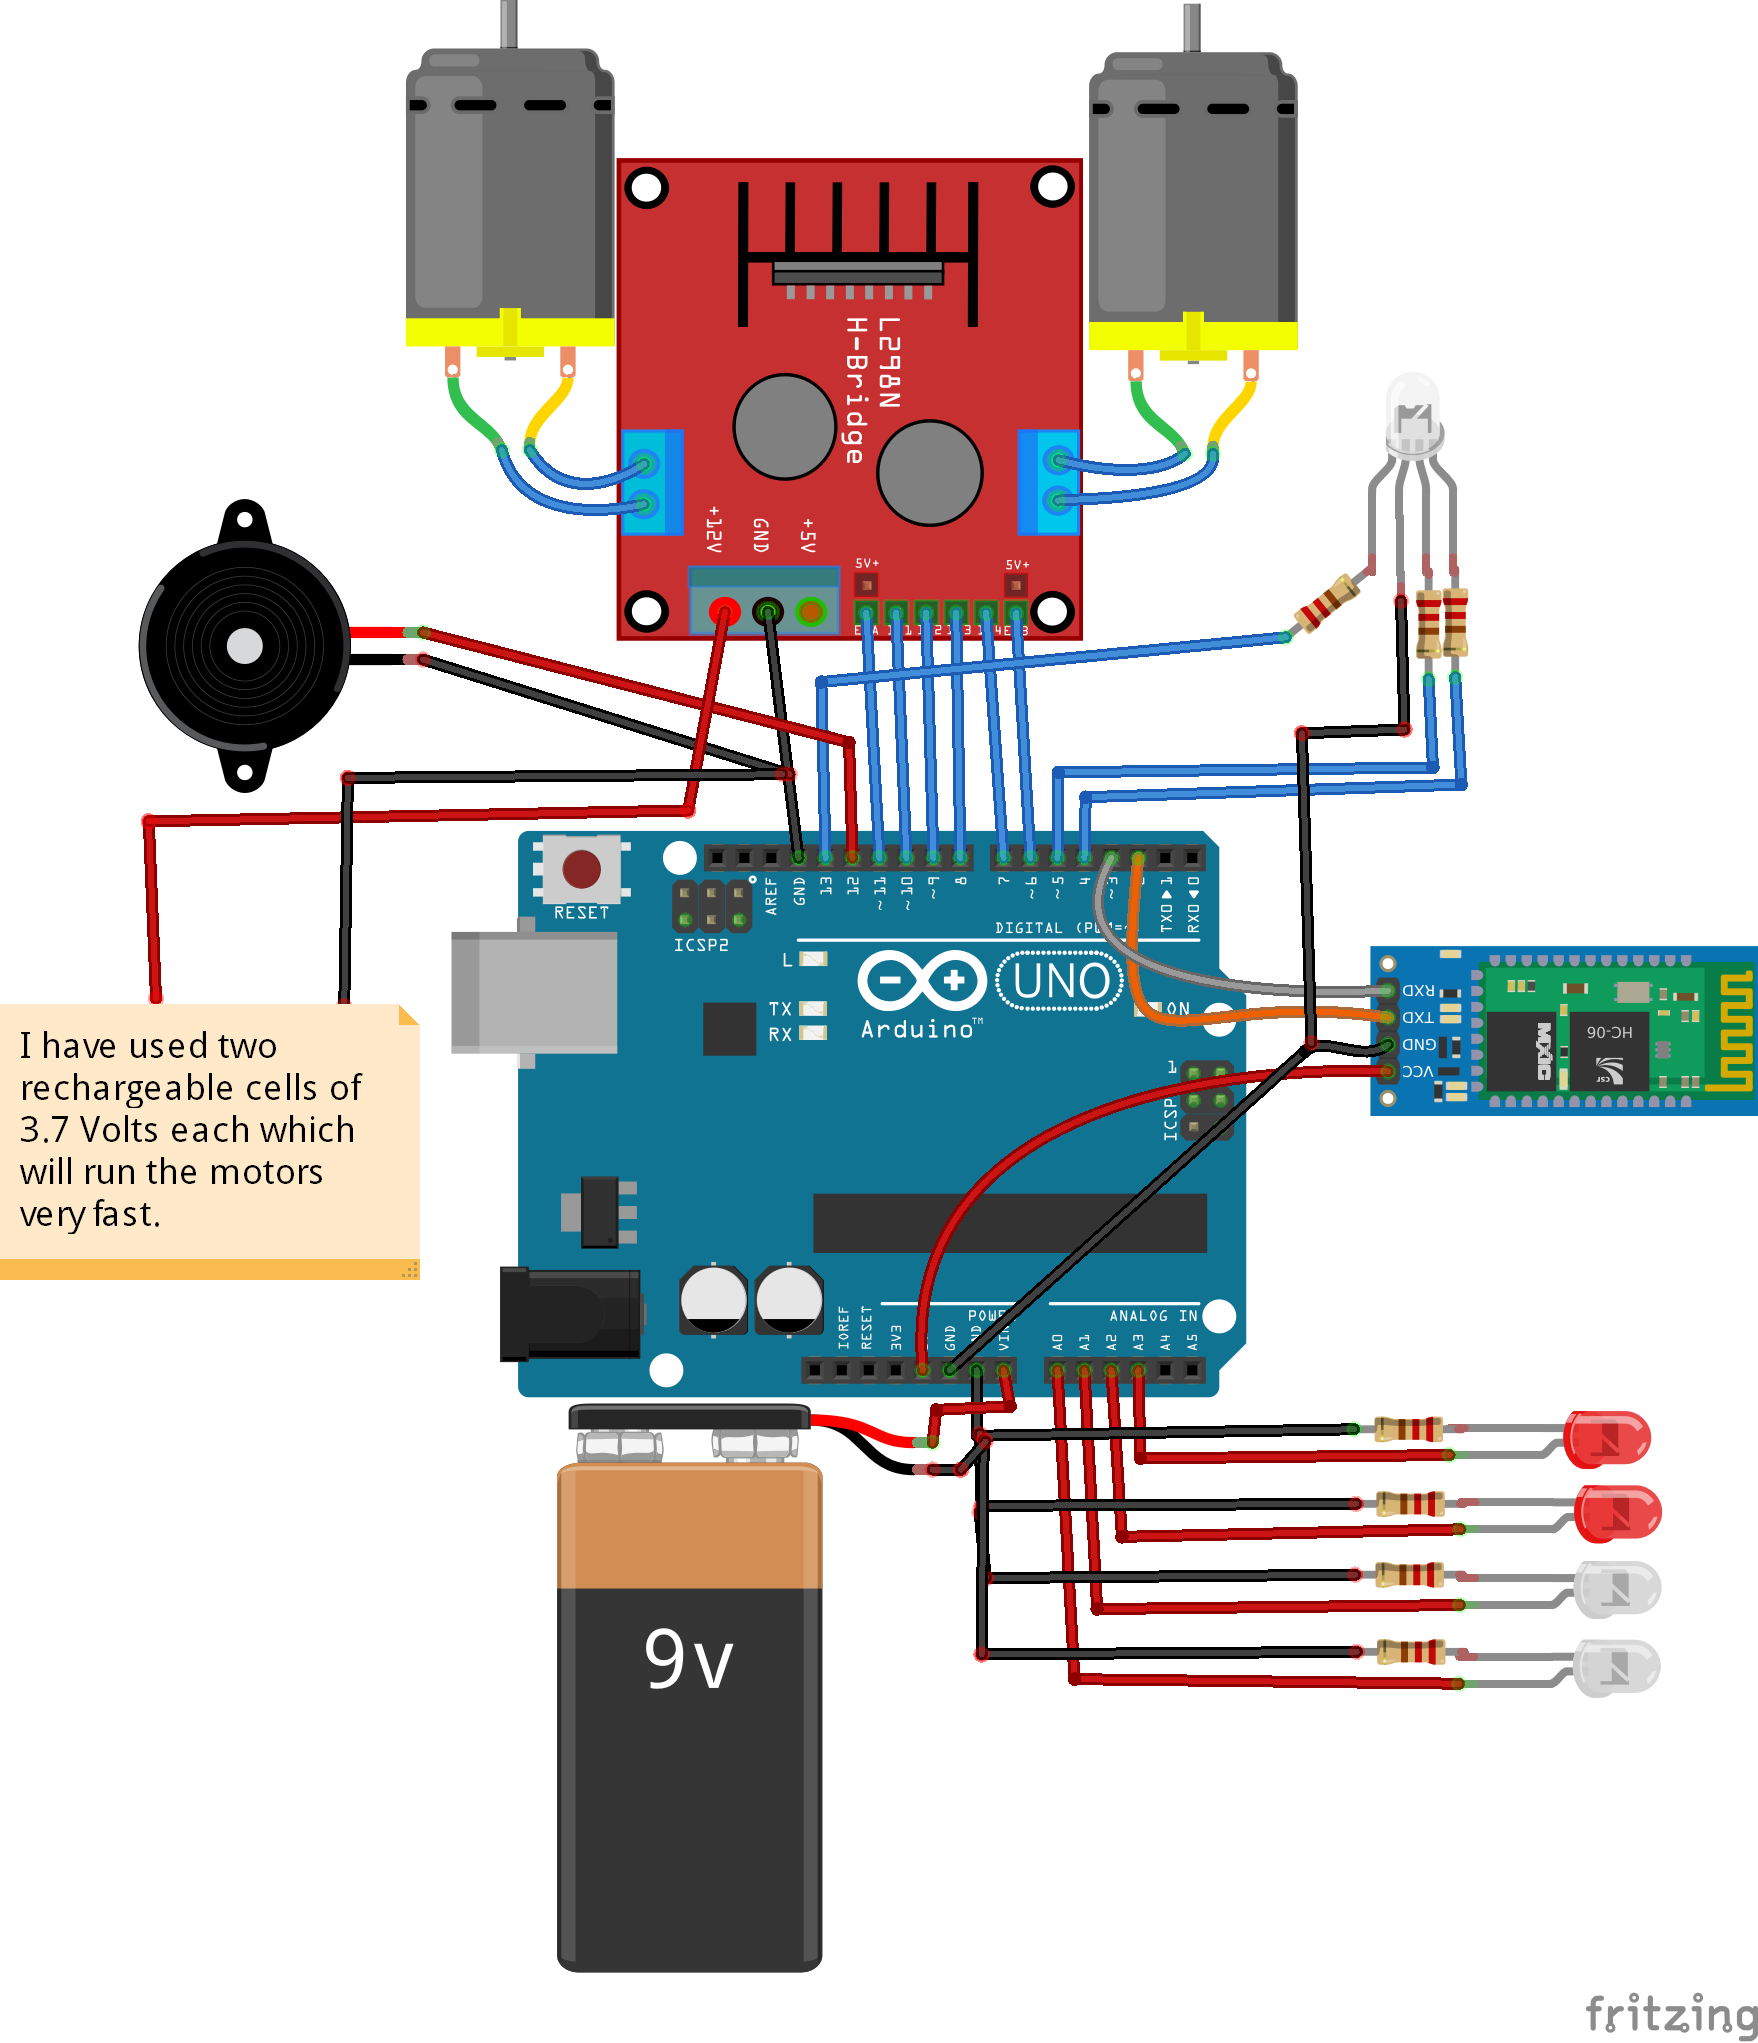
I have used two rechargeable cells of 3.7V each to run these motors. These cells can be used again and again and also will run the motors fast.
If you want to read more about RGB module interfacing with Arduino, then read this tutorial | Arduino RGB LED Tutorial
If you want to read more about Bluetooth module interfacing with Arduino, then read this tutorial | Arduino Bluetooth Module Tutorial
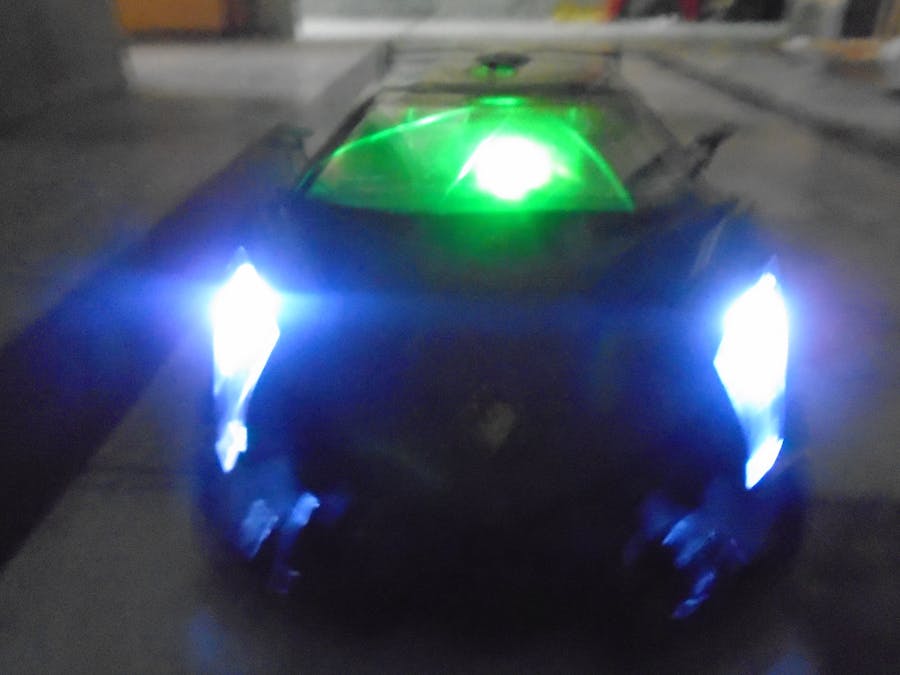
After making all the connections as shown in the above circuit diagram, my car with the circuit attached was looking like as shown in the figure below.
After attaching the top body on it, the car was looking like an original Lamborghini. The RGB connected in the middle makes it look more beautiful and its high speed makes it to compete with the RC cars available in the market.
//including the libraries
#include <SoftwareSerial.h> // TX RX software library for bluetooth
#include <LEDFader.h>
//Defining pins for RGB led
#define GREEN 13
#define BLUE 5
#define RED 4
#define delayTime 3
#define LED_NUM 3
LEDFader leds[LED_NUM] = {
  LEDFader(4),
  LEDFader(5),
  LEDFader(13)
};
//Initializing pins for bluetooth Module
int bluetoothTx = 2; // bluetooth tx to 2 pin
int bluetoothRx = 3; // bluetooth rx to 3 pin
SoftwareSerial bluetooth(bluetoothTx, bluetoothRx);
//Front Motor Pins
int Enable1 = 6;
int Motor1_Pin1 = 7;
int Motor1_Pin2 = 8;
//Back Motor Pins
int Motor2_Pin1 = 9;
int Motor2_Pin2 = 10;
int Enable2 = 11;
//Front Light pins
int front_light1 = A0;
int front_light2 = A1;
//Back light pins
int back_light1 = A2;
int back_light2 = A3;
int horn = 12;
char command ; //variable to store the data
int velocity = 0; //Variable to control the speed of motor
void setup()
{
  //Set the baud rate of serial communication and bluetooth module at same rate.
  Serial.begin(9600);
  bluetooth.begin(9600);
  //Setting the L298N, LED and RGB LED pins as output pins.
  pinMode(Motor1_Pin1, OUTPUT);
  pinMode(Motor1_Pin2, OUTPUT);
  pinMode(Enable1, OUTPUT);
  pinMode(Motor2_Pin1, OUTPUT);
  pinMode(Motor2_Pin2, OUTPUT);
  pinMode(Enable2, OUTPUT);
  pinMode(front_light1, OUTPUT);
  pinMode(back_light1, OUTPUT);
  pinMode(front_light2, OUTPUT);
  pinMode(back_light2, OUTPUT);
  pinMode(horn, OUTPUT);
  pinMode(GREEN, OUTPUT);
  pinMode(BLUE, OUTPUT);
  pinMode(RED, OUTPUT);
  //Setting the enable and RGB LED pins as HIGH.
  digitalWrite(Enable1, HIGH);
  digitalWrite(Enable2, HIGH);
  digitalWrite(GREEN, HIGH);
  digitalWrite(BLUE, HIGH);
  digitalWrite(RED, HIGH);
}
void loop(){
  if(bluetooth.available() > 0){  //Checking if there is some data available or not
    command = bluetooth.read();   //Storing the data in the 'command' variable
    Serial.println(command);      //Printing it on the serial monitor

    //Change pin mode only if new command is different from previous.
    switch(command){
    case 'F':  //Moving the Car Forward
      digitalWrite(Motor2_Pin2, LOW);
      digitalWrite(Motor2_Pin1, HIGH);
      digitalWrite(Motor1_Pin1, LOW);
      digitalWrite(Motor1_Pin2, LOW);
      break;
    case 'B':  //Moving the Car Backward
      digitalWrite(Motor2_Pin1, LOW);
      digitalWrite(Motor2_Pin2, HIGH);
      digitalWrite(Motor1_Pin1, LOW);
      digitalWrite(Motor1_Pin2, LOW);
      break;
    case 'L':  //Moving the Car Left
      digitalWrite(Motor1_Pin1, LOW);
      digitalWrite(Motor1_Pin2, HIGH);
      digitalWrite(Motor2_Pin1, LOW);
      digitalWrite(Motor2_Pin2, LOW);
      break;
    case 'R':   //Moving the Car Right
      digitalWrite(Motor1_Pin2, LOW);
      digitalWrite(Motor1_Pin1, HIGH);
      digitalWrite(Motor2_Pin1, LOW);
      digitalWrite(Motor2_Pin2, LOW);
      break;
    case 'S':   //Stop
      digitalWrite(Motor2_Pin2, LOW);
      digitalWrite(Motor2_Pin1, LOW);
      digitalWrite(Motor1_Pin2, LOW);
      digitalWrite(Motor1_Pin1, LOW);
      break;
    case 'I':  //Moving the Car Forward right
      digitalWrite(Motor2_Pin2, LOW);
      digitalWrite(Motor2_Pin1, HIGH);
      digitalWrite(Motor1_Pin2, LOW);
      digitalWrite(Motor1_Pin1, HIGH);
      break;
    case 'J':  //Moving the Car backward right
      digitalWrite(Motor1_Pin2, LOW);
      digitalWrite(Motor1_Pin1, HIGH);
      digitalWrite(Motor2_Pin1, LOW);
      digitalWrite(Motor2_Pin2, HIGH);
      break;
    case 'G':  //Moving the Car Forward left
      digitalWrite(Motor2_Pin2, LOW);
      digitalWrite(Motor2_Pin1, HIGH);
      digitalWrite(Motor1_Pin1, LOW);
      digitalWrite(Motor1_Pin2, HIGH);
      break;
    case 'H':  //Moving the Car backward left
      digitalWrite(Motor2_Pin1, LOW);
      digitalWrite(Motor2_Pin2, HIGH);
      digitalWrite(Motor1_Pin1, LOW);
      digitalWrite(Motor1_Pin2, HIGH);
      break;
    case 'W':  //Front light ON
      digitalWrite(front_light1, HIGH);
      digitalWrite(front_light2, HIGH);
      break;
    case 'w':  //Front light OFF
      digitalWrite(front_light1, LOW);
      digitalWrite(front_light2, LOW);
      break;
    case 'U':  //Back light ON
      digitalWrite(back_light1, HIGH);
      digitalWrite(back_light2, HIGH);
      break;
    case 'u':  //Back light OFF
      digitalWrite(back_light1, LOW);
      digitalWrite(back_light2, LOW);
      break;
    case 'V':  //Horn On
      tone(horn,494);
      break;
    case 'v':  //Horn OFF
       noTone(horn);
      break;
    case 'x': //Turn ON Everything
    break;
    case 'X': //Turn OFF Everything

    break;
    //Controlling the Speed of Car
    default:  //Get velocity
      if(command=='q'){
        velocity = 255;  //Full velocity
        analogWrite(Enable2, velocity);
      }
      else{
        //Chars '0' - '9' have an integer equivalence of 48 - 57, accordingly.
        if((command >= 48) && (command <= 57)){
          //Subtracting 48 changes the range from 48-57 to 0-9.
          //Multiplying by 25 changes the range from 0-9 to 0-225.
          velocity = (command - 48)*25;
          analogWrite(Enable2, velocity);
        }
      }
      }
    }
     RGB();
  }
  void RGB()
{
    // Update all LEDs and start new fades if any are done
  for (byte i = 0; i < LED_NUM; i++)
  {
    LEDFader *led = &leds[i];
    led->update();
    // This LED is not fading, start a new fade
    if (led->is_fading() == false)
    {
      int duration = random(1000, 3000); // between 1 - 3 seconds
      // Fade Up
      if (led->get_value() == 0)
      {
        byte intensity = random(100, 255);
        led->fade(intensity, duration);
      }
      // Fade Down
      else
      {
        led->fade(0, duration);
      }
    }
  }
 }


_ztBMuBhMHo.jpg?auto=compress%2Cformat&w=48&h=48&fit=fill&bg=ffffff)


Comments
Please log in or sign up to comment.