Being able to control Raspberry Pi via voice commands is always amazing. I have demonstrated how you can control your Raspberry Pi using Amazon Alexa. For establishing connection between Raspberry Pi and Alexa, we are going to use certain open-source services and sdk. Logic for controlling Alexa commands and Raspberry Pi will be hosted on local server on Raspberry Pi. As you will require SSL certificates for 'endpoint' in Amazon Alexa, you can use certain open source services to establish tunneling from your Raspberry Pi to Amazon Alexa.
The skill for Alexa will be made using Flask-Ask. For establishing connection we will be using ngrok. ngrok establishes a HTTP tunnel from Raspberry Pi to Alexa. The endpoint url will change every time ngrok is restarted, as an alternative you can use pagekite.
For successful execution, make sure below services are installed.
- Amazon developer account.
- Flask Ask library for python installed on Raspberry Pi. (steps provided below)
- ngrok installed on Raspberry Pi.
- Cryptography module for python below 2.0.0. (Recommended)
So, let's begin.
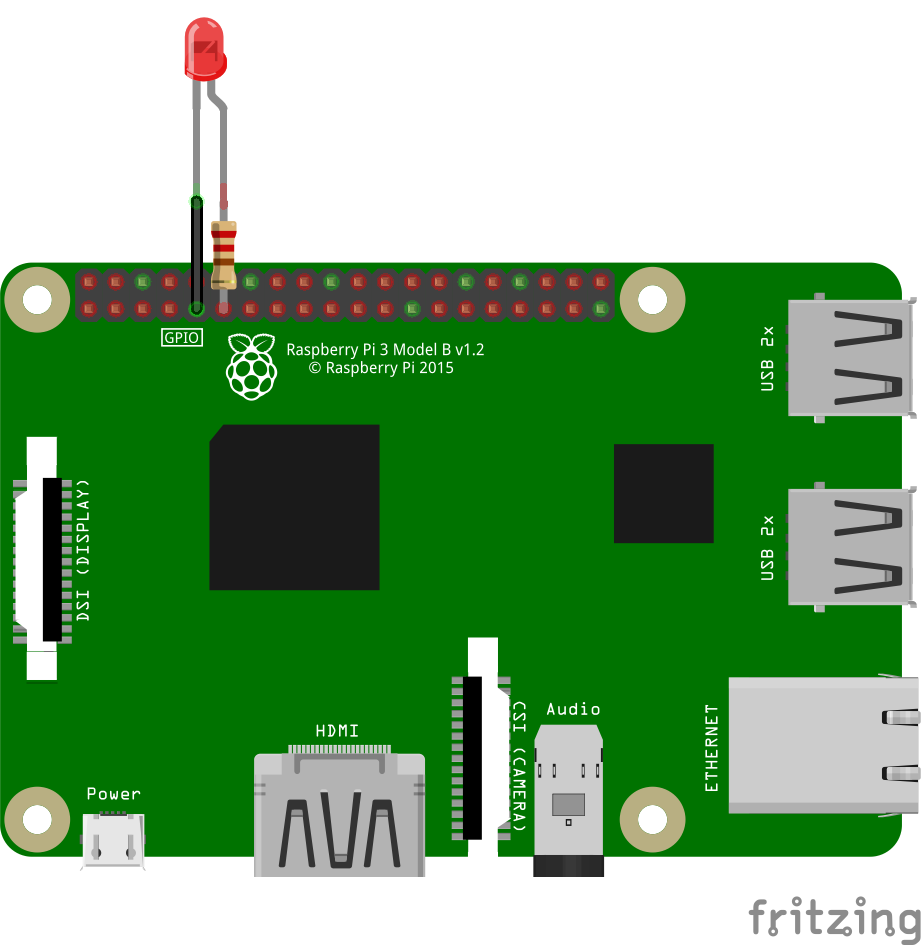
Step-1: Making CircuitConnected LED to GPIO in 17 as per BCM configuration of Raspberry Pi. The circuit diagram is as below.
Make sure your Raspberry Pi is completely updated. To update Raspberry Pi use below commands.
sudo apt-get update
sudo apt-get upgrade
Download ngrok for "linux arm" from this link. Unzip the downloaded ngrok file you have downloaded.
unzip path/ngrok.zip
Start HTTP tunnel on port 5000.
./ngrok http 5000
You will be prompted with below screen.
Leave this as it is. The "https://" URL will be required as an endpoint in Alexa Skill. The URL will change every time service is restarted.
Step-3: Installing Flask-Ask Library:Install Flask-Ask using following command.
pip install Flask-Ask
Use 'sudo' if prompted with user permission. While installing some users might face issues with setup tools and cryptography. To resolve setup tools issue, update the setup tools with latest version.
pip install --upgrade setuptools
For resolving cryptography issues, you need to downgrade cryptography to version 1.9.
pip install cryptography==1.9
Downgrading cryptography tools is not recommended, but if you are facing issues with this project you can downgrade it. Make sure you upgrade cryptography tools after you are finished with this project. To upgrade cryptography use the following command.
pip install cryptography
Now, you must have Flask-Ask installed.
Step-4: Coding the Raspberry Pi.Copy and paste the python code given in git repository. This code will control behavior of LED connected to Raspberry Pi.
Save the code and run the code. Do not run the code in same terminal as ngrok. Open another terminal and run this code. This code will be hosted on localhost which will be tunneled to Alexa Skill through ngrok.
Step-5: Alexa SkillOpen your Alexa Skill console and create a new skill. Name your skill anything you like.
In "Choose a model to add to your skill", select 'custom' and 'create skill'.
Open JSON editor and copy the JSON code provided in the git repository.
Save tfhe interaction model and Build your skill.
Step-6: Connect Alexa Skill to Raspberry Pi.In 'Endpoint' on Alexa Skill, select HTTPS and write the URL generated from ngrok in default region. For SSL certificate type, select 'My development endpoint is sub-domain of domain that has a wildcard certificate from a certificate authority.' Now, save the endpoint.
Before testing the skill, make sure you have followed all the steps above. Head over to 'test' section of your skill console and start testing your skill. Try saying commands like "Alexa, ask raspberry to turn on light". This should turn on LED light connected to you Raspberry Pi. If you have an Amazon Echo device, you can test you skill on your device.


Comments