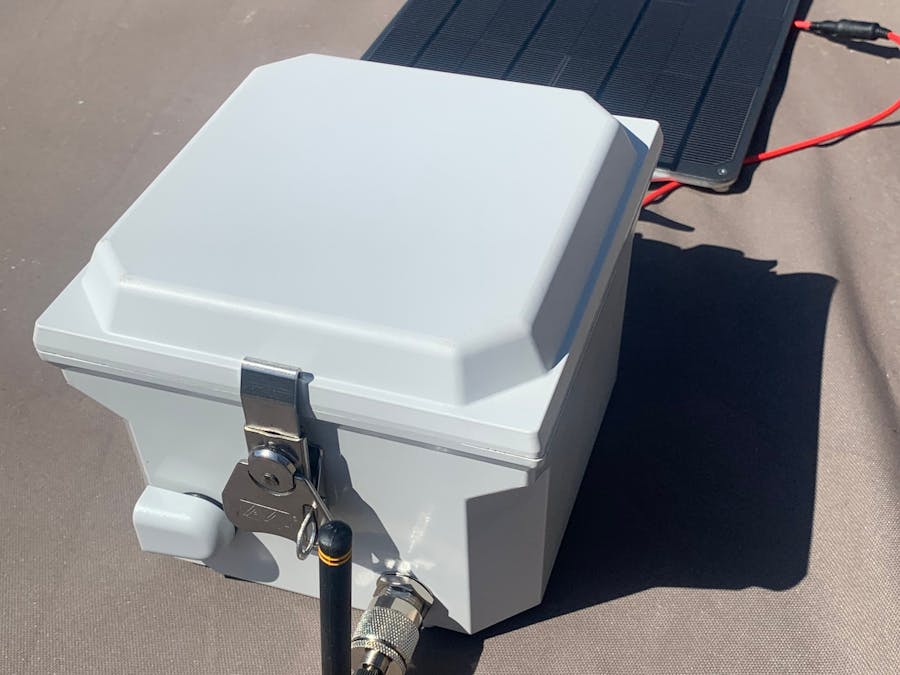
In San Diego and southern California in general, there are many urban and suburban communities built around canyons and areas of large brush that are prone to fires caused by homeless or other bystanders. This poses a threat to residents and tax payers foot the bill when these happen. This package also doubles as air quality sensor providing more detailed tracking of air quality and detection of smoke and abnormal heat for local planning.
What are you going to build to solve this problem? How is it different from existing solutions? Why is it useful?
It is too costly to build out battery operated modules using existing cellular plans especially when the area of coverage is so large. You need to be able to reduce cost and power requirements significantly to be able to cover a large enough area.
How does your solution work? What are the main features? Please specify how you will use the Helium Development Kit (courtesy of STMicroelectronics) in your solution.
We will use an air quality sensor to monitor air quality and detect the presence of smoke. This will allow us to capture both air quality and fires and correlate how sensitive the system can be when a fire is detected. If cheap enough and operating long enough it can be deployed in enough areas to give a good signal to authorities before too much damage is done.
How does the Helium Network help facilitate the scalability of your project?
Because of the large area coverage of the Helium network, it is easy to set up this system and have them immediately publishing data to the network without any complicated custom RF or wireless infrastructure or contracts.
How could your project, in partnership with Helium, benefit society?
It could help provide early notification and tracking against a constant danger that we continue to face every fire season. Catching these early on could prevent damage to communities or fires getting too far out of hand
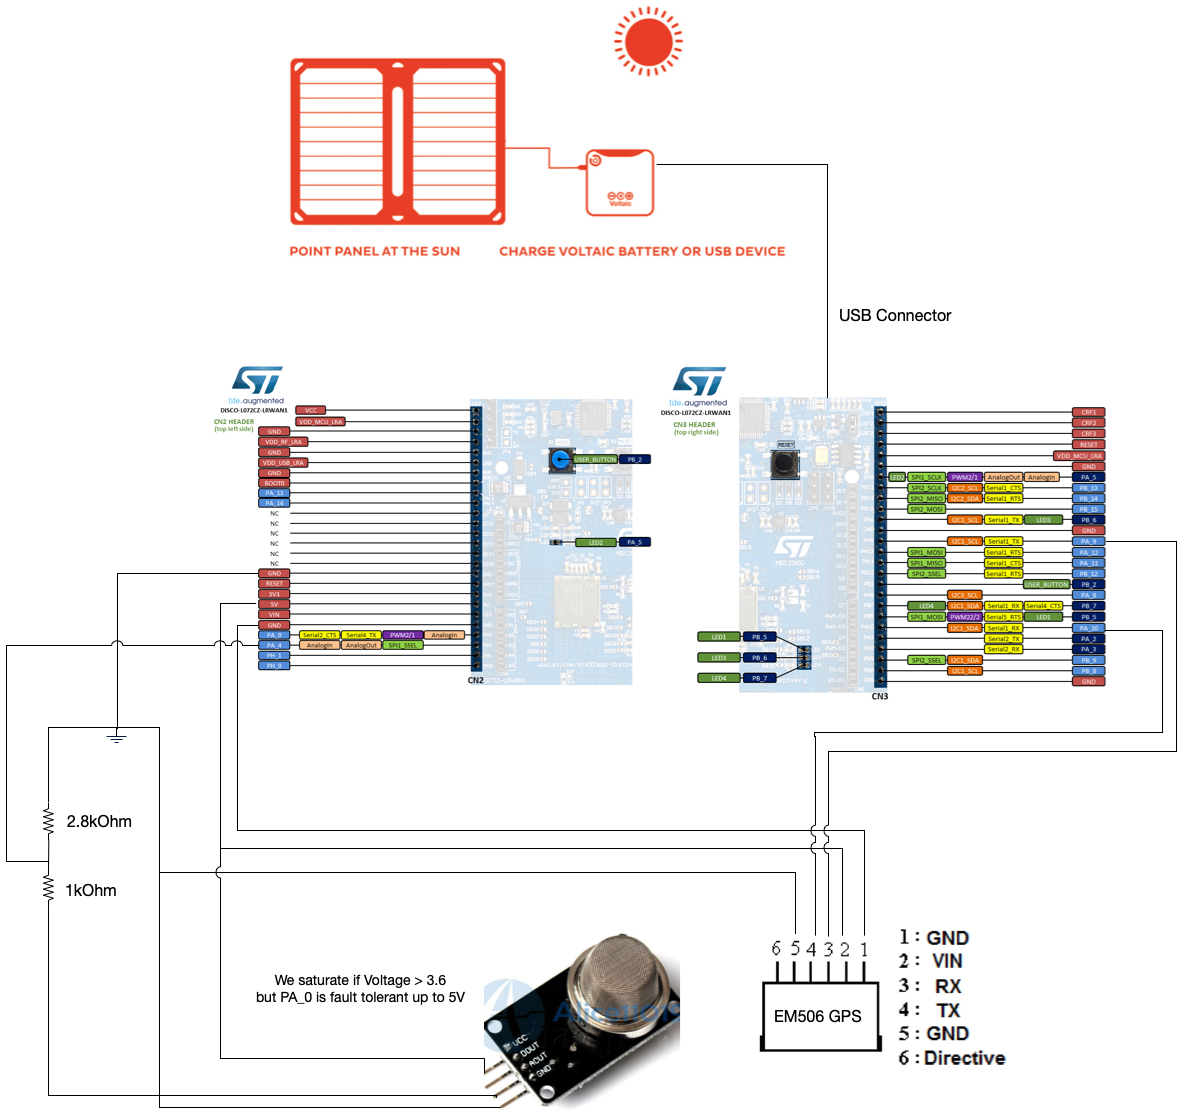
System DesignWe will be using the MQ-135 Air quality sensor. It can detect NH3, NOx, alcohol, Benzene, smoke, CO2, etc.
From the Data Sheet, you can see that CO concentrations that can be detected range from 10-200 PPM (parts per million).
Doing a quick test by burning a paper towel near the sensor, we can see that Carbon Monoxide (CO) has the highest concentration of detection, which is what we'll use to monitor for smoke. We'll start our project off by setting an arbitrary trigger level of 50 PPM, which we'll use later in our Cayenne dashboard to alert us of smoke.
- The GPS fix upon successful Helium Join() command, and then any time our device moves. This will allow us to reduce the amount of packets sent over Helium.
- Air quality data every hour
- CO PPM's above a certain threshold (50PPM)
We want to reduce the amount of data we have to send over the Helium network in order to conserve on data credit burn. This will allow us to focus on sending the most important information when it is needed.
Helium ConsoleFirst we'll need to add a device into console to make sure we can see device data. If you haven't already, head on over to https://console.helium.com/ to create an account. From there we will add the device and the necessary routing to get our packets to a Cayenne Dashboard.
1) Go and add a device and click Add Device, then give it a unique name. The other 3 fields will be utilized when programming our device. You can always get access to them when you view your specific device under the Devices tab.
2) Create a Label: this is the glue to ties devices to integrations, which we'll set up next.
3) Create an Integration: This is the pipe that gets your data from Helium to Cayenne. Once you attach a label to this integration, any devices that are attached to the same label will have it's data routed through the label and pushed out to the specified integration.
You'll first wan to create a Cayenne account here, we'll then set up our dashboard by doing a few things:
1) Select Add New > Device to add our device. You'll need your Device EUI from helium console steps completed above.
2) As soon as data shows up in Cayenne, we can configure our dashboard. We'll configure the RSSI and CO levels to display a line chart and signal meter in our dashboard. You'll see our device on the left with the 8 sub sections that appear below our device. Select each one to configure and rename them to something more meaningful (like below).
3) Next we'll setup our alarms and notifications for when CO levels are too high.
To Flash the ST B-L072Z-LRWAN1, you'll need to first setup your arduino environment and get the proper libraries. For additional details, you can read the Helium Developer guides.
Required Driver (Windows Only)Download driver here.
That’s it for the hardware setup! Next we will setup your environment.
Getting the Arduino IDEDownload and install the latest version of Arduino IDE for your preferred OS.
STM32L0 Core Support & LibrariesThe ST B-L072Z-LRWAN1 requires one package to be installed follow the instructions below.
Arduino Core for STM32L0To install, open your Arduino IDE:
- Navigate to (File > Preferences), (Arduino > Preferences) on MacOS.
- Find the section at the bottom called Additional Boards Manager URLs:
- Add this URL in the text box:
https://grumpyoldpizza.github.io/ArduinoCore-stm32l0/package_stm32l0_boards_index.json- Close the Preferences windows
Next, to install this board support package:
- Navigate to (Tools > Boards > Boards Manager...)
- Search for Tlera Corp STM32L0 Boards
- Select the newest version and click Install
Now that we have the required Arduino board support and libraries installed, let's program the board with the provided example sketch.
To create a new Arduino sketch, open your Arduino IDE, (File > New). Next, replace the template sketch with the sketch we've provided, copy and paste the entirety of it.
Next we'll need to fill in the AppEUI, DevEUI, and AppKey, in the sketch, which you can find on the device details page on Console. For this sketch you do not need to modify the formatting of the EUIs and Key at all, simply copy and paste them as is.
At the top of the sketch, replace the three FILL_ME_IN fields, with the matching field from Console, example shown below.
Next, we need to select the correct board to build for in the Arduino IDE. Navigate to (Select Tools > Board: > B-L072Z-LRWAN1).
Selecting PortWe're almost ready to upload our sketch, the very last step is to select the correct Serial port in the Arduino IDE. Navigate to (Tools > Port: COM# or /dev/ttyACM#or usbmodem) depending on whether you are on Windows, Mac, or Linux.
Upload SketchWe're finally ready to upload our sketch to the board. In the Arduino IDE, click the right arrow button, or navigate to (Sketch > Upload), to build and upload your new firmware to the board. You should see something similar to the image below at the bottom of your Arduino IDE, when the upload is successful.
When your firmware update completes, the board will reset, and begin by joining the network. Let's use the Serial Monitor in the Arduino IDE to view the output from the board. Navigate to (Tools > Serial Monitor), you should begin to see output similar to below.
Now let's head back to Helium Consoleand look at our device page, you should see something similar to the screenshot below.
This system works great where the temperature of the sensor does not fluctuate much, but as the sensor is heat/resistance dependent, being in direct sunlight in an enclosed housing poses some challenges that need to be addressed.
Running our system in direct sunlight over 4 days yields values that need to be normalized. Looking at the data sheet, we can adjust our values according to the temperature response curve shown in the chart below.
I would also build in edge detection algorithms to reduce the amount of data sent over the Helium network. There's much to be done, but this project gives you the foundation to start to build end to end air quality monitoring and smoke/fire detection systems.


Comments
Please log in or sign up to comment.