Find Extended Documentation here
Videography By Charles Elmer
This interactive experience creates force simulations based on inertial motion data planted in the hilt of a light saber. The system requires two users, one that holds the light saber and another that controls a laser beam. When the light saber successfully blocks the laser beam the motion data generates a particle field online. Force Fielder is a multi faceted submission that uses a wide range of technology in this prototype. This work was inspired by Episode 4 where Luke is first channeling the force with Obi Wan Kenobi on the Millennium Falcon. I highly encourage reusing parts of my experience to build your own iteration as this project wouldn't have been possible without open source software. Best, Paul
The light emitted from the laser triggers a motion data event that an event listener interprets into Force Fields. This system has three main applications using different software platforms. The nodes are connected to each other through physical and digital means.
*Originally the laser controller was a Parrot Transporter Drone but the execution didn't reflect the original concept. See details below..
Hardware
Light Saber
- Particle Photon
- Sparkfun Photon IMU Shield
- Sparkfun Photon Battery Shield
- 3.3v Lithium Ion Battery 1000mah
- Adafruit Perma-Proto Quarter-Sized Breadboard PCB
- Solid Core 22 Gauge Wire
- 3 photoresistors
- 3 10k resistors
- 1 Neo Pixel Strip
- Elastic Strip
- Needle
- Thread
- Electrical Tape
- Various PVC Pipes
- Fluorescent Light Tubing
- Soldering Iron
- Solder
Leap Laser Controller
- LEAP Motion Controller
- 2 Micro Servo Motors
- Particle Photon
- USB Micro Cable
- Small 3.3v Laser Pointer
- Solid Core 22 Gauge Wire
- Breadboard
- Zip ties
- Clamp
- Square Wooden Dowel Rod
- Fog Machine
Laser Beam Drone
- Parrot Transporter Drone
- Small 3.3v Laser Pointer
- Mini Lipo battery
- headerless Particle Photon
Software
Particle Build IDE
Light Saber Dependencies
- Sparkfun LSM9DS1
- Neopixel
- Application
Laser Beam Dependency
- Voodoo Firmware
Server Side Javascript (Node.js) in Sublime IDE
Cylon.js (Node Package Dependencies)
- cylon-spark
- cylon-leapmotion
- cylon-gpio
- cylon-i2c
- cylon
Client Side Javascript and HTML in Sublime IDE
- P5 Processing for js library
- Particle (Formerly Spark) JS Library For The Particle Photon
If you're unfamiliar with using the Photon please read the Getting Started Guide.
Hardware
- Build the shaft of the saber by connecting various pieces of pvc plumbing tubing ensuring that the base is large enough to contain the embedded electronics and that the top is a snug fit with one end of the fluroscent tubing. Cover the hilt in black tape and set aside.
- Stack a Photon on top of the imu shield, on top of a battery shield with the male headers on the battery shield cut off.
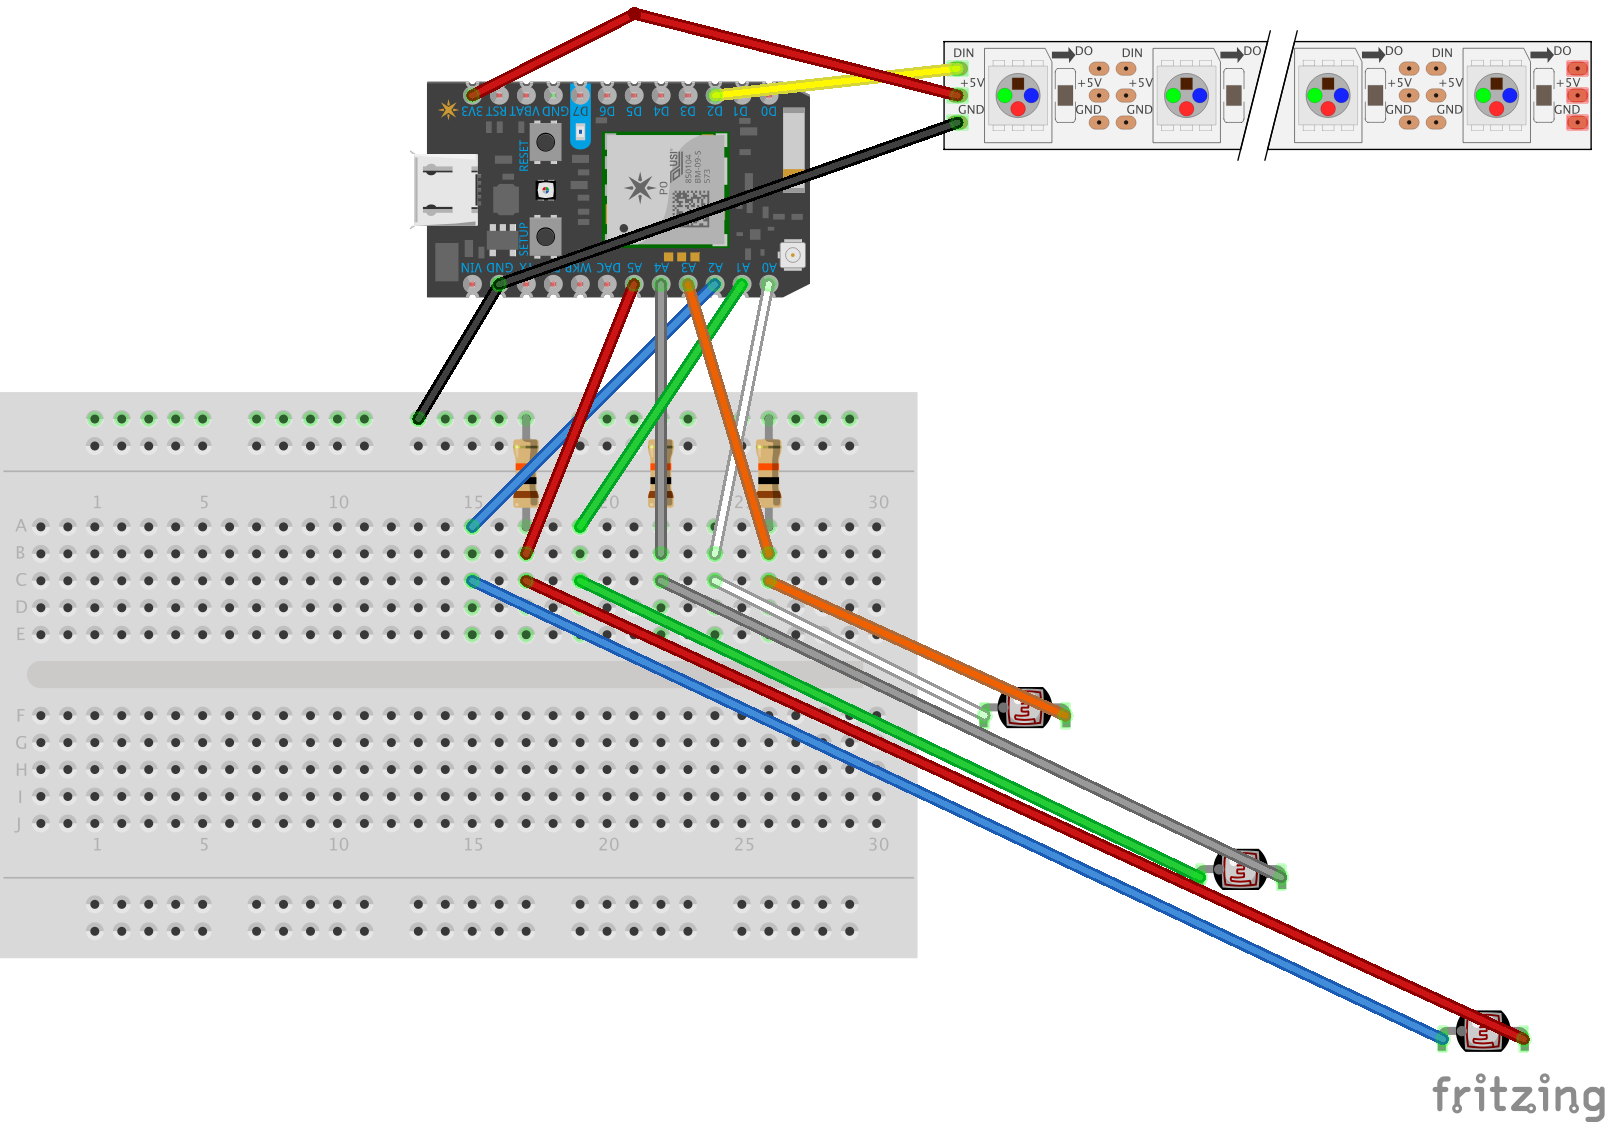
- Solder and heatshrink 3 photoresistors to stranded core wire of increasing length to space out the light sensors at the bottom, middle, and top of the saber.
- Solder the wire from the photo resistors to one side of the proto board with 10k resistors arranged like so.
- Solder the associated lines from the Fritzing diagram below to the pcb through holes on the back side of the battery shield at pins a0-a5 with the resistor lines to a3-a5 and the direct lines from a0-a2.
- Measure and cut a desired length of a Neopixel strip (try to stay under 60 pixels to still work with the 3.3v power source) dependent on the length of the fluroscent tube.
- Solder wire from the Neo Pixel din side also to the back of the battery shield. The connections are Neo DIN to Shield D2, ground to ground, and Neo VCC to Shield 3.3v. It's important that you connect the Neo Pixel direct line to D2 so not to conflict with the digital io pins the imu shield is occupying.
- Measure and cut an elastic band the same length as the Neo Pixel Strip that will be placed directly over the LEDs
- Cut three holes in the elastic that match the distance from the photoresistors to the hilt.
- Insert the photoresistors through the holes with the light sensing side not directly facing the LEDs.
- Sew the strips together with a needle and thread by pushing the needle through the Neo Pixel strip's plastic encasing at the sides to avoid damaging the inner circuitry. I taped the end of the strip with blue electrical tape to ensure the two strips stay aligned.
- Insert the circuit through the pvc tubing, gently pulling the light strip through the saber end of the hilt.
- Put the light strip inside of the fluorescent tubing. Secure the tubing to the hilt with electrical tape.
- Connect the battery to the JST plugin on the battery shield.
- Place the cover on the bottom of the hilt to secure the photon in place.
Software
In the Build IDE code we'll use the example file from the Sparkfun LSM9DS1 combined with a few tidbits from the Neo Pixel library example and the Particle publish example. This laser listener creates an average threshold from on and off values of 3 (photoresistors) then publishes the IMU data in one large string when the threshold is crossed. Please visit the lightSaber folder in the Github repo for the build code.
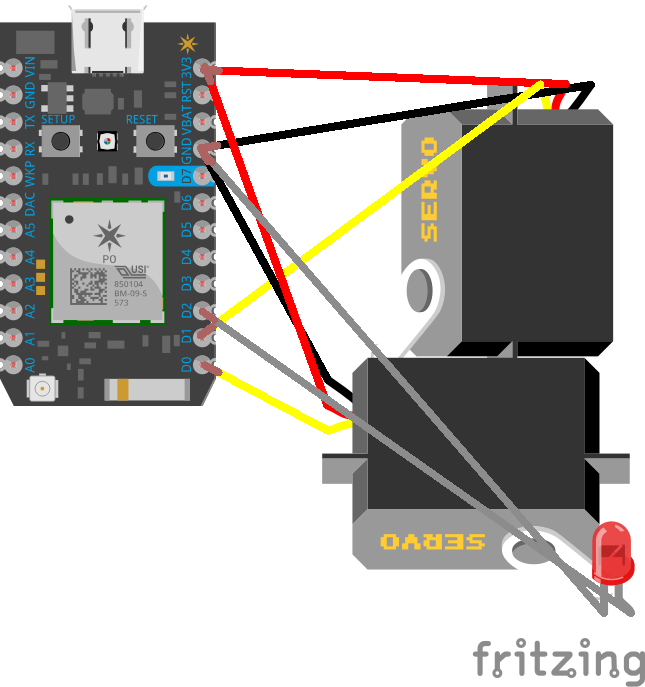
- Follow James Bruce's Laser Turret Tutorial while substituting a Photon for the Arduino.
- Secure the laser and servos together with zip ties then tie the module to a wooden dowel rod that is clamped to a surface.
- LoadVoodoospark Firmware onto said Photon by copying the Voodoo firmware into the Build IDE and flashing said firmware to the laser controller
- Download and installNode.json your computer.
- In the terminal (I'm on a mac), installCylon.jsand all library dependencies by running the following commands either globally (using the -g command after the word install) to access the libraries from anywhere on your computer or navigate to your project directory and run the npm installs locally as I did to upload a github project that includes all the dependencies necessary to run the program.
$ npm install cylon$ npm install cylon cylon -spark
$ npm install cylon cylon-leapmotion
$ npm install cylon-i2c
$ npm install cylon-gpio
- Connect your Leap to to the computer.
- Open Sublime Text and create a Javascript file in the same parent directory that contains your node_modules folder.
- Insert said code from the test.js file (or just use the test file) in the leap controller folder of the repo and replace YOUR_ACCESS_TOKEN and YOUR_DEVICE_ID with your Particle credentials.
- In your terminal cd to the parent directory containing your js file and node modules then run the command
$ node YOUR_FILE_NAME.js
- The program should connect to the devices then run. If there is any error, double check that your devices are connected and that the voodoo firmware was uploaded to the correct Photon. You can exit the program in the terminal by pressing control + c.
I originally intended to mount a photon on top of a Parrot Transporter Drone that would act as the laser controller. Unfortunately there were multiple problems that I would further iterate upon moving forwards. The stack of electronics I attempted to mount on the drone weighed 12.9 grams while the toy action figure provided with the drone weighed 4.6 grams. This additional weight made the drone difficult to control and decreased the time airborne. Future iterations would use a nicer drone that can take a larger load including a camera running openCV to automatically position the laser in the direction of the light saber user.
Hardware
- Solder two male headers to the VIN and Ground in the top left corner of a headerless Photon
- (Optional) cut off the jst on the lipo and replace with two female jumper cable heads.
- Hot glue together the almost headerless photon, small lipo battery and the 3.3v laser pointer. Glue the stack onto a flat Lego piece and attach the Lego to the drone.
Software
In the Build IDE create a laser listener which subscribes to a fireLaser event. You can find the code in the laserListener folder of the repo.
At IFTTT create a recipe using any trigger/channel you like for the 'if' and publish a buttonFire event using the Particle Channel for the 'that'. Ensure that the name of your event published is the same name as the one subscribed to in the Build IDE.
When contact is made the event containing the imu data is published through the cloud. Using the spark.js library we create an event listener that unpackages the string data tied to the event instance. We then use a P5 sketch to visualize said data like so..
Software
*This code is mixture of two examples found online. Harrison Jones from Particle posted js examples using local storage and temporary access tokens here . Also, Martin Schneider posted this OpenProcessing doodle which I've converted to a P5 sketch and connected to the event data. If you have a Particle account you can sign in and test if your system is working by opening the forceFields.html file in the repo.
If you don't have a Particle account here's a sample of what you can hope the final output might look like (set dodge to false to automatically display a visual like so).
If you've made it this far, thank you for your time and energy! Again, please share mods and replications.
Happy Hacking:),
Paul Elsberg


_3u05Tpwasz.png?auto=compress%2Cformat&w=40&h=40&fit=fillmax&bg=fff&dpr=2)
Comments