


Hardware components | ||||||
 |
| × | 1 | |||
 |
| × | 1 | |||
 |
| × | 1 | |||
Software apps and online services | ||||||
| ||||||
 |
| |||||
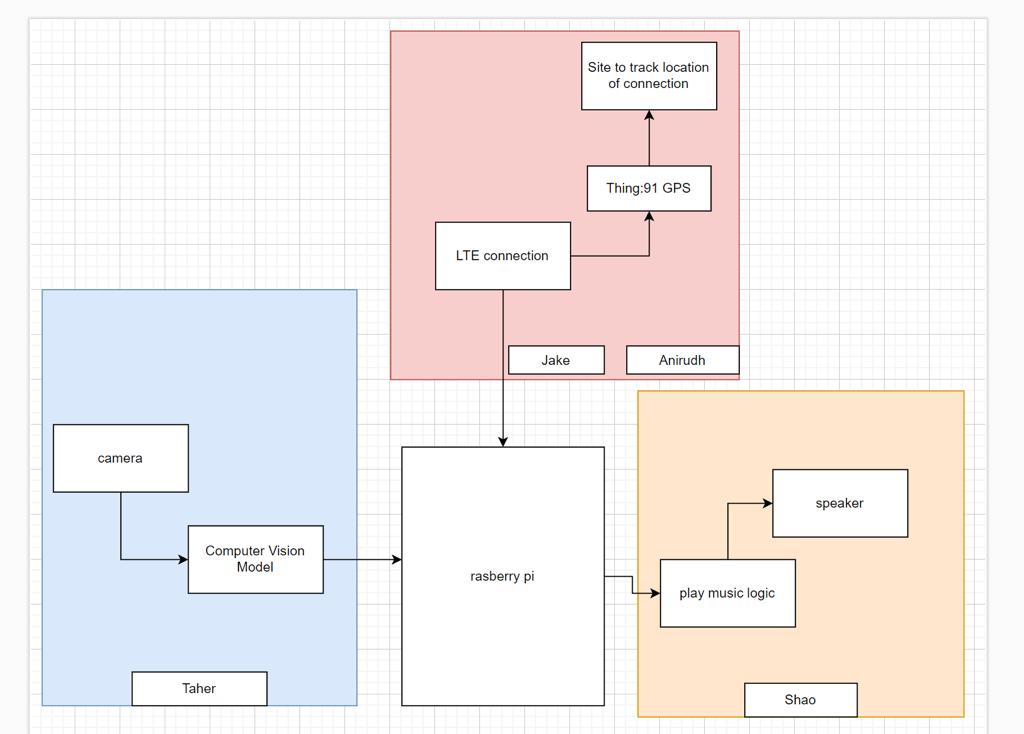
While this last decade has brought so much innovation in regards to security and safety, many old inventions that are less flashy, but still used frequently, lack these improvements as new technology comes aorund. In high traffic areas like cities and campuses, personal transportation such as
bicycles, scooters, and other segways are used frequently to get from place to place with cars being less feasible. These vehicles usually have little technology at best at warning and protecting pedestrians, and are often left unattended outside buildings where many cases of thievery can occur. We believed that there could be a cheap solution to all of these problems with our multipurpose safety and security tool, ScootSafe. The first part of this tool uses a Computer Vision model to detect pedestrians and emit a sound that increases in volume as you get closer to a pedestrian to warn them and the rider of someone in the way. The next part is a BlackBox which periodically takes these images taken by the camera and loads it to our acme server, where our web application periodically pulls it and displays it on our user authenticated website. Lastly our Thingy:91 sends GPS signal data to our acme server that also gets periodically pulled to display the coordinates on a google maps API of your devices current location. This website has multiple views for a user to display the location and images of their own devices, to help with relocating lost or stolen vehicles.
The ReportWebsiteFor our project, we created a DJANGO based python web application to display our image capturing and GPS data to our potential users. We have 5 different views for a basic website being a login page, creating an account, a hub after logging in to select which application to view, our GPS mapping through google maps API, and our Blackbox data which displays most recent image captures by our device. Using Object-Oriented Methods, we have device groups created for every logged in user so that no one else’s information is viewable by another user. These images are gathered through a program that, through a http request, connects to the ACME server on our raspberry pi and displays it on our site. Our GPS data is gathered by Thingy:91 and sent to our web application database, where it is updates each devices location after every request to the site. These latitude and longtitude values are saved to our database and used as markers in the google maps API for each device.
GPSThe ScootSafe System revolutionizes vehicle tracking with its cutting-edge features. At the core of this system lies a GPS module, which seamlessly integrates with your vehicle to enable real-time tracking. Once you register your device on the ScootSafe website, you gain immediate access to monitor the location of your vehicle with ease and convenience.
This advanced system takes advantage of the GPS module and a data plan SIM card that is cleverly integrated into the Thingy 91 board. Together, these components work harmoniously to ensure regular updates of your vehicle's data. The GPS module continuously captures precise location coordinates, altitude, and speed, which are then transmitted to our dedicated tracking servers. Through a secure and reliable connection, this information is seamlessly relayed to the ScootSafe platform.
In addition to providing real-time tracking capabilities, the ScootSafe System offers several other valuable applications for the collected data. In the unfortunate event of a stolen or lost vehicle, the system's tracking feature becomes instrumental in facilitating its recovery by enabling authorities to precisely locate and retrieve the vehicle. Furthermore, the system can also be programmed to alert users about speed limits, ensuring they adhere to road regulations and maintain a safe driving experience. Additionally, by analyzing the collected data, the system can identify regions with challenging terrains or hazardous conditions, allowing users to avoid such areas and choose safer routes. This comprehensive utilization of data enhances the functionality and versatility of the ScootSafe System, offering users greater control and peace of mind while utilizing their vehicles.
The following images show how the AT commands used to start the GPS sequence. It sets the parameters and then request GPS data at 1 sec intervals
The following images show how the GPS coordinates show on the thingy91:-
This is how the thingy91 looks:-
The first thing that I needed to do was decide what type of programming language to use. After some research, with what all was required for the raspberry pi to do I chose python. There will be a usb camera attached to the raspberry pi which gets the image and I check if there is a face in it. It will also give me the approximate distance of the face from the camera. This distance isn’t accurate because I think either the focal length that I kept for the camera may be wrong or else there may be something wrong in the formula I used for the distance. This is the output that I get on the raspberry pi for the image:-
I also used M2M server to send the image to the web site. Since I was using the server for the first time, I got a lot of help from the Jupyter notebooks. The link is here:- ankraft/onem2m-jupyter-notebooks: A couple of Jupyter notebooks to explain how to create, access and manage oneM2M resources (github.com). I had to first make a AE resource and Container. Once I understood how the server works it wasn’t very hard to do it. On the website site, I first made it so that the latest one gets received. Then, I also the ACME server to send the GPS location to the website. For now we gave it predefined values to show how it would work. Then another thing that I used the M2M server is to send the distance between face and camera.
The things that I learnt on the way. Firstly, I noticed that when I tried to send the image with resolution of 640 X 480 the server got stuck. This is because the server can’t send large data. So, I had to reduce the resolution to 120 X 120. Then it was successfully sent on the server. I couldn’t send the image directly to the server. It had to be converted to base64. When I did some research, I got to know that base64 is the easiest thing to do but it increases the memory by 30%. There was another option of using multipart. This method can send large data easily. I will use this method in the future so that I can easily send the video instead of images. The link to the website where I got the information is:- Send Image Files in an API POST request | by Nimesha Dilini | Medium. Another thing that I saw was that when I was running the program, there was very big delay like when I was turning the camera, the image will not get updated. I believe that this is because we are using too much processing power that the raspberry pi can’t handle. To handle this problem for now, I put a delay function. But in the future, we would want to send photo to server only when there is a person at a distance or only when there is a major change from the previous photo.
These are the things that can be done in the future. We can add the notification and subscription to the server so that it automatically checks whether it received new things or not. Another thing that we can do is adding ACP controls as we have multiple AE resource and we didn’t want them to have entire access because of security reasons. The AE resource should only use the one that it requires.
Below is the resource tree for the oneM2M server:-
Below is how the oneM2M server looks like when it is running:-
Raspberry Pi is a versatile single board computer with GPIO support. Since our distance detection algorithm is developed on Raspberry Pi, the alarm system will do so. The design goal of my part is to design an alarm system that will be activated either by the distance-detection algorithm or the switch that the rider can press. Therefore, I decided to design the audio playback as functions that other processes can call. Also, instead of writing a script, a python code is written for portability.
The first experiment is to use the audio jack, and connect it directly to a speaker scrapped from a tablet. However, the sound is merely audible. The second attempt is to use the GPIO to produce single tone audio (square wave), however, timer interrupt with pthread on python seems unreliable when frequency is within human audible range (e.g. 400Hz to 10kHz).
The final design use audio jack and a simple amplifier (https://www.instructables.com/How-to-Make-Simple-Audio-Amplifier-With-Mosfet/). And instead of pyaudio that was used in the first experiment, I changed to pygame, which is a higher-level libraries. The result is close to satisfactory; with some level of noise, potentially from the connections shown below:-
The setup is able to significantly amplify the sound, but later we found that the mini-monitor is able to produce clearer and louder sound, so we switched. The reason could be lack of materials and poor layout. Potential improvements include, use audio grade MOSFET/IC, shorter wires and soldered connections.
Real Life ApplicationThis is how it looked on my bike. As we didn't have an electric bike, we did on a normal bike. This is the image:-
This is the live demonstration:-
When we tested our bell, we found out that it didn’t detect the face as fast as we thought it would. Also, sometimes because of the sun, the face wasn’t detected. These things are also what we would like to improve. We would also like to reduce the size of the bell so that it fits easily on the bike


Comments