Water is an essential resource to every living-creature on Earth. We, human beings, have more than 50% of our body composed basicly by water.
Like every limited resource, the only way of using this the best as possible is measuring its consumption to fix how you use the resource (an engineering rule: there's no improvement without measuring!).
Considering these facts, measure and improve water consumption may mean saving the planet Earth / keeping all the living-creatures alive. So, it's a big thing measuring water consumption. Seeing a little bit beyond, to "complete" a really big thing, there'll be very nice the possibility to set the consumption's limit (so, consumers of water can effectively change the way they use water due to minimize its consumption and reduce the bills - what's no bad idea too!). And it's what this project do: help you to reduce water consumption in a clever way!
Due to rising of embedded technology and the recent IoT (Internet of Things) boom, it's possible to not just measure water consumption, but send alerts of excessive consumption over the Internet too (using limits of water consumption defined by consumer). In other words: if you have Internet access and this project running in your home, doesn't matter where you are, you'll be able to check how it's your water consumption in your house, in real-time.
To sum up, I decided to do this project for:
- Create a clever and effective way to reduce water consumption (what impacts positively in bills and in enviroment care)
- Make it possible through the Internet, so physical distance it's irrelevant to project's goal
- Contribute for Earth's future using technology.
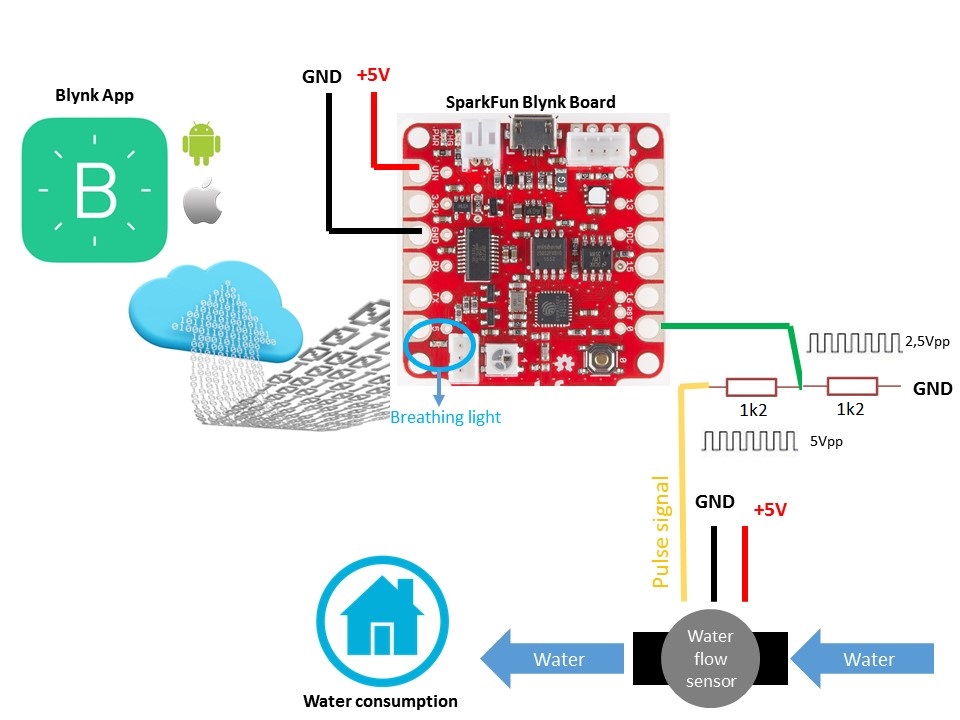
To make it real in your own home, you'll need:
- One SparkFun Blynk Board ( https://www.sparkfun.com/products/13794 )
- Setup Arduino IDE to program the SparkFun Blynk Board (there's a great tutorial here: https://learn.sparkfun.com/tutorials/blynk-board-arduino-development-guide )
- Blynk App and some energy points. This app works both on iOS and Android devices. For more information, visit: http://www.blynk.cc/
- One water sensor flow (like this one: http://www.seeedstudio.com/wiki/G1/2_Water_Flow_sensor ).
- Some wire and alligator clips.
- A 5V DC power source (you can use an old 5V cellphone battery charger, it'll work like a charm).
- Two 1k2 1/4W resistors.
Check this out:
Blynk AppTo this project work as we want to, we'll need to make SparkFun Blynk Board and Blynk App communicate each other.
So, I made an App on BlynkApp for this project. It's composed basicly by three sections:
- Metering section: contain all information obtained by BlynkBoard (water flow and consumption and a representation of breathing light) and two important commands / button actions: Cons. reset (it allows resetting water consumption) and Get Version (it gets the BlynkBoard software version, what can be very useful on bug tracking).
- History: Here, it's possible to check all water flow and consumption history. It's a very interesting resource, because it allows users to check graphically their water consumption and flow meterings during the time.
- Calibrate: Third and last section of app. Here, it's possible to start and end calibration of Blynk Board. The calibration commands are all sent by Internet, so the user does not need to be near the Blynk Board / press buttons on Blynk Board to calibrate this system.
Check some pictures of App:
To get my app, follow these steps:
1. Download Blynk App: http://j.mp/blynk_Android or http://j.mp/blynk_iOS
2. Touch the QR icon and point the camera to the code below or open the link below - http://tinyurl.com/h6k6pxp
3. Enjoy my app!
QR Code:Here there are what you need to make this project alive!
a) CalibrationOnce the code is loaded into Blynk Board, it's almost ready to operation. Considering it's the very first time the Board is powered on, a calibration is needed (because, until now, Blynk Board "doesn't know" how many pulses are equal a 1 l measured).
To do this, follow the steps:
1 - Be sure Blynk Board is on and connected to Internet.
2- Start Blynk App and go to calibrate section
3- Press start button. If you pay attention to the breathing light, you'll realize that it stopped blinking (it's a way to Blynk Board "say" to you that calibration mode is on)
4- Make exactly 1 liter of water pass through the water flow sensor.
5- Press End button. If you pay attention to the breathing light, you'll realize that it is blinking again (it's a way to Blynk Board "say" to you that calibration mode is off and now water flow and consumption can be measured)
6- Calibration is complete! Enjoy!
b) Getting data from Blynk BoardOnce calibration is complete, Blynk Board is ready to sent measurent information to BlynkApp. All the information sent to Blynk App can be seen on Mettering section.
The following picture shows the details of this section:
It's also possible to check water flow and consumption over the time. To check this feature, just go to History Section.
In this chart, the red line shows water consumption and the black line shows water flow.
Time to see this project in action!Unfortunately, my water flow sensor is gone (it's not working anymore), so I had to simulate it with an Arduino UNO board. Check this out:
What's next?Also, you can apply this same project for:
- Measuring your drinkable water consumption (drink water = more life quality!)
- Detecting possible leaks in plumbing (when consumption and flow go too high / above normal)
- Have an good idea of water bill (before getting it)
- To infinite and beyond!


_3u05Tpwasz.png?auto=compress%2Cformat&w=40&h=40&fit=fillmax&bg=fff&dpr=2)
Comments
Please log in or sign up to comment.