phoenixzx200
Published © CC BY

Clappy: The Clap controlled Lamp

This is a lamp which will activate using your clap sound.

BeginnerShowcase (no instructions)382
Clappy: The Clap controlled Lamp

Things used in this project

Hardware components

Arduino UNO
Arduino UNO
×1
Sound Sensor
×1
Jumper wires (generic)
×1
5v 1a adapter (generic)
×1
Grove - 2-Channel SPDT Relay
Seeed Studio Grove - 2-Channel SPDT Relay
×1

Software apps and online services

Arduino IDE
Arduino IDE

Hand tools and fabrication machines

Multitool, Screwdriver
Plier, Long Nose
Plier, Long Nose
Hot glue gun (generic)

Story

Read more

Schematics

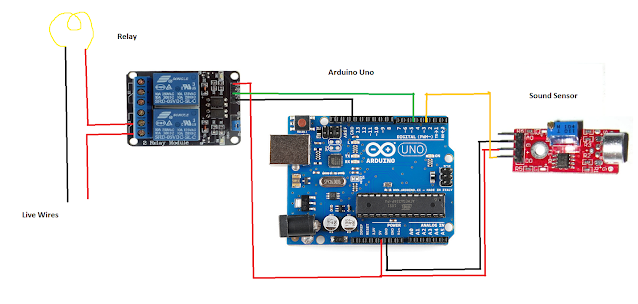
Wiring for the project

Wire the relay carefully
Do the wiring according to the diagram

Code

Upload this code

Arduino
// Declaring the variables for Relay status, relay pin and sound sensor


int soundSensor = 2;
int Relay = 4;
boolean RelayStatus = false;

void setup() {
  pinMode(soundSensor, INPUT);
  pinMode(Relay, OUTPUT);

}

void loop() {
//reading sensor data 
  int SensorData = digitalRead(soundSensor);
  if (SensorData == 1) {

    
//If the relay status is OFF

    if (RelayStatus == false) {
      RelayStatus = true;
      digitalWrite(Relay, LOW);
    }


//If the relay status is ON


    else {
      RelayStatus = false;
      digitalWrite(Relay, HIGH);
    }
    delay(250);
  }
}

Credits

phoenixzx200
2 projects • 0 followers
Contact

Comments

Please log in or sign up to comment.