There is a lot of theft scenarios nowadays which causes a great loss to the owner.
The system is designed to detect intrusion (unauthorized entry ) into a building or other area. This project can be used in residential, commercial, industrial, and military properties for protection against burglary or property damage, as well as personal protection against intruders
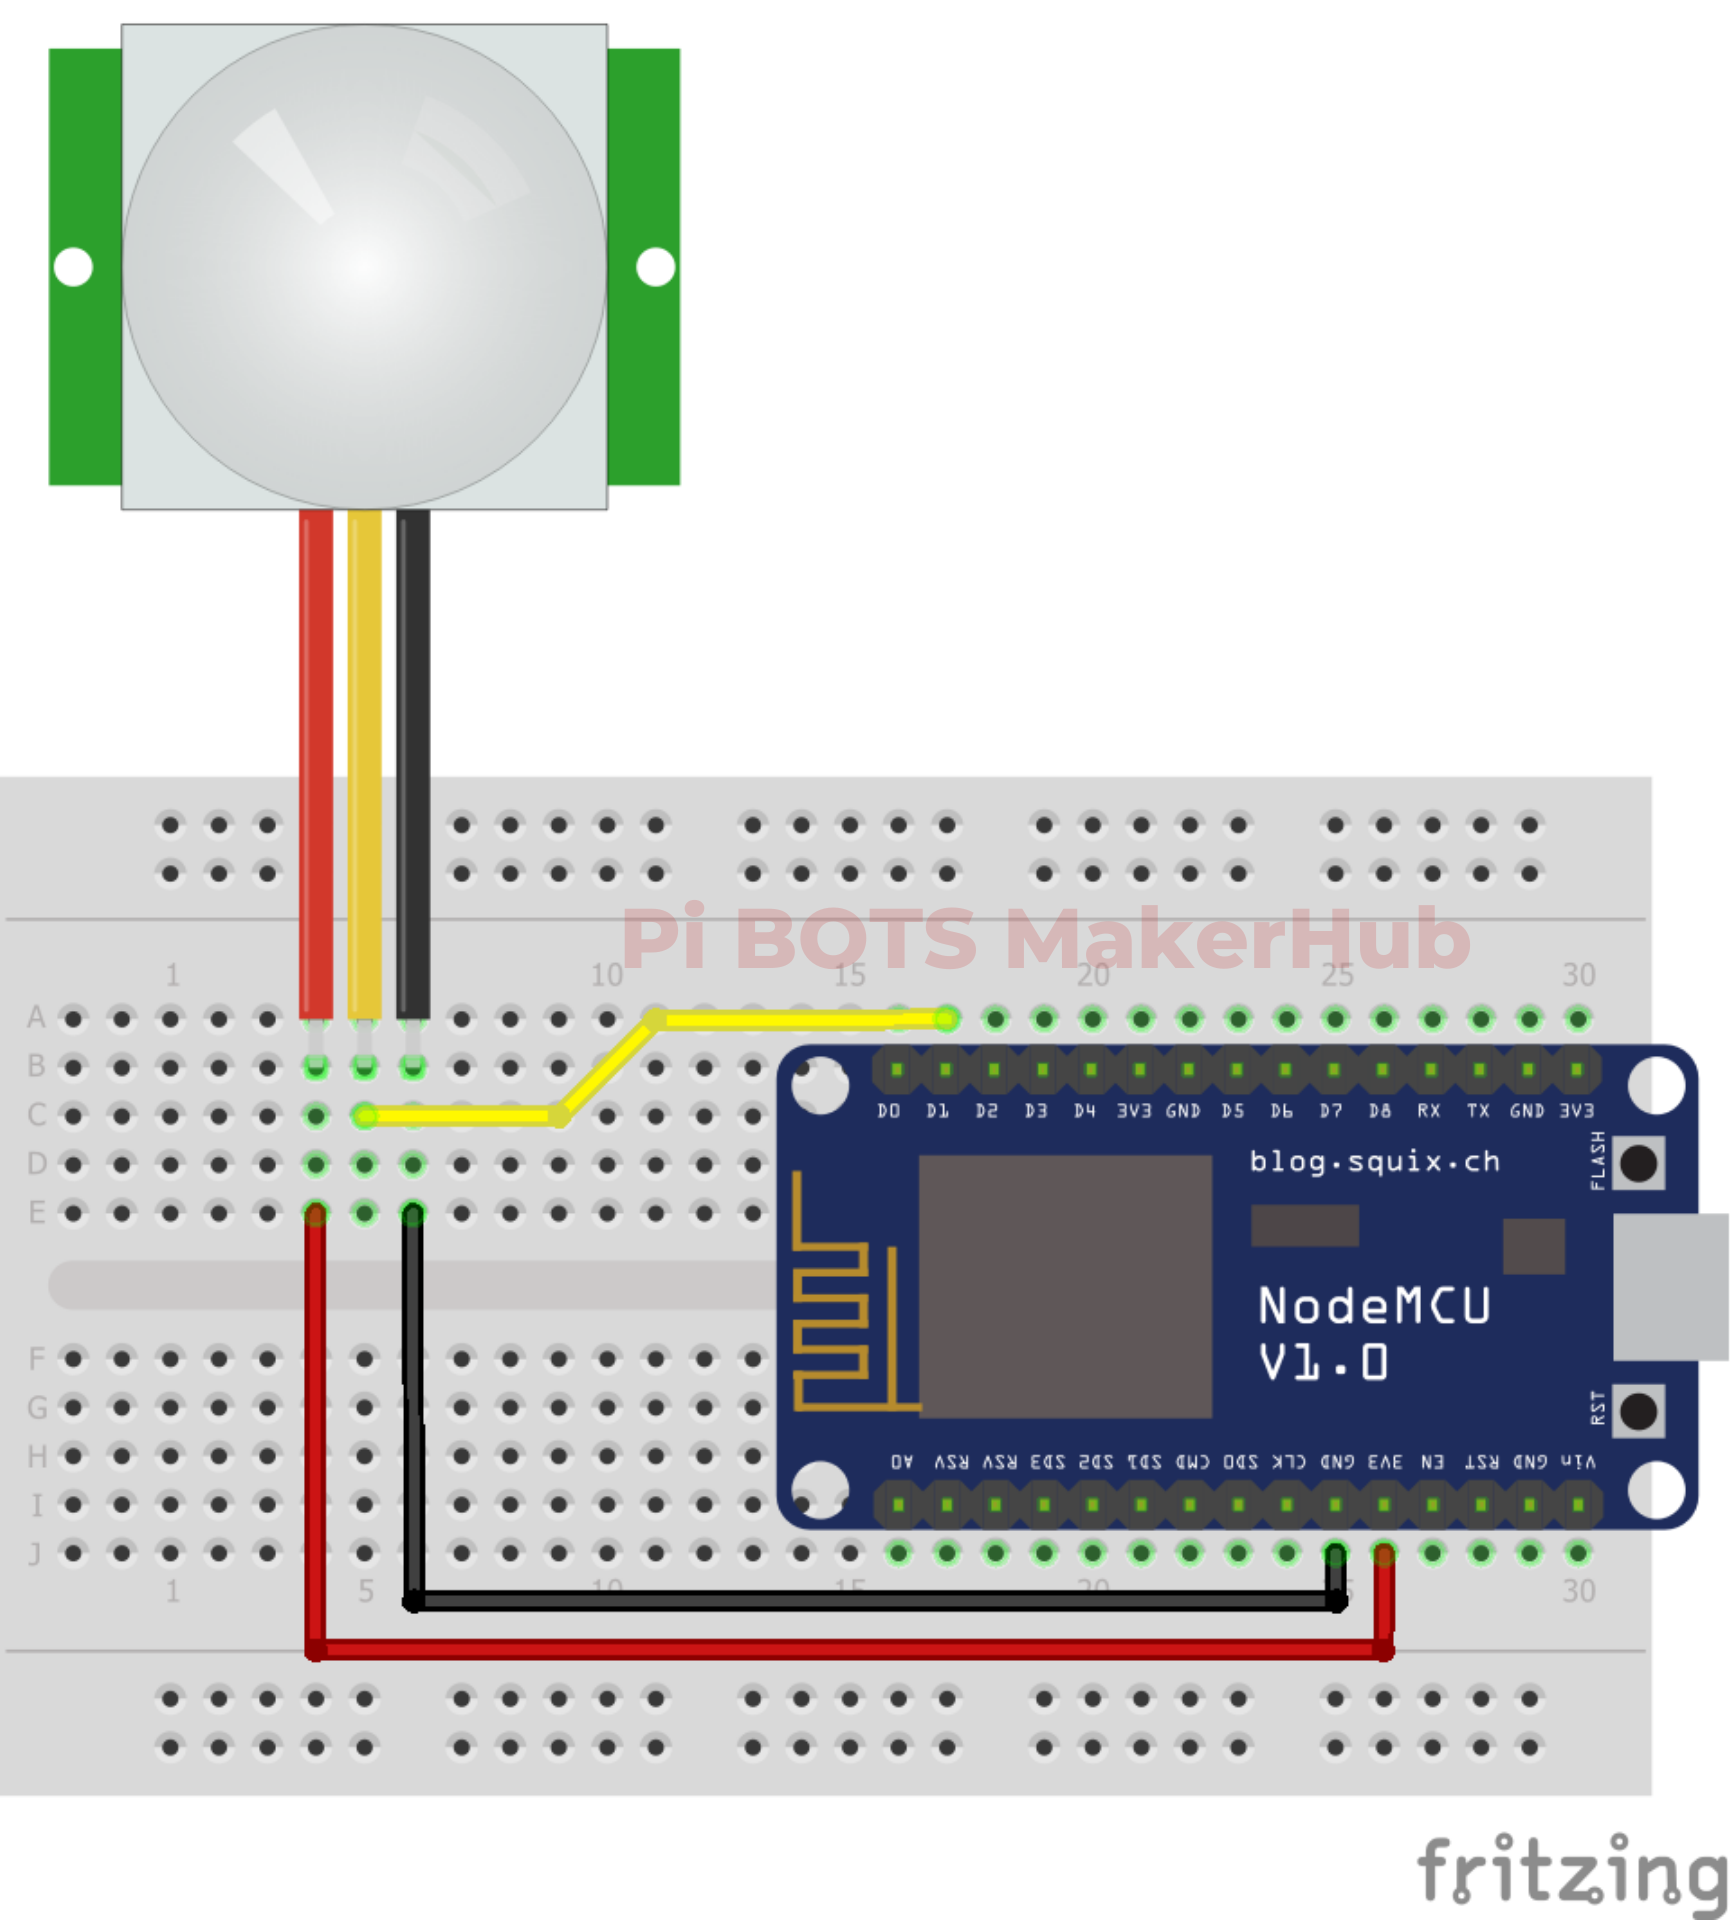
A compact, low budget device is attached to the wall of the area which has to be monitored. This project consists of a PIR Motion Sensor that will detect the presence of the intruder and notify the owner.
To test the real-time scenario, we deployed it in our office to test how possibly it could help us and the results were pretty affirmative.
How does it work?As you know, the NodeMCU is a WiFi-enabled microcontroller, Which can connect to the internet via WiFi. So, using the BLYNK Blynk application, we can activate the device. For this purpose, we connected the button with the virtual pin, so that when the activate button is pressed, the value in the variable "state" will change from "1" to "0" (Refer code).
In the next step, if the "state" is 1, the PIR Sensor starts to check for the intruders. So, whenever an intruder (ie, motion) is detected, the sensor will send a HIGH value to the NodeMCU. When NodeMCU reads a HIGH value, an HTTP request will be sent from the NodeMCU. This HTTP request (WebHooks API) will trigger ClickSend SMS Service, thus we receive the SMS in our Phone as soon as the Motion is Detected.
HTTP (Hypertext Transfer Protocol) is a standard Application protocol that functions as a request-response protocol between client and server.
HTTP client helps to send HTTP requests and receive HTTP responses from HTTP server.
It is widely used in IoT based embedded applications like Home Automation, vehicle engine parameter monitoring remotely for analysis, etc.
- PIR Motion Sensor
PIR sensors allow you to sense motion, almost always used to detect whether a human has moved in or out of the sensors range. They are small, inexpensive, low-power, easy to use and don't wear out. For that reason, they are commonly found in appliances and gadgets used in homes or businesses. They are often referred to as PIR, "Passive Infrared", "Pyroelectric", or "IR motion" sensors.
- NodeMCU
NodeMCU is an open-source LUA based firmware developed for ESP8266 wifi chip. By exploring functionality with ESP8266 chip, NodeMCU firmware comes with ESP8266 Development board/kit i.e. NodeMCU Development board.
Since NodeMCU is an open-source platform, its hardware design is open for edit/modify/build.
NodeMCU Dev Kit/board consist of ESP8266 wifi enabled chip. The ESP8266 is a low-cost Wi-Fi chip developed by Espressif Systems with TCP/IP protocol. For more information about ESP8266, you can refer to ESP8266 WiFi Module.
- BreadBoard
- Jumper Wires
Install the Blynk App from Playstore/AppStore. Sign in or Create a new Account if you don't have an Account. Create a Button Widget and make it as a toggle switch. Configure the button with Virtual pin V1. This button will activate or deactivate the device. ie, the device will work only if the switch is ON. Next, Create a LED Widget on Virtual Pin V2. Then click on the Play Button at the top right corner to Exit Edit Mode. The Steps are given below.
If This Then That, also known as IFTTT, is a freeware web-based service that creates chains of simple conditional statements, called applets. An applet is triggered by changes that occur within other web services such as Gmail, Facebook, Telegram, Instagram, or Pinterest. We are Configuring or SMS feature through this Linking Platform.
First of all, open the IFTTT website by clicking HERE. Sign in with your Google account. Then create a new applet. To create a new applet, Click on the Account Icon at the top right corner (Near Explore) and click create. Now click on This and search for WebHooks. Click on Connect. A new window will be loaded with a blue-colored box containing "Recieve a web Request". Click on the box. Now you will be asked to provide EVENT NAME. Type ESP_MOTION in the box and press "Create trigger".
Now click on that and search for SMS and select ClickSend SMS. This feature will send SMS to the configured mobile number. Click on Connect and create a new account, then close the newly opened window, and press the Connect Button again and login with the account and authorize. Now fill the form with required Details. First Field is the Recipient Mobile Number, the second field is the Sender details, which can be a name or a number (doesn't really matter), and the third box is the Message body, you can customize it as you like.
And finally, click the Create Action Button.
We have configured the SMS service. Now we have to Configure the PIR Sensor and NodeMCU with our configured WebHooks API.
Open the Code given below, Make sure you have installed the ESP8266 Core, if you haven't, search for it. You can find a lot of posts on the web. Now you have to make some changes to the Code. WebHooks URL to trigger the Event, WiFi SSID, Password and the Blynk authentication Token.
const char* iftttURL = "WEBHOOKS URL";
const char* ssid = "SSID";          // Your WiFi Name.
const char* password = "PASSWORD";  // Your WiFi Password.
char auth[] = "BLYNK_AUTHTOKEN";      // Your Blynk Authentication token.
Open the WebHooks Documentation Page to get the URL to be run. Click on the Documentation button on this page.
You will see something like this
"https://maker.ifttt.com/trigger/{event}/with/key/cngKKJ6py15q3adxlbAv*****************"Here, You have to edit the event name which is in the curly brackets, remove those brackets and type in the Event name there and copy the whole link. The text after the 'key' is your WebHooks Key. Now Paste the URL Copied in your Arduino code. Now one important thing is to be taken care of is that, you have to Remove one letter From the Link.Remove the "S" from https://. The link will look like this.
"http://maker.ifttt.com/trigger/{event}/with/key/cngKKJ6py15q3adxlbAv*****************"Now type in your WiFi SSID and Password.
The next thing you have to change is the Blynk authentication token. You can find the token in your Email in which you used to sign up. copy the Token and paste in your Code.
The purpose of each line of code is shown in the Code as Comment, So I'm not gonna rewrite it.
Now Select the Correct board, Which is NodeMCU in my case, and the port which the board is connected to. And click the Upload Button. Open the Blynk app on your phone and Activate the device. Now see your LOW-COST Theft detection device in action.
Now, if we Select a custom Notification Tone for this SMS, We can use it as an alarm. Such that, Whenever a movement is detected, the Alarm will turn on.
Watch the youtube video to make sure you have done everything correctly.
That's all in this Project, Thank You


Comments
Please log in or sign up to comment.