This is one of three problems I had at home and I solved with an DIY internet of things device.
I am using IFTTT since 2011 and started tinkering around with Raspberry Pi two years ago but could not really connect all things because of my lack of coding and electronic skills. Now with the Maker Channel and Raspberry Pi Hats like the GrovePi+ its finally possible for me to really connect everything.
In this tutorial I am showing you how I build a door buzzer that you can activate from your phone without the need of programming an app. First I just bought a Wemo Maker, it worked out create but I am a maker so I had to do it myself and find out if I could make it better and cheaper. In the end the total build will cost you around 90 € instead of 80 € for the Wemo Maker. At first its a little bit more expensive but if you like to add more things like a motion sensor or a camera to create a full home security system it becomes much cheaper with the raspberry pi as other options like Wemo. Also you are not depend of some iot company.
Happy Hacking
@andreaskopp (twitter)
Step 1: Configure the Do Button App on your phone
The best device to trigger to control your IoT device is a phone as you already have it with you all the time. Its not finished yet, so the next step would be to always open the door when I am near my door or open the door just with me voice ...
The Do Button app is a app from IFTTT so you can manually trigger your IFTTT recipes. There is a iOS and a Android Version.
Create a Recipe
- Download the Do App https://ifttt.com/products/do/button
- If you do not have IFTTT account create one
- In the screen Add a Recipe tab on Channels
- Under Channels looks for the Maker Channel and tab it (Maker is not searchable yet)
- tab on Create a Recipe
- tab on Make a web request
- type in a recipe title like door_buzzer
- but an X in the URL field (we will put in the right url later online)
- Method should be GET
- Content application/json
- Body leave blank
Add Do Button to Quick Launch
Since I do not want to open the app each time I want to open the door, I am adding the do button app to the Quick Launch screen. So whenever I swipe from the top of the screen down the button will appear. I think this is a feature of iOS seven. I do not know if this is also possible with Android. Let me know in the comments.
- Swipe down with the finger from the very top
- tab edit
- Add the do Button app to the Quicklaunch
- now you can add as many do buttons as you want
Step 2: Use an MQTT Broker like Devicehub
Its no problem to send a web request whenever you press a physical button connected to an Raspberry pi for example.
But its not possible to receive a web request and then control something connected to the raspberry pi. Update: It is possible! If the raspberry pi serves as a server. I am working on implementing it
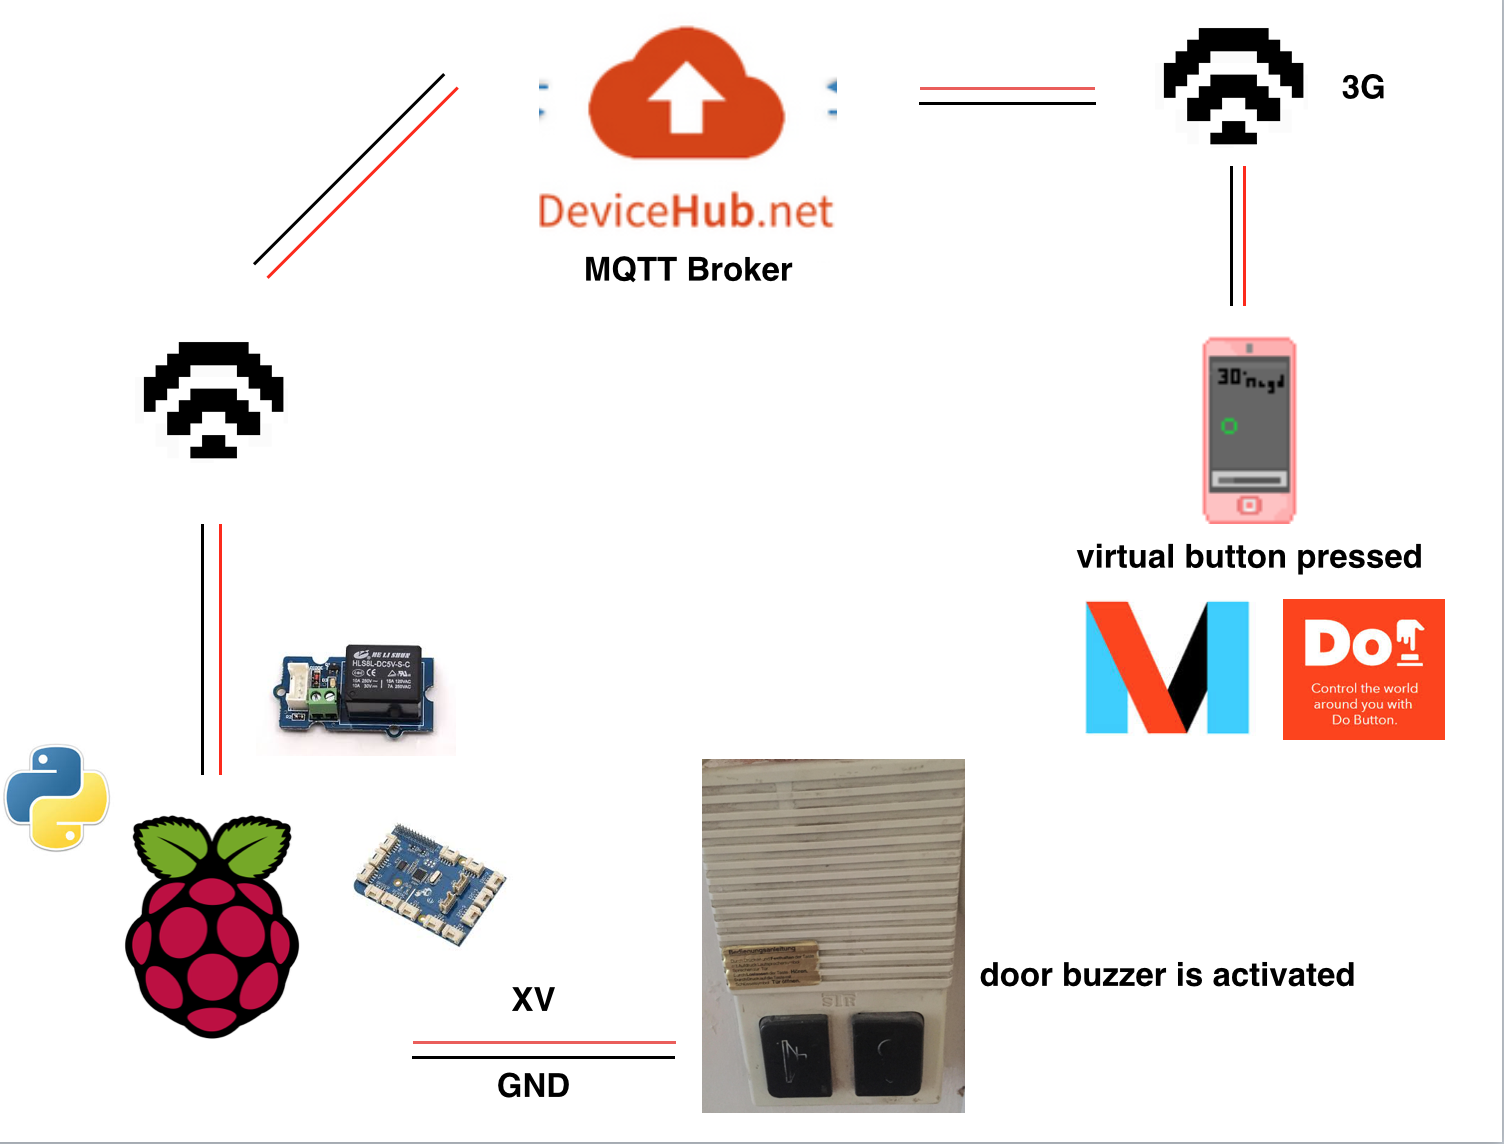
The pi would need to ask all the time is there all already something, is there all ready something. I guess that would be to much for the little guy. For that you need a MQTT Broker. To which you then subscribe to and that does this asking job and and send a request once you press the button on your phone. Because I do not know how to create an MQTT Broker myself I used a service called devicehub.net. They are based in Budapest and where really helpful and answered all my questions. It all worked great in the end. There service is free for up to 100 devices.
- Register an account on Device hub
- Under Projects click add project
- Click add device
- Fill in the information: door_buzzer, Raspberry pi, Python, wifi,
- Click on Add device
- Click on Add actuator
- Click on Digital (You can either Add an Digital or an Analog Actuator)
- Type in the name of your Actuator like door_buzzer
- Click on New actuator
Step 3: Connect the Do Button to Device Hub
To connect your do button to Devicehub and later the Raspberry Pi and the relay you need to write down a couple of keys.
Get the keys
- open a text editor on your computer
- and paste in these keys Device UUID, Project ID, API Key
- you can get all the info if you click on Development Information in your devicehub account
Past keys in the recipe
- Find the recipe you created before under the do tab
- Click on it
- Under URL paste in the following URL and put in your on keys:
https://api.devicehub.net/v2/project/YOUR_PROJECT_ID/device/YOUR_DEVICE_UUID/actuator/door_buzzer/state
- in the body field pate the following and add your API key:
{"state":"TOGGLE", "apiKey":"YOUR_API_KEY"}
- there still are some problems with the platform for example at one stage I could not add a new digital actuator on the project id, I will write them that and hope they can fix that
- click on Update
- test it right away by tapping on your door_buzzer button the switch should be going to the right
- Congrats you have completed the first part!!
Step 4: Prepare you Raspberry Pi
Get a raspberry Pi. For this purpose you could also use a older Raspberry Pi B+ or a raspberry Pi A+. I used a Raspberry Pi 2. I always use kano as OS as I like the design. To not have to fiddle with electronics I like to use the GrovePi+ for my projects. Once you have completed a couple of projects you can just connect sensors and buttons directly to the GPIOs of the Raspberry or make your own hat.
Configure your GrovePi+
- Stick the GrovePi+ to the Raspberry Pi and follow these steps:
http://www.dexterindustries.com/GrovePi/get-started-with-the-grovepi/setting-software/
- Test if you already can see the grovepi+ with this
- If the command is not recognized you need to install some more packages
- Follow these steps of Adafruit to configure i2c
https://learn.adafruit.com/adafruits-raspberry-pi-lesson-4-gpio-setup/configuring-i2c
- there should be 04 at row 4
- sudo su and type in geany to open the editor as root
- go to GrovePi/Projects/Button_And_Buzzer.py and save under GrovePi/Software/Python (the program has to be in this folder to work)
- connect a button to D4 (INPUT) and a buzzer to D2 (OUTPUT)
- run the program, you should hear the buzzer
Connect your Pi to DeviceHub
- connect a led to D5
- connect a relay to D3
- connect to your pi over ssh with ssh pi@ipAdress
cd GrovePi/Software/Python
- paste in the python program from this website
- add your keys
- install the device hub software (https://github.com/devicehubnet/devicehub_py)
- make sure that you are root (sudo su) and got to GrovePi/Software/Python
pip install git+git://github.com/devicehubnet/devicehub_py.git
pip install httplib2
pip install paho-mqtt
- your a finished! Test the whole system with the press of your do button
- does it work?
Step 5: Make your Software start at startup
One last step is to make your software start each time you boot your raspberry. There are several ways how to do it.
sudo chmod +x /home/username/GrovePi/Software/Python/iot-button.py
sudo nano /etc/rc.local
before exit 0 put this:
/bin/sleep 15 && /home/naima/GrovePi/Software/Python/iot_button.py &
this starts the program after 15 seconds after reebot
sudo reboot
Step 6: Connect the Pi relay to your buzzer system
You need to check where the ground wire and the current wire is at your buzzer system. At my system there is one Ground wire and one wire with 12V. When you connect these two wires the buzzer will be activated. Check if it works.
Step 7: Design a Case and Wall Mount
The final step will be to design a case for everything a mount it to the wall next to my buzzer.


Comments
Please log in or sign up to comment.