No one is oblivious of Corona Pandemic rechristen as COVID 19 by WHO that has wreaked havoc all around the globe. We are going through a precarious phase of life and death. So it becomes paramount that we keep ourselves safe and maintain good health. One way of restricting the spread of coronavirus is to maintain social distancing. We must watch out for those who show symptoms of flu, cough etc and refrain us from getting in contact with them.
The idea of this project is inspired by the ongoing crises. It aims to detect whether the person standing at the door has fever or not and also notify the member of the house whether he should be allowed inside the house or not.
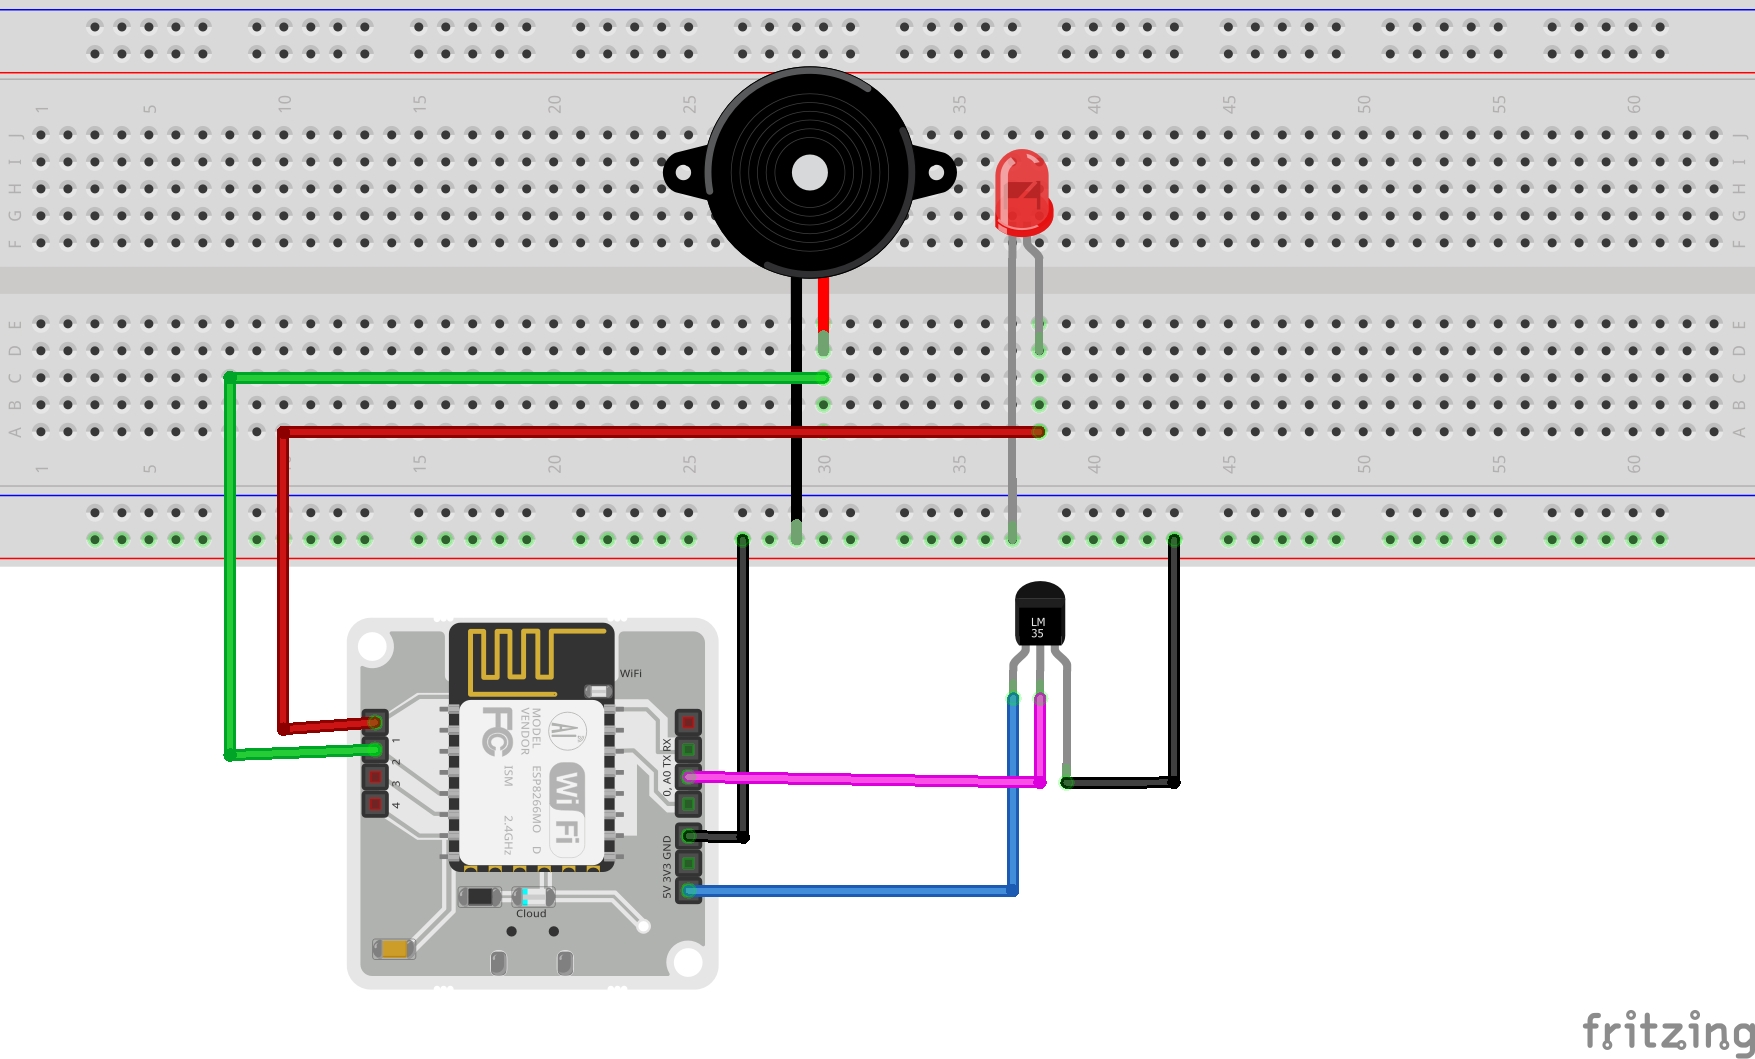
Setting up the project- Circuit Connection:- For making the hardware connection first collect all the parts shown in the below images:
Now to connect temperature sensor read from left to right (facing LM35 towards you) and do the connections as follows using male to female jumper wires:-
- VCC pin of the LM35 connects to 5v of the Bolt Wifi module.
- The output pin of the LM35 connects to A0 (Analog input pin) of the Bolt Wifi module.
- GND pin of the LM35 connects to the GND.
Then connect the positive terminal of LED and Buzzer to the digital pin 1 and 2 respectively of the Bolt WiFi module and negative terminal to the GND.
At last, connect the Bolt Wifi module with Power Bank or Charger and connect it with WiFi using Bolt-Mobile App.
(Make sure to do the connection correctly as any wrong connection may damage the parts when you give supply to the module)
- Account Set-up:- Make an account on Bolt Cloud and Twilio using the following link:-
Bolt Cloud:- https://cloud.boltiot.com/register/
Twilio SMS Service:- https://www.twilio.com/try-twilio
(Refer to the Bolt IoT course if you find any problem in making these accounts; you will have access to the course once you purchase the Bolt WiFi module)
Link:- https://trainings.boltiot.com/p/iotandml
After making both the accounts you will get your credentials as shown in the images below:-
- Coding Environment:- Install Jupyter Notebook using the following link:- https://jupyter.org/
OR
If you have "pip" already installed in your system then type the following command in Command Prompt terminal:-
pip install JupyterIn the same terminal install bolt library by the following command (you won't be able to run the code of the project without this library):-
pip install boltiotAfter installing open Jupyter Notebook and write down the project code using your following credentials:-
API_KEY = "xxxxxxxxxxxxxxxxxxxxx"   # Bolt API Key
DEVICE_ID = "xxxxxxxxxxxxxxxxxxxx" # Bolt Device ID
SID = 'xxxxxxxxxxxxxxxxxxxx' # Twilio Account SID
AUTH_TOKEN = 'xxxxxxxxxxxxxxxxxxxxxx' #Twilio Auth Token
FROM_NUMBER = 'xxxxxxxxxxxxxxxxxxxxxxxxxxxx' # Twilio Trial Number
TO_NUMBER = 'xxxxxxxxxxxxxxxxxxxxxxxxx' #Your own mobile numberNow let us start with the working of the project
As the loop starts, both Buzzer and LED will blink for 0.5 seconds which will notify the user to put the temperature sensor between his arms to check for the fever. Then the reading time will start for 15 seconds. After 15 seconds the sensor value is compared with the threshold value i.e 380 (which is equal to 37 °C, The human body temperature is 37 °C)
(Formula to convert sensor value to °C = sensor_value*100/1024)
If the sensor value found to be less than 380 i.e. 37 °C, this means that the person is safe. He will get to know by the blinking of LED and the members of the house will get notified by the Twilio message as shown below:
But if the sensor value turned out to be greater than 380 i.e. 37 °C, this means that the person has a fever. He might be affected by coronavirus as well. In that case, the buzzer will buzz and the members of the house will get notified by the Twilio message as shown below:
After the loop is over, the buzzer will buzz for 5 times which indicates that the person is tested. The next loop will start after 5 seconds to test the next person.
Output


Comments
Please log in or sign up to comment.