This project was created for an Assignment that I am currently completing in Deakin University and it was to implement a solution for taking care of plants in an automated way so that the user does not have to worry about their plants when they are away form home or busy due to work.
Without a system which monitors the vitals of a plant the average caretaker of a plant might not know the amount of sunlight of water needed by a plant. This may end up leading to over tending or neglecting the plants. This project is crafted to cater to indoor plants foremost and on of the big problems indoor plants face is the lack of sunlight when sitting inside a room.
With a proper implementation of this system the user should be able leave their plants untended for extended periods of times without a need to worry about the plants well-being.
Currently the created system only fully implements the sensing and notifying functions in the complete project the water and light systems will be added to be controlled by the Arduino.
===================================================================
Design Principles· Device should monitor soil moisture and light levels of the plant
· Automatically turn on light and watering system when necessary
· Give user a GUI to control the water and light systems manually
· Avoid accidentally over watering the system due to user negligence with manual system
· Avoid providing excessive light when night turns
===================================================================
CodingAllof the mentions codes are attached in the GitHub repository
Here I will go through my code and explain what I have created and how the code functions. To create this project you will have to set up 3 main things
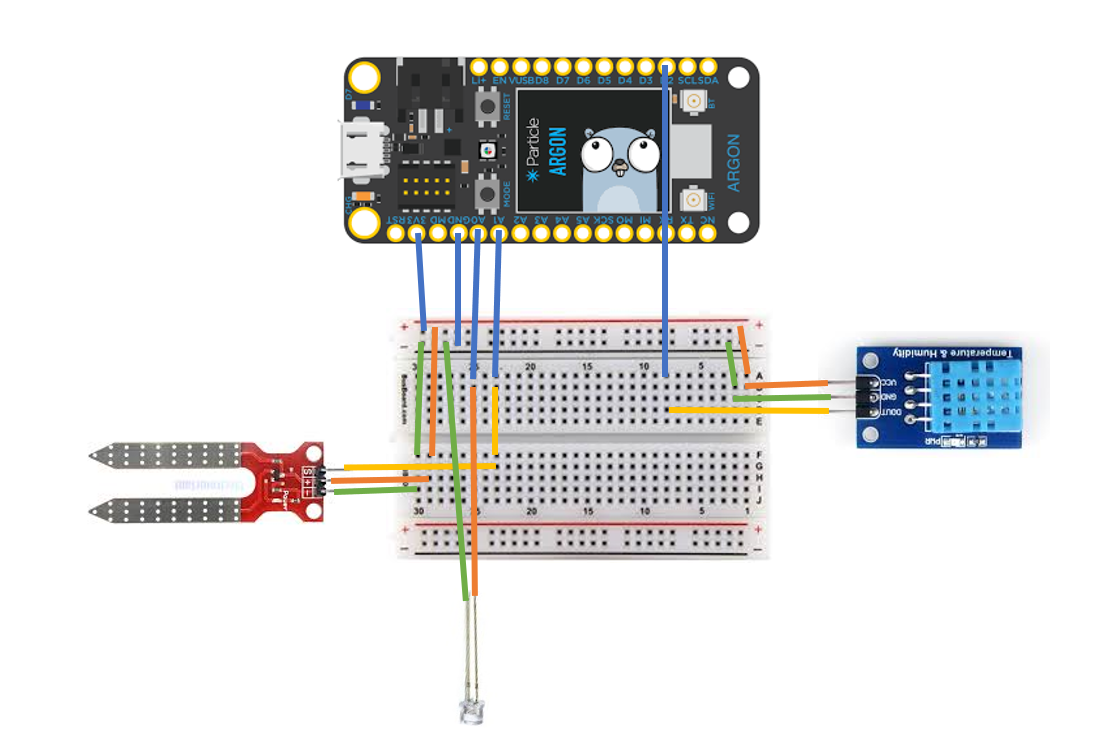
1. Argon with the sensing systems
2. Html page that allows manual control
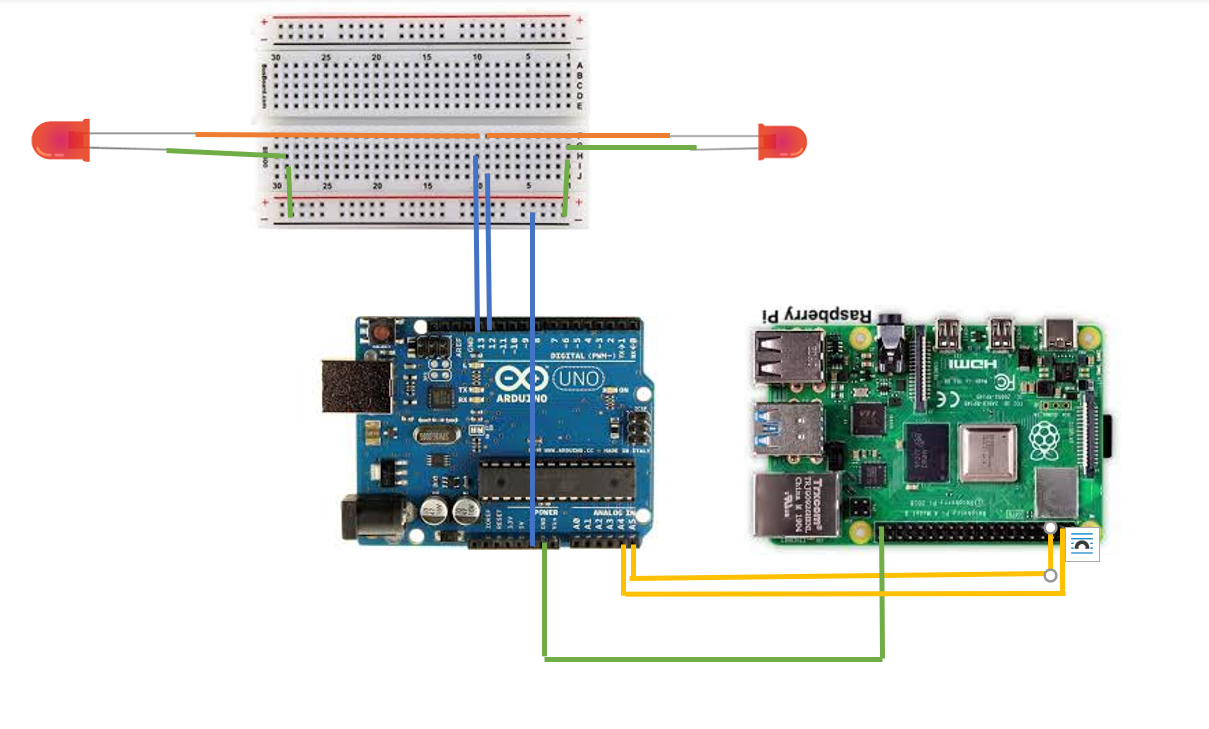
3. Raspberry pi and Arduino with the water and light systems (i.e. LEDs for the moment until final project)
**Please note when using the codes given in GitHub use different unique client names to connect to MQTT in all 3 systems and if you want to change the topics that are being subscribed to or published to change them in argon and raspberry pi codes.
HTML code already has a unique client generator (in the long run it would have been useful to have this in other 2 codes too)
----------------------------------------------------------------------------------------------------------------
Firstly, lets create the code for the Argon system:
** For this code you might run into a error saying libraries not found if so please add library via particle console and remove the included lines of code for the libraries
For this code I have used 2 libraries
- Adafruit_DHT.h
- MQTT.h
both of these libraries are available in the particle web console so go ahead and include them in your project.
Now we will need to plan out what functionality we will be giving the argon in the overall project.
1. Sensing data
- Soil Moisture
- Light intensity
- Temperature
the reason for sensing soil moisture and light intensity is straight forward as those are the parameters we are trying to manage however why do we measure temperature? Answer to this is that we will be changing our threshold values of soil moisture according to temperature reasoning behind this is in hot weather the soil would dry up quickly and the plant would not have enough time to soak up the needed water so we will water it more that what we do normally.
2. Analysing sensor data
3. Sending messages to the MQTT server regarding the current needs of the plant.
since data is already being analysed in the argon we will be only sending if at the moment the plant needs water/light or not.
----------------------------------------------------------------------------------------------------------------
SensingData
skipthis section if you know how to read sensor data from the 3 sensorsused
The first library Adafruit_DHT.h will be utilised here to work with our DHT temperature sensor. Using this library is pretty straight forward:
first we define a DHTPIN then we define DHTTYPE that is the type of sensor our case its DHT11 then we initialise the function dht with the above defined constants
DHT dht(DHTPIN, DHTTYPE);to start the sensor we will run
dht.begin();function and to collect temperature data we will call the function
float t = dht.getTempCelcius();Moving on to the other sensors we have the soil moisture and light dependent resistor both of these are fairly straight forward to use
int Moisture = A1;
int ldr = A0;                   //setting pins to variables
================================================================================
pinMode(Moisture, INPUT);
pinMode(ldr, INPUT);            // setting up the pins to read the values
================================================================================
analogMoisture = analogRead(Moisture);
light = analogRead(ldr);        //reading pins for sensed values
Above is the summery of how you would be reading the values of these 2 sensors
----------------------------------------------------------------------------------------------------------------
Analysingdata
For analysis we will be utilising some simple if statements and the ? operator we will be working with mainly 4 boolean checks
- lighting
- water
- moistureDangerLow
- moistureDangerHigh
lighting will be true if light is greater than 50
water will be true if water is not within the range of minimum and maximum thresholds which are defined as variables with their normal values at 300 and 1000
if temperature rises above 38 degrees Celsius then minimum value will increase to 600.
moistureTheresholdmin = (t>38)? 600 : 300;moistureDangerLow will be true if moisture is less than 100
moistureDangerHigh will be true if moisture is greater than 1500
that is all the analysis of the data we will be doing
---------------------------------------------------------------------------------------------------------------
Connecting the MQTT server and publishing
After analysis we can use these boolean checks to determine which message to publish on to the server.
Before this we will talk about how we will connect to the server. Here we will be using the second library MQTT.h
MQTT client("test.mosquitto.org", 1883, callback);This is the first step to get started with connecting to a MQTT sever as you can see we are creating a client (i.e. ourselves the argon which is connecting to the sever) the first parameter is the host name here we are trying to connect to a test server with the port number 1883.
client.connect("photonDev^&256");This is step 2 client.connect function will make the client we earlier made connect to the server under the name given in the parameters. This hear is the name that you should give a unique name so that you make sure that there is no one joining the server under the same name which would case disconnections.
Now that connection is established we will move on to publishing and we will only be doing this if we are currently connected to check this it is a simple if statement
if (client.isConnected())If you are familiar with particle devices you will know about the publish function this function works in a similar way to that. you will have a topic and a message payload or data for your parameters within you publish.
In the project I will be publishing to 3 topics from my Argon
- RPiProject - messages to the Raspberry pi to forward to the web page to ask for time of day
- RPiProjectAction - messages to Raspberry pi to take action immediately and ignore other messages
- webProject - messages to the web page to check if manual system is engaged
PRiProject topic will consist of messages stating "Water" and "Light" indicating the water or light level is low
PRiProjectAction topic will consist of messages stating "Water?ok" and "Water?stop" indicating the water level is too low or too high and needs to take action immediately
webProject topic will consist of messages stating "Waterstop" and "Lightstop" indicating the water or light levels are within range
-----------------------------------------------------------------------------------------------------------------
Now lets move to the HTML code which contains 3 parts
- Simple html page
- Simple css for styling
- JavaScript for functionality
HTML
The HTML file is a simple page with a div tag (with id clock) for the real time clock which is implemented by JS and 2 buttons for controlling the water/light systems. Also another div tag (with id message) for the messages that the web page receives to be printed out as a log.
<img class="img-background" src="C:\Users\pravi\Downloads\img_lights.jpg">** remove the source link of this image and put your own link for an image
CSS
The CSS file contains mainly styling for the real time clock.
I will not be discussing the clock in much detail for further details you can follow this tutorial which I found handy.
JavaScript
Alright, so now we will move on to the functionality.
first we will connect to the MQTT server the functions used here are also similar to argon
// Generate a random client ID and set host and port
    clientID = "clientID-" + parseInt(Math.random() * 100);
    host = "test.mosquitto.org";
    port = "8080";

    // Initialize new Paho client connection
    client = new Paho.MQTT.Client(host, Number(port), clientID);
creates a client and runs the connect function on the client object.
// Connect the client, if successful, call onConnect function
    client.connect({
        onSuccess: onConnect,
    });
The web page will receive messages on the topic webProject and it will recieve 4 different messages
- "Waterstop" - from argon
- "Lightstop" - from argon
- "Water?" - from RPi sent when it receives a message "Water" from argon
- "Light?" - from RPi sent when it receives a message "Water" from argon
when the first two messages arrive we will check if the system is manually engaged at the moment if so we will not take action other wise we will send a message to the RPi telling it to stop the water or light. (publish message will be listed below)
When the last two messages arrive this means the RPi got a message stating that the water or light levels are too low and then the RPi forward this message to the web page to make sure that the day of time is not night. when the web page gets this message it will check the real time clock values to check the time of day and decide if it is night.
var rtClock = new Date();    //create a new real time clock object

    var hours = rtClock.getHours();    //get the hours of the time it will be in 24hr
    if (hours<17 && hours>6) {    //specified day time to be from 6am to 7pm
        message = new Paho.MQTT.Message(message + "ok")
    }
    if (hours>=17 && hours<6) {
        message = new Paho.MQTT.Message(message + "stop")
    }
This is how I managed to do this.
Now we will see the messages published by the web page
- "Water?ok" / "Light?ok"
- "Water?stop" / "Light?stop"
all 4 messages will be sent to RPiProjectAction topic
These 4 messages are also sent by clicking the button on the web page.
when the button is clicked it will send the appropriate message and change its text content to the opposite of what it was to indicate now that if you press it, it will stop.
for example if the button says water when you press it the web page will send a message to RPi saying "Water?ok" and change the text of the button to stop water.
document.getElementById("water").textContent = "Waterstop" //changes button name
message = new Paho.MQTT.Message("Water?ok") //create message
message.destinationName = "RPiProjectAction" //set topic
client.send(message) //publish message
following this logic you can complete the other functionality of the buttons.
---------------------------------------------------------------------------------------------------------------
Now, we will create the output system
· Run the following commands in the raspberry pi console before getting started
sudo apt-get updatesudo apt-get install python-smbussudo apt-get install mosquittosudo apt-get install python3-pipsudo pip3 install paho-mqttwe will make use of several libraries in this code:
import paho.mqtt.client as mqtt         # Import the MQTT library
import time                 # The time library is useful for delays
import struct
import smbus
The library smbus will be used to create the I2C connection
we first set up the bus and the address
bus = smbus.SMBus(1)
address = 0x8
then we can use this bus to send information to the Arduino so that it can control the systems accurately
bus.write_byte(address, 0x1)for example the above line will send a char value equal to "1" to the Arduino so the Arduino can now compare the value from a if statement to decide its actions.
Similar to above codes we will connect to the mqtt server
ourClient = mqtt.Client("makerio_mqtt_2130")     # Create a MQTT client object
ourClient.connect("test.mosquitto.org", 1883)   # Connect to the test MQTT broker
this code is a simple one where you will make the raspberry to react to the message that it receives from argon and website the RPi has 6 actions that it takes:
Message : Action
"Light?ok" : Sends signal to Arduino to stop light system
"Water?ok" : Sends signal to Arduino to start water system
"Water?stop" : Sends signal to Arduino to stop water system
"Light?stop" : Sends signal to Arduino to stop light system
"Water" : Forwards to webpage as "Water?"
"Light" : Forwards to webpage as "Light?"
for simplicity I have made so that all message on the topic RPiProject it will forward to web page as only those 2 messages will be received
To make the RPi react to messages that it recieves these functions are implemented
ourClient.on_message = messageFunction # Attach the messageFunction to subscriptionthis makes it so that every time a message is received the messageFunction will run
def messageFunction (client, userdata, message):all functionality is implemented in this function.
For Arduino we will be using the Wire.h library and creating a very simple code to control the 2 LEDs representing our 2 systems.
// Join I2C bus as slave with address 8
  Wire.begin(0x8);

  // Call receiveEvent when data received
  Wire.onReceive(receiveEvent);
using these lines we can establish a I2C connection with the raspberry pi and the function onReceive will be the function we will be implementing the code to control the LED.
for this we only need to read the wire value and do the corresponding action using if statements
===================================================================
Hardware Setup
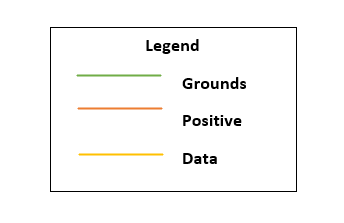
This can be done be following the wiring schematics I have provided with this article.
===================================================================
Problems You might face
- Raspberry pi was connecting and disconnecting from servers continuously making my it impossible to communicate. I found out this was due to not giving the client a unique name and was fixed after I changed the client name into abstract one.
- The HTML page gave a SSL protocol error when connecting to the server and did not connect to the server this problem only occurred on my laptop as when I opened the same files on another laptop it did not give this error. Currently I’m still not certain as to why I ran into this error or how this can be resolved entirely but after trying out somethings I could connect to the server when I open my file in an incognito tab of my web browser.
===================================================================
FutureImprovements
Upgrading the web page and stylising it to be more professional and also adding a weather API to the web page which would also allow my system to transfer into outside plants as now I will be able to gather data of weather and external effects so that I could implement functionalities such as avoiding watering if there is a forecast of rain in the following 2-3 hours. And water in advance if there’s forecast of high temperatures.
Also improvements to the sensing system is also possible as at the moment we are only directly measuring 2 vitals of the plant directly to be more effective we will need to measure the nutrient levels of the soils and the addition of nutrients can be done through the water system be adding dissolved nutrients into the water system when needed.
===================================================================
ConclusionEventually, the venture was extremely amusing to plan, and make, be that as it may on the off chance that I was to genuinely execute this project, it would require a lot of update and further programming so as to make a implementable solution.


_ztBMuBhMHo.jpg?auto=compress%2Cformat&w=48&h=48&fit=fill&bg=ffffff)

_zhWsCcSEcl.jpg?auto=compress%2Cformat&w=48&h=48&fit=fill&bg=ffffff)


_3u05Tpwasz.png?auto=compress%2Cformat&w=40&h=40&fit=fillmax&bg=fff&dpr=2)
Comments
Please log in or sign up to comment.